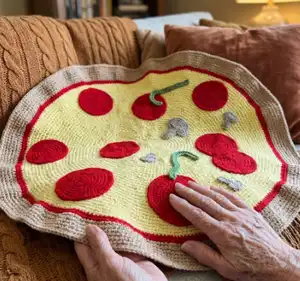
Crochet a fun, playful pizza blanket that looks like a giant slice of your favorite pie. This pattern guides you step-by-step through the circular pizza base and a variety of toppings so you can customize your blanket. Youll enjoy working in the round and adding playful elements like pepperoni, olives, peppers, mushrooms and pineapple. Perfect for gifting or cuddling up on the couch with a handmade touch.
Progress Tracker
0% Complete
— Understanding the pattern :
Info :
(#, #) X # - Repeat instructions inside of () X amount of times indicated by #. (#)- The number inside the () at the end of each row will tell you how many stitches you should have. We will be working in the round.
Info :
Tip on how to keep track of increases: Place a stitch marker in the second stitch of each increase so you can easily identify where increases are located and maintain even spacing. Example shown: R6: Dc 4 (Inc 1, Dc 4) x11 (72).
— Pizza :
Start R1 :
With 5mm hook and yellow yarn Mc, Ch 3, and then work 11 Dc into the Mc. (12)
Info :
At the end of each round: insert your hook into the top of the Ch 3, Sl St, Ch 3, and then Dc into the same stitch. *The Ch 3 will act as a stitch thus making the Ch3 + Dc= an Inc*
R2 :
Inc in each stitch around (24)
R3 :
Dc 1 (Inc 1, Dc 1) x11 (36)
R4 :
Dc 2 (Inc 1, Dc 2) x11 (48)
R5 :
Dc 3 (Inc 1, Dc 3) x11 (60)
R6 :
Dc 4 (Inc 1, Dc 4) x11 (72)
R7 :
Dc 5 (Inc 1, Dc 5) x11 (84)
R8 :
Dc 6 (Inc 1, Dc 6) x11 (96)
R9 :
Dc 7 (Inc 1, Dc 7) x11 (108)
R10 :
Dc 8 (Inc 1, Dc 8) x11 (120)
R11 :
Dc 9 (Inc 1, Dc 9) x11 (132)
R12 :
Dc 10 (Inc 1, Dc 10) x11 (144)
R13 :
Dc 11 (Inc 1, Dc 11) x11 (156)
R14 :
Dc 12 (Inc 1, Dc 12) x11 (168)
R15 :
Dc 13 (Inc 1, Dc 13) x11 (180)
R16 :
Dc 14 (Inc 1, Dc 14) x11 (192)
R17 :
Dc 15 (Inc 1, Dc 15) x11 (204)
R18 :
Dc 16 (Inc 1, Dc 16) x11 (216)
R19 :
Dc 17 (Inc 1, Dc 17) x11 (228)
R20 :
Dc 18 (Inc 1, Dc 18) x11 (240)
R21 :
Dc 19 (Inc 1, Dc 19) x11 (252)
R22 :
Dc 20 (Inc 1, Dc 20) x11 (264)
R23 :
Dc 21 (Inc 1, Dc 21) x11 (276)
R24 :
Dc 22 (Inc 1, Dc 22) x11 (288)
R25 :
Dc 23 (Inc 1, Dc 23) x11 (300)
R26 :
Dc 24 (Inc 1, Dc 24) x11 (312)
R27 :
Dc 25 (Inc 1, Dc 25) x11 (324)
R28 :
Dc 26 (Inc 1, Dc 26) x11 (336)
R29 :
Dc 27 (Inc 1, Dc 27) x11 (348)
R30 :
Dc 28 (Inc 1, Dc 28) x11 (360)
R31 :
Dc 29 (Inc 1, Dc 29) x11 (372)
R32 :
Dc 30 (Inc 1, Dc 30) x11 (384)
R33 :
Dc 31 (Inc 1, Dc 31) x11 (396)
R34 :
Dc 32 (Inc 1, Dc 32) x11 (408)
R35 :
Dc 33 (Inc 1, Dc 33) x11 (420)
R36 :
Dc 34 (Inc 1, Dc 34) x11 (432)
R37 :
Dc 35 (Inc 1, Dc 35) x11 (444)
R38 :
Dc 36 (Inc 1, Dc 36) x11 (456)
R39 :
Dc 37 (Inc 1, Dc 37) x11 (468)
R40 :
Dc 38 (Inc 1, Dc 38) x11 (480)
R41 :
Dc 39 (Inc 1, Dc 39) x11 (492)
R42 :
Dc 40 (Inc 1, Dc 40) x11 (504)
R43 :
Dc 41 (Inc 1, Dc 41) x11 (516)
R44 :
Dc 42 (Inc 1, Dc 42) x11 (528)
R45 :
Dc 43 (Inc 1, Dc 43) x11 (540)
R46 :
Dc 44 (Inc 1, Dc 44) x11 (552)
R47 :
Dc 45 (Inc 1, Dc 45) x11 (564)
R48 :
Dc 46 (Inc 1, Dc 46) x11 (576)
R49 :
Dc 47 (Inc 1, Dc 47) x11 (588)
R50 :
Dc 48 (Inc 1, Dc 48) x11 (600)
R51 :
Dc 49 (Inc 1, Dc 49) x11 (612)
Info :
How to change colors with Dc: In the last stitch of R51, Dc with the yellow yarn, when there are two loops on your hook, yarn over and pull through with red yarn.
R52 :
Dc 50 (Inc 1, Dc 50) x11 (624)
R53 :
Dc 51 (Inc 1, Dc 51) x11 (636)
Info :
*Change to Brown yarn before you Ch 3*
R54 :
Dc 52 (Inc 1, Dc 52) x11 (648)
R55 :
Dc 53 (Inc 1, Dc 53) x11 (660)
R56 :
Dc 54 (Inc 1, Dc 54) x11 (672)
R57 :
Dc 55 (Inc 1, Dc 55) x11 (684)
R58 :
Dc 56 (Inc 1, Dc 56) x11 (696)
R59 :
Dc 57 (Inc 1, Dc 57) x11 (708)
R60 :
Dc 58 (Inc 1, Dc 58) x11 (720)
Info :
To Finish off: Don’t Ch 3, make a Sl St in the first stitch and finish off. Now to make toppings!
— Toppings :
Pepperonis R1 :
With red yarn and a 5 mm hook: Mc, Ch 3, and then work 11 Dc into the Mc. (12)
Info :
At the end of each round: insert your hook into the top of the Ch 3, Sl St, Ch 3, and then Dc into the same stitch. *The ch 3 will act as a stitch thus making the Ch3 + Dc= an Inc*
Pepperonis R2 :
Inc in each stitch (24)
Pepperonis R3 :
Dc 1 (Inc 1, Dc 1) x11 (36)
Pepperonis R4 :
Dc 2 (Inc 1, Dc 2) x11 (48)
Pepperonis R5 :
Dc 3 (Inc 1, Dc 3) x11 (60)
Pepperonis R6 :
Dc 4 (Inc 1, Dc 4) x11 (72)
Pepperonis R7 :
Dc 5 (Inc 1, Dc 5) x11 (84)
Pepperonis R8 :
Dc 6 (Inc 1, Dc 6) x11 (96)
Pepperonis R9 :
Dc 7 (Inc 1, Dc 7) x11 (108)
Info :
Sl St into the first stitch and finish off, leave a long tail for sewing
Olives Start :
With black yarn and a 4.5 mm hook: Ch 15, insert your hook into the first Ch and Sl St to make a circle.
Olives R1 :
Ch 1, Sc in the same stitch as the Sl St, ScInc in the reaming Chs (30)
Info :
Sl St into the first stitch and finish off, leave a long tail for sewing. *If your olive curls, try with a looser tension*
Peppers R1 :
With green yarn and a 4.5 mm hook, Ch 60. Starting in the 3rd ch from the hook, Dc 57 across, Dc 3 in the last Ch. *see figures 1-2*
Peppers Info :
Rotate the pepper 180°. Sc in each Ch, place Sc 2 in the last Ch, Sl St in the first Dc, *see figures 3-4*. Finish off and leave a long tail for sewing
Pineapple Row 1 :
With darker yellow yarn and a 4.5 mm hook: Ch 9, start in the 3rd Ch from the hook, Dc across (7)
Pineapple R2 :
Dc 3, Inc 1, Dc 3 (8)
Pineapple R3 :
Dc 4, Inc 1, Dc 3 (9)
Pineapple R4 :
Dc 4, Inc 1, Dc 4 (10)
Pineapple R5 :
Dc across (10)
Pineapple R6 :
Dc 5, Inc 1, Dc 4 (11)
Pineapple R7 :
Dc across (11)
Pineapple R8 :
Dc 5, Inc 1, Dc 5 (12)
Pineapple R9 :
Dc 6, Inc 1, Dc 5 (13)
Pineapple R10 :
Dc 6, Inc 1, Dc 6 (14)
Pineapple R11 :
Dc 7, Inc 1, Dc 6 (15) Ch 1. Next we will Sc around all 4 sides of the pineapple. Start by placing 2 Sc in the first corner. Place 3 Sc in the 3 remaining corners. *See Figures below*. When we Sc across the top, Sl St into the last 3 stitches. Finish off and leave a long tail for sewing
— Mushrooms :
Small mushrooms Row 1 :
*using a 4.5mm hook and warm grey yarn, we will be working in rows, be sure to Ch 1 and turn at the end of each row* Ch 6, starting in the 2nd Ch from the hook, Sc across (5)
Small mushrooms R2-8 :
Sc across (5) *7 rows* (in the last row, do not Ch1 and turn)
Small mushrooms R9 :
Ch 6, turn, Starting in the 2nd Ch from the hook, Sc 5 across Chs, Sc 5 across the stem, Ch 6 (15) (Don’t Ch 1 at the end of this row) *See figures 1-4*
Small mushrooms R10 :
Starting in the 2nd Ch from the hook, Sc across (15) *see fig-5*
Small mushrooms R11 :
Sc 4, Dec, Sc 3, Dec, Sc 4 (13)
Small mushrooms R12 :
Sc 3, Dec, Sc 3, Dec, Sc 3, (11)
Small mushrooms R13 :
Sc 4, Dec, Sc 5, (10)
Small mushrooms R14 :
Sc across (10)
Small mushrooms R15 :
Sc 4, Dec, Sc 4 (9)
Small mushrooms R16 :
Sc 4, Dec, Sc 3 (8) Ch 1
Small mushrooms R17 :
Sc around the sides of the mushroom, place 2 Sc in the two cap corners, and the two bottom stem corners, Sl St in the first stitch *see fig-6-9*
Large mushrooms Intro :
*using a 4.5mm hook and warm grey yarn, we will be working in rows, be sure to Ch 2 and turn at the end of each row*
Large mushrooms Row 1 :
Ch 14, starting in the 3rd Ch from the hook, Dc across (12)
Large mushrooms R2-R3 :
Dc across (12) *2 rows*
Large mushrooms R4 :
Ch 10, turn, starting in the 3rd Ch from the hook,, Dc 8 across the Chs, Dc 6 across the stem, Ch 10 (Don’t Ch 2 at the end of this row) *See Figures 1-4*
Large mushrooms R5 :
Turn, Dc in the 3rd Ch from the hook, Dc across (22)
Large mushrooms R6 :
(Dc 4, dcdec) x3, Dc 4 (19)
Large mushrooms R7 :
(Dc 5, dcdec) x2, Dc 5 (17)
Large mushrooms R8 :
Dc across (17)
Large mushrooms R9 :
(Dc 3, dcdec) x3, Dc 2 (14)
Large mushrooms R10 :
(Dc 2, dcdec) x3, Dc 2 (11)
Large mushrooms R11 :
dcdec, Dc 7, dcdec, (9) Ch 1
Large mushrooms R12 :
Sc around the sides of the mushroom, place 2 Sc in the cap corners and 2 Sc in the stem corners
— Assembly :
Info :
Needed: sewing needle, pins. Time to sew on your toppings! Channel your inner chef and create the pizza of your dreams. Not sure how to layout your toppings? Throw the toppings on one by one, and sew them down wherever they happen to land on the pizza. Dont be afraid to overlap a few toppings.
Info :
How to sew on the toppings: Sew in between the stitches of the cheese. You shouldn’t be able to see much of your needle from the back side. Repeat this process around the entire topping and weave in your end.
This playful Pizza Blanket pattern invites you to crochet a cozy, whimsical piece that doubles as decor and a huge hug! 🍕
Add pepperoni, peppers, mushrooms, olives and pineapple for a fully loaded look and stitch your own pizza story. 🧶
Share photos of your finished pie — it makes me so happy to see your blankets! 😄