๐Ÿงถ Beautiful โœจ Detailed ๐Ÿ’ Adorable

Blue Tang Fish Amigurumi Pattern

Blue Tang Fish Amigurumi Pattern
4.4โ˜… Rating
5-7 Hours Time Needed
2.3K Made This
โœ‚๏ธ

Intermediate Level

Ideal for those with basic crochet experience, featuring slightly more advanced stitches and techniques to expand your skills.

โฑ๏ธ

Weekend Treat

Takes 5-7 hours, making it an enjoyable project to finish over a couple of days.

๐Ÿงธ

Cute Companion

An adorable friend to cherish, handcrafted with love to bring comfort and joy for years to come.

About This Blue Tang Fish Amigurumi Pattern

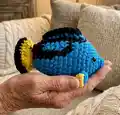
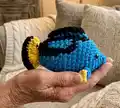
This pattern creates a charming Blue Tang fish amigurumi with color changes to capture the classic markings. The body is crocheted from the body up to the tail with no-sew assembly, and dorsal fins are added by picking up stitches. You will use super bulky yarn for a soft, plush finish and plastic safety eyes for an expressive look.

Blue Tang Fish Amigurumi Pattern crochet pattern - detailed view of completed project

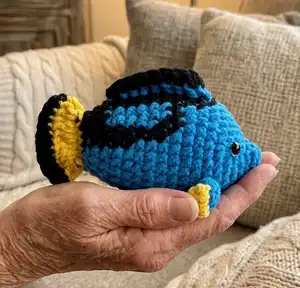
Includes a materials list, abbreviations, full round-by-round instructions, and detailed dorsal fin pickup instructions. Photos show key steps for color changes and placement.

Why You'll Love This Blue Tang Fish Amigurumi Pattern

I absolutely love this pattern because it turns simple stitches into a playful, recognizable little fish full of character. I enjoy the no-sew body construction which saves time and gives a smooth finished look. The color change moments create fun contrast and let you practice controlled colorwork without complicated techniques. I love how quick it is to make with super bulky yarnโ€”perfect for making multiples as gifts.

Blue Tang Fish Amigurumi Pattern step 1 - construction progress Blue Tang Fish Amigurumi Pattern step 2 - assembly progress Blue Tang Fish Amigurumi Pattern step 3 - details and accessories Blue Tang Fish Amigurumi Pattern step 4 - final assembly and finishing

Switch Things Up

I love customizing this Blue Tang by changing the colors; try pastel blues and greys for a softer look or bright neons for a playful toy.

I sometimes make mini versions by switching to DK yarn and a smaller hook to create keychain-friendly fish.

I also experiment with different eye types: safety eyes for durability or embroidered eyes for a softer, child-friendly toy.

Try using variegated yarn for the body to create unexpected stripe patterns without changing colors manually.

Swap the yellow fin color with orange or white for seasonal or themed variationsโ€”each color gives a different personality.

I like adding tiny embroidered smiles or gills to change facial expressions and character at a glance.

To make a set, vary yarn weights and hooks to create a family of fish in complementary sizes.

For a posable display version, I add a short length of thin wire inside the tail before stuffing to shape poses safely.

Try adding small crocheted accessories like a tiny shell or seaweed base to create a display scene or gift set.

I recommend practicing the pick-up stitches for dorsal fins on scrap yarn first to get comfortable before working on the finished piece.

Common Mistakes & How to Fix Them

โœ— Not switching yarn colors where indicated; follow the note about bold/underlined text to change to black yarn at the correct rounds. โœ— Forgetting to stuff as you go causes lumps and uneven shaping; stuff gradually and evenly while closing the body to maintain the intended shape. โœ— Skipping safety eye placement before closing the head will make positioning difficult; attach eyes at rounds R5-R6, apart 8 stitches as instructed. โœ— Pulling stitches too tight while using super bulky yarn limits flexibility and can distort shape; maintain even, moderate tension throughout the work. โœ— Not weaving in ends securely will lead to loose tails later; weave in yarn ends and cut after each finished section to keep the piece neat.

Blue Tang Fish Amigurumi Pattern

Make an adorable Blue Tang (Dory-style) amigurumi with clear step-by-step instructions and helpful photos. This pattern guides you from the body to the tail with no-sew construction and simple finishing steps. Perfect for gifting or adding a pop of ocean color to your handmade collection. You will enjoy color changes and easy shaping with this cheerful fish.

Intermediate 5-7 Hours

Materials Needed for Blue Tang Fish Amigurumi Pattern

โ€” Main Fabric

  • 01
    Super Bulky yarn (Category 6) - Main color Blue, approximately 50g
  • 02
    Accent color Black - approximately 20g
  • 03
    Accent color Yellow - approximately 10-15g for fins
  • 04
    Fiberfill stuffing - small bag for stuffing body and fins

โ€” Tools Required

  • 01
    3.5mm (E) crochet hook
  • 02
    Stitch marker
  • 03
    Sewing needle
  • 04
    Scissors
  • 05
    Plastic safety eyes 8mm (2 pieces)
  • 06
    Hot glue gun
  • 07
    Polyester fiberfill stuffing

Progress Tracker

0% Complete

โ€” CROCHET FROM THE BODY UP TO THE TAIL (NO SEW) :

Info :

Begin with Blue yarn. *When the text is bold and underlined, switch to BLACK yarn*

Round 1 :

5 SC in an MR (5)

Round 2 :

2SC, INC, 2SC (6)

Round 3 :

INC, SC, 2INC, SC, INC (10)

Round 4 :

SC, 7INC, 2SC (17)

Round 5 :

4SC, (INC, SC) 4 times, INC, 4SC (22)

Round 6 :

5SC, (INC, SC) 6 times, 5SC (28)

Round 7 :

8SC, INC, 10SC, INC, 8SC (30)

Round 8 :

14SC, 2SC, 14SC (30)

Round 9-10 :

13SC, 4SC, 13SC (30)

Round 11 :

10SC, 10SC, 10SC (30)

Round 12 :

9SC, 2SC, 2SC, 4SC, 2SC, 2SC, 9SC (30)

Round 13 :

9SC, SC, 3SC, 4SC, 3SC, SC, 9SC (30)

Round 14 :

3SC, DEC, 3SC, DEC, 3SC, DEC, 2SC, DEC, 3SC, DEC (24)

Round 15-16 :

6SC, 2SC, 3SC, 3SC, 2SC, 2SC, 6SC (24)

Round 17 :

2SC, DEC, 2SC, (DEC, 2SC) 3 times, DEC, 2SC, DEC (18)

Round 18 :

5SC, 9SC, 4SC (18)

Round 19 :

(SC, DEC) 2 times, (SC, DEC) 3 times, SC, DEC

Info :

*Stuffing*

Info :

Cut the Black and Blue yarn

Info :

Change to Yellow yarn

Round 20 :

Crochet 2 side together with 6SC

Round 21 :

Turn, 2CH, DC-INC 6 times (12)

Info :

Change to Black yarn

Round 22 :

Turn, CH, 12SC (12)

Info :

Weave in the yarn end and cut

โ€” DORSAL FINS :

Part 1 (P1) :

Begin with Blue yarn (Make 2). Pick up the yarn from row 7, apart 8 stitch. Row 1: (Chains 1, HDC, 3DC, HDC) in one stitch (5). Change to Yellow yarn. Row 2: Turn, CH, 5SC (5). Weave in the yarn end and cut.

Part 2 (P2) :

Begin with Blue yarn. Pick up the yarn from R8 to R16, in the vertical line from head to tail. Row 1: (Chains 1, SC, 7DC, SC) in one stitch (9). Change to Black yarn. Row 2: Turn, CH, 9SC (9). Weave in the yarn end and cut. Attach the eyes at R5-R6, apart 8 stitch.

Assembly Instructions

  • Attach the safety eyes at rounds R5-R6, placing them apart 8 stitches before closing the face to ensure correct placement.
  • Stuff the body firmly during Round 19 and before completing Round 20 so the shape remains even and smooth.
  • Pick up and sew/attach Dorsal Fin Part 1 to the yarn picked up at Row 7, spaced apart 8 stitches, and secure ends by weaving in.
  • Pick up and attach Dorsal Fin Part 2 along the vertical line from R8 to R16, aligning the fin center from head to tail, then weave in ends.
  • Weave in all yarn ends and trim; use a small dab of hot glue if needed to secure safety eyes or any loose ends.

Important Notes

  • ๐Ÿ’กWhen the pattern text is bold and underlined you must switch to the BLACK yarn as instructed to achieve the striped detail.
  • ๐Ÿ’กAttach safety eyes before finishing the head and stuffing to ensure stable and symmetrical placement.
  • ๐Ÿ’กWeave in yarn ends after finishing each section to keep the piece tidy and prevent unraveling.

This cheerful Blue Tang fish is designed to bring a little ocean magic to your handmade collection. It combines bold colorwork with easy shaping to create a lovable mini friend you can finish in a weekend. Share it as a handmade gift or make a school of colorful fish for display. ๐ŸŸ๐Ÿงถ

You ask,

we answer.

FAQs

What size will the finished piece be?

The finished amigurumi measures approximately 10-14 cm (4-5.5 inches) depending on your tension and exact yarn amounts when using super bulky yarn and a 3.5mm hook.

Can I use different yarn weights for this pattern?

Yes, you can change yarn weight, but your finished size will change. Use an appropriate hook size for your chosen yarn and adjust stuffing accordingly.

Do I need prior crochet experience for this pattern?

This pattern is rated intermediate due to color changes, picking up stitches for fins, and shaping; basic familiarity with SC, HDC, DC, increases, and decreases is recommended.

How long does this project typically take to complete?

Most crocheters complete this project in 5-7 hours, depending on experience and whether you make one or several fish.