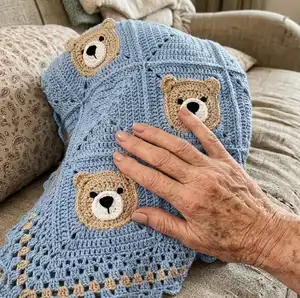
Wrap a little one in handmade comfort with this adorable Bear Baby Blanket pattern. You will make cute teddy bear squares and classic solid granny squares, then join them together with a pretty scalloped border. The pattern includes full round-by-round instructions, materials, and assembly notes so you can create a cherished baby blanket for gifting or snuggles.
Progress Tracker
0% Complete
— Pattern Notes :
Info :
US crochet terms used throughout. The blanket is worked in rounds. I have modified the solid granny square slightly to ensure that the completed square is the same size as the teddy bear square.
Info :
Gauge / Tension: Each square measures 4.25" (10.75cm).
Info :
Finished Size: Width – 28.5 inches / 72.25cm. Length – 28.5 inches / 71.25cm.
— Teddy Bear Square (Make 13) :
Info :
Using Colour A. Make a magic circle. (if you do not like the magic circle method, see the Alternative Round 1 below).
Round 1 :
Ch2 (counts as your 1st dc here and throughout), 11dc in the magic circle, sl st to top of beg ch2 to join, [12 sts]
Alternative Round 1 :
Ch4, sl st to 1st ch to form a ring, ch2 (counts as your 1st dc here and throughout), 11dc into the ring, sl st to top of beg ch2 to join, [12 sts]
Round 2 :
Ch2, 1dc in same st, 2dc in next 11 sts, sl st to top of beg ch2 to join, [24 sts]
Round 3 :
Ch2, 1dc in same st, 2dc in next 23 sts, sl st to top of beg ch2 to join, [48 sts]
Round 4 :
Ch1 (does not count as your 1st st) 1sc in same st, 1sc in next 16 sts, 6dc in FLO of next st (1st ear made), 1sc in next 11 sts, 6dc in FLO of next st (2nd ear made), 1sc in next 18 sts, to join sl st to 1st sc or make an invisible join, [58 sts]
Info :
Cut yarn, fasten off and weave in ends.
Info :
Change to Colour B: IMPORTANT: Attach your yarn to the BLO of the FIRST STITCH of the last round worked. It is important that you begin the next round in this exact stitch so that the first corner is made directly behind the ear.
Round 5 :
Ch3 (counts as your 1st st here and throughout), 1dc in BLO of next 2 sts, 1EXdc in BLO of next 2sts, (2tr, ch2, 2tr) in BLO of next st, *1EXdc in BLO of next 2 sts, 1dc in BLO of next 7 sts, 1EXdc in BLO of next 2 sts, (2tr, ch2, 2tr) in the BLO of the next st (directly behind the ear made up of 6dc - do not work into these 6dc)*, repeat from * to * twice, 1EXdc in BLO of next 2 sts, 1dc in BLO of next 7 sts, 1EXdc in BLO of next 2 sts, (2tr, ch2, 2tr) in BLO of next st, 1EXdc in BLO of next 2sts, 1dc in next 4 sts, sl st to top of beg ch3 to join, [15 sts on each side of square, 4 x ch2 sps]
Round 6 :
Ch3, 1dc in next 6 sts, *(2dc, ch2, 2dc) in ch2 corner sp, 1dc in next 15 sts*, repeat from * to * for a total of 3 times, (2dc, ch2, 2dc) in last ch2 corner sp, 1dc in next 8 sts, to join sl st to top of beg ch3 or make an invisible join (for easier seaming later), [19 sts on each side of square, 4x ch2 sps]
Info :
Cut yarn, fasten off and weave in ends. IMPORTANT: If you used the magic circle method in round 1, make sure that you weave in the yarn tail securely so that the middle of your square does not unravel.
— Snout for Bear Head (Make 13) :
Info :
Using Colour C. Make a magic circle. (if you do not like the magic circle method, see the Alternative Round 1 below).
Round 1 :
Ch2 (counts as your 1st dc here and throughout), 11dc in the magic circle, sl st to top of beg ch2 to join, [12 sts]
Alternative Round 1 :
Ch4, sl st to 1st ch to form a ring, ch2 (counts as your 1st dc here and throughout), 11dc into the ring, sl st to top of beg ch2 to join, [12 sts]
Round 2 :
Ch1 (does not count as your 1st st), 1hdc in same st, 2hdc in next st, *1hdc in next st, 2hdc in next st*, repeat from * to * for a total of 5 times, to join sl st to 1st hdc or make an invisible join, [18 sts]
Info :
Cut yarn (leaving a long tail for sewing), fasten off and weave in ends.
— Assembly of Teddy Bear Square :
Step 1 :
Embroider the nose onto the snout (I used a piece of black yarn about 20" long).
Step 2 :
Sew the snout onto the teddy bear square.
Step 3 :
Embroider one eye on either side of the snout (cut about 10" of black yarn for each eye).
Info :
NOTE: Embroider the details to your liking.
— Solid Granny Square (Make 12) :
Info :
Using Colour B. Make a magic circle. (if you do not like the magic circle method, see the Alternative Round 1 below).
Round 1 :
Ch5 (counts as your 1st dc and a ch2), (3dc, ch2) into the magic circle 3 times, 2dc, sl st to 3rd ch of beg ch5 to join [3dc on each side of square]
Alternative Round 1 :
Ch4, sl st to 1st ch to form a ring, ch5 (counts as your 1st dc and a ch2), (3dc, ch2) into the ring 3 times, 2dc, sl st to 3rd ch of beg ch5 to join [3dc on each side of square]
Round 2 :
Ch3 (counts as your 1st dc here and throughout), *(2dc, ch2, 2dc) in next ch2 corner sp, 1dc in next 3 sts*, repeat from * to * for a total of 3 times, (2dc, ch2, 2dc) in last ch2 corner sp, 1dc in next 2 sts, sl st to top of beg ch3 to join, [7dc on each side of square]
Round 3 :
Ch3, 1dc in next 2 sts, *(2dc, ch2, 2dc) in next ch2 corner sp, 1dc in next 7 sts*, repeat from * to * for a total of 3 times, (2dc, ch2, 2dc) in last ch2 corner sp, 1dc in next 4 sts, sl st to top of beg ch3 to join, [11dc on each side of square]
Round 4 :
Ch3, 1EXdc in next 4 sts, *(2EXdc, ch2, 2EXdc) in next ch2 corner sp, 1EXdc in next 11 sts*, repeat from * to * for a total of 3 times, (2EXdc, ch2, 2EXdc) in last ch2 corner sp, 1EXdc in next 6 sts, sl st to top of beg ch3 to join, [15EXdc on each side of square]
Round 5 :
Ch3, 1EXdc in next 6 sts, *(2EXdc, ch2, 2EXdc) in next ch2 corner sp, 1EXdc in next 15 sts*, repeat from * to * for a total of 3 times, (2EXdc, ch2, 2EXdc) in last ch2 corner sp, 1EXdc in next 8 sts, sl st to top of beg ch3 to join or make an invisible join (easier when seaming later), [19EXdc on each side of square]
Info :
Cut yarn, fasten off and weave in ends.
Info :
Change to Colour A: Attach yarn to ch2 corner sp. Round 5: Repeat round 4. Cut yarn, fasten off and weave in ends. Change back to Colour B: Round 6: Repeat round 4.
Info :
Round 7: (Sl st) 3 times to the ch2 corner sp, *(ch3, 1dc in next ch1 sp, 5dc around the post of last dc made, 1sc in next ch1 sp) 19 times to next ch2 corner sp, ch4, 1sc in ch2 corner sp*, repeat from * to * 4 times, sl st to 1st ch of beg ch3 to join.
Info :
Cut yarn, fasten off and weave in ends.
— Arrangement & Joining :
Info :
Arrangement of Bear Crochet Baby Blanket: Once you've made all your squares, you will arrange them before joining. See photo 5 for the diagram demonstrating arrangement (5x5 layout with teddy faces spaced as shown).
Info :
Joining Your Squares: For this blanket, the designer used a flat slip stitch seam (work a dc2tog over ch2 sps at seams as indicated in the border instructions). You can use any method you like to join your squares.
— Border (Using Colour B unless otherwise noted) :
Info :
Attach yarn to the ch2 corner sp in the top right hand corner of the blanket.
Round 1 :
*(3dc, ch2, 3dc) in ch2 corner sp, 1dc in each st to next ch2 corner sp, working 1 dc2tog over the ch2 sps at each seam*, repeat from * to * 4 times, sl st to 1st dc at beg of round to join.
Round 2 :
(Sl st) 3 times to the ch2 corner sp, *(3dc, ch2, 3dc) in ch2 corner sp, **sk next 2 sts, V-st in next st**, repeat from ** to ** to last 3 sts before next ch2 corner sp, sk next 3 sts*, repeat from * to * 4 times, sl st to 1st dc at beg of round to join.
Round 3 :
(Sl st) 3 times to the ch2 corner sp, *(3dc, ch2, 3dc) in ch2 corner sp, ch1, **3dc in next V-st, ch1**, repeat from ** to ** to next ch2 corner sp*, repeat from * to * 4 times, sl st to 1st dc at beg of round to join.
Round 4 :
(Sl st) 3 times to the ch2 corner sp, *(3dc, ch2, 3dc) in ch2 corner sp, ch1, **3dc in next ch1 sp, ch1**, repeat from ** to ** to next ch2 corner sp*, repeat from * to * 4 times, sl st to 1st dc at beg of round to join.
Info :
Cut yarn, fasten off and weave in ends.
Info :
Change to Colour A: Attach yarn to ch2 corner sp. Round 5: Repeat round 4. Cut yarn, fasten off and weave in ends. Change back to Colour B: Round 6: Repeat round 4.
Round 7 :
(Sl st) 3 times to the ch2 corner sp, *(ch3, 1dc in next ch1 sp, 5dc around the post of last dc made, 1sc in next ch1 sp) 19 times to next ch2 corner sp, ch4, 1sc in ch2 corner sp*, repeat from * to * 4 times, sl st to 1st ch of beg ch3 to join.
This Bear Baby Blanket pattern combines playful teddy-face squares with cozy granny squares for a timeless baby gift. Make a whole set in soft cotton for easy care and a snuggly finish. Each square is worked in rounds with clear instructions and a pretty scalloped border to finish. 🧶🧸