🧢 Beautiful ✨ Detailed πŸ’ Adorable

Baby Barefoot Sandals Pattern

Baby Barefoot Sandals Pattern
4.7β˜… Rating
2-3 Hours Time Needed
2.4K Made This
βœ‚οΈ

Beginner Friendly Level

Perfect for those just starting their crochet journey, with clear instructions and simple techniques

⏱️

Bite-Sized Project

Finishes in 2-4 hoursβ€”perfect for an afternoon of creative relaxation.

✨

Stylish Touch

An elegant detail to elevate any look, combining traditional techniques with contemporary design sensibilities.

About This Baby Barefoot Sandals Pattern

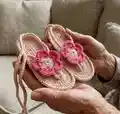
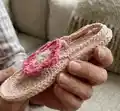
These barefoot sandals are a charming, quick crochet project that creates a small floral sandal to wear or gift. The pattern includes a circular sandal base worked in rounds, delicate flower petals, and two simple straps to tie around the foot. You can make baby and toddler sizes by changing hook size and yarn weight for an easy personalization.

Baby Barefoot Sandals Pattern crochet pattern - detailed view of completed project

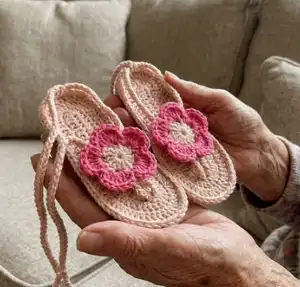
Perfect for photo props, showers, or tiny handmade gifts, the sandals finish with a textured flower center. The instructions include clear notes about brackets, loops, and finishing so you can stitch confidently.

Why You'll Love This Baby Barefoot Sandals Pattern

I absolutely love this pattern because it transforms a few basic stitches into a sweet, wearable accessory that looks far more intricate than it is. I enjoy how quick it is to make a pairβ€”you can finish one in an afternoon and customize colors easily. The flower detail adds a lot of personality with minimal extra work, and I like that both fingering and worsted yarns work well. This pattern is forgiving for beginners but still satisfying for more experienced crocheters who love tiny projects.

Baby Barefoot Sandals Pattern step 1 - construction progress Baby Barefoot Sandals Pattern step 2 - assembly progress Baby Barefoot Sandals Pattern step 3 - details and accessories Baby Barefoot Sandals Pattern step 4 - final assembly and finishing

Switch Things Up

I love customizing these sandals by changing color combinations; try a neutral base with bright flower centers for contrast.

I often use embroidery floss or crochet thread for a delicate look, or switch to worsted yarn for a chunkier toddler-friendly version.

To make them larger or smaller, I change hook size and yarn weight; a bigger hook and bulkier yarn create a quick toddler pair.

I sometimes embellish the flower with a tiny button or bead sewn into the center for extra sparkle and texture.

For a more rustic look, I use natural cotton yarn and a slightly longer strap so it ties in a bow instead of a knot.

I also like to make matching headbands or wristlets using the same flower motif to create a coordinated set.

If I want the sandal to be more secure, I shorten the straps and add an extra wrap around the ankle before tying.

Try varying the petal size by changing the number of DCs in each petalβ€”for example, 3 dc instead of 5 dc makes a smaller petal.

I sometimes embroider a tiny initial on the flower center for a personalized gift that feels extra special.

Finally, I recommend experimenting with variegated yarns for the flower to create a multi-tonal effect without changing colors mid-project.

Common Mistakes & How to Fix Them

βœ— Counting the starting chain as a stitch can throw off your round counts; do not count the chain stitch as a stitch at the beginning of the round. βœ— Joining to the wrong place at the end of a round can warp your shape; always join to the top of the chain stitch you began the round with to keep edges even. βœ— Ignoring which loops to work can change the look of the petals; work the whole Round 3 in the back loops only as instructed for the correct texture. βœ— Not stuffing or shaping as you go can make the flower look flat; when filling the center slip stitch randomly until the holes are filled and the center looks neat. βœ— Skipping slip stitches when instructed for straps can misplace the strap position; slip stitch in the next three stitches to reach the correct chain-2 spot before chaining the strap length.

Baby Barefoot Sandals Pattern

Make adorable barefoot baby sandals with a delicate crochet flower accent. This pattern guides you through a simple circular base, creating petals, and attaching straps to fit baby or toddler sizes. Youll enjoy the quick, portable project that makes sweet gifts and photo props. Suitable for small skeins of fingering or worsted yarn and quick to customize.

Beginner Friendly 2-3 Hours

Materials Needed for Baby Barefoot Sandals Pattern

β€” Main Fabric

  • 01
    Fingering weight yarn, crochet thread, or embroidery floss for Color A (sandal base) - baby size recommended
  • 02
    Fingering weight yarn, crochet thread, or embroidery floss for Color B (flower) - baby size recommended
  • 03
    Worsted weight yarn for Color A and B (optional for toddler size)
  • 04
    Knit Picks Comfy Fingering (example used) - small amounts per pair
  • 05
    Small scraps or 5-25g of contrast yarn for flower centers

β€” Tools Required

  • 01
    Crochet hook size C (2.75 mm)
  • 02
    Crochet hook size D (3.25 mm) for toddler size
  • 03
    Scissors
  • 04
    Yarn needle for sewing/weaving ends
  • 05
    Stitch markers (optional)
  • 06
    Tapestry needle for finishing
  • 07
    Measuring tape to check flower size (approx 1.5in baby, 2in toddler)

Progress Tracker

0% Complete

β€” Materials :

Info :

Baby Size: 1.5 inches across flower

Info :

Sandal Base Color A - C or 2.75 mm hook Fingering weight yarn, crochet thread or embroidery Floss

Info :

Flower Color B - Fingering weight yarn, crochet thread or embroidery Floss

Info :

Toddler Size: 2 inches across flower D or 3.25 mm hook Color A and B are Worsted Weight yarn

Info :

Use the same pattern for both sizes Featured Sandals are made with Knit Picks Comfy Fingering and Worsted weight yarns.

β€” Abbreviations :

Info :

Ch Chain Sc Single crochet Dc Double Crochet Sl st Slip stitch

β€” Notes :

Infos :

1. Do not count the chain stitch as a stitch at the beginning of round. 2. When joining at end of round always join to the top of the chain stitch you began the round with. 3. I did not do an end of the round stitch count in this pattern because of all the chaining. I thought it might be confusing. All of our other patterns do have stitch count though. :o)

β€” How to read pattern :

Info :

A. When you see parenthesis () in the pattern they are either referring to the numbers for the larger sizes or will be around notations such as (See ...). Note A) When you see Brackets [] in the pattern that means that you work everything in them as a set or together. Note B) When you see Brackets [] in the pattern that means that you work everything in them as a set or together. Note C) When I have a number followed by a st, that stitch needs to be worked over that number of stitches. Example: "10 sc" that is 1 sc in each of the next 10 stitches.

β€” Gauge :

Info :

??????? I wasn't sure what to put here! We normally have gauge I just wasn't sure how to measure it for this pattern. :o)

β€” Sandal Base :

Round 1 :

With color A ch 4, join with slip stitch to 4th chain from hook to form a small ring. (See Picture A)

Round 2 :

Chain 1 (does not count as stitch) place 9 sc in ring. Join with slip stitch to the chain 1 from the beginning of round. (See Picture B) Do not turn.

Round 3 :

This whole round will be worked in the back loops only of the previous round. Ch 3, starting in first stitch * [2 dc, chain 2, 2 dc], 1 dc in each of the next two stitches. Repeat from * 1 more time. [2 dc, chain 11, now working back down chain put 1 slip stitch in 10th chain from hook, ch 1, 2 dc back in same stitch], 1 dc in each of next two stitches]. Join with slip stitch to the top of the chain 3 that you started the round with. Do not turn.

Info :

Place second strap here (see picture D). First strap made (see picture D).

β€” First strap :

Instruction :

Slip stitch in next 3 stitches. This should bring you to the middle of the first chain 2 spot. (See pictures C and D) Ch 60, Bind off!

β€” Second Strap :

Instruction :

Attach yarn to next chain three spot with a single crochet. (See Picture D on first page) Ch 60, Bind off!

Note :

I tied the ends of my straps in a knot to kind of finish them off. You don't have to, I just thought it made them look better. :o)

β€” Flower :

Instruction :

With color B attach yarn to any one of the exposed front loops that were not worked in round 3. (See Picture E). Starting in the stitch you attached to, remember to work all stitches between brackets in the same stitch. [Ch 2, 5 dc, ch 2, slip stitch back to same stitch], first petal made! :o)

Round :

Now skip next stitch, *[slip stitch to next stitch, Ch 2, 5 dc, ch 2, slip stitch back to same stitch], skip next stitch, repeat from * all the way around and end round by joining with a slip stitch to base of first flower petal made. You should have 5 flower petals when complete. Bind off!

Note :

Folding a corner of the sandal to the back makes it easier to get to the exposed front loops when making the flower petals. (See picture F)

β€” Finishing :

Instruction :

Using color A again attach to center of flower by pulling a loop of yarn from back to front and top stitch by slip stitching all the way around the center of the flower at the base of the petals. (See arrows in picture G) After slip stitching around the center circle fill in the center by slip stitching across the flower's center in random stitches until the center is filled to your liking. :o) This may look ugly before it is finished but no worries! Just keep slip stitching away and fill in the holes until it is pretty. :o) (See Picture H) Bind Off!

β€” Final :

Info :

Weave in Ends and you are Done!

Assembly Instructions

  • Attach the flower to the exposed front loops of the sandal base where not worked in round 3, aligning petals evenly and slip stitching the base of the petals to the base ring.
  • Make the first strap by slip stitching in the next 3 stitches to reach the middle of the first chain-2 spot, chain 60 and bind off; this forms the first tie strap.
  • Attach the second strap by single crocheting into the next chain-3 spot, chain 60 and bind off to make the second tie strap.
  • Tie or knot the strap ends for a finished look or leave raw ends to weave in, then weave in all loose yarn ends securely with a yarn needle.
  • Fold a corner of the sandal to the back if needed while creating flower petals to access exposed front loops more easily and maintain neat petal placement.

Important Notes

  • πŸ’‘Do not count the chain stitch as a stitch at the beginning of the round to keep stitch counts consistent.
  • πŸ’‘When joining at the end of a round always join to the top of the chain stitch you began the round with.
  • πŸ’‘Work Round 3 in the back loops only of the previous round to create the correct texture for the straps and petal placement.
  • πŸ’‘Fill the flower center by slip stitching across the center in random stitches until it is filled to your liking before binding off.

These baby barefoot sandals are a delightful, quick crochet make that adds handmade charm to any tiny outfit. Perfect for baby showers, newborn photos, or tiny summer toes, theyre easy to customize and quick to finish. Have fun mixing colors and creating sets! πŸ§ΆπŸ‘£

You ask,

we answer.

FAQs

What size will the finished piece be?

The finished baby sandal flower measures approximately 1.5 inches across for the baby size and about 2 inches for the toddler size when using the recommended yarn and hook sizes.

Can I use different yarn weights for this pattern?

Yes, you can use fingering weight or worsted weight yarns; use C (2.75 mm) for fingering/baby size and D (3.25 mm) for toddler size, noting that yarn weight will change the final size.

Do I need prior crochet experience for this pattern?

This pattern is beginner friendly and uses basic stitches like chain, single crochet, double crochet and slip stitch; basic familiarity with working in rounds and back loops is helpful.

How long does this project typically take to complete?

Most crocheters complete a pair in about 2-3 hours, though time may vary based on experience, yarn choice, and how many embellishments you add.