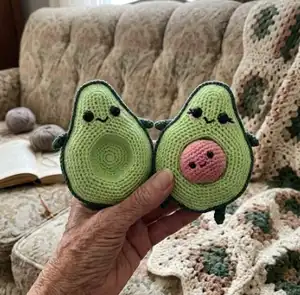
Create a charming Avocado Family with this full crochet pattern—two adorable avocado halves and a removable seed. You will make inside and outside halves, tiny arms and legs, and a sweet seed with complete stitch-by-stitch rounds. The pattern is photo-supported and perfect for crafters who enjoy small, detailed amigurumi projects. Grab your cotton yarn and hook and make a delightful handmade gift.
Progress Tracker
0% Complete
— Light green part/inside :
Round 3 :
*1 sc, 1 sc-inc* x6 (18)
Round 4 :
*2 sc, 1 sc-inc* x6 (24)
Round 5 :
*3 sc, 1 sc-inc* x6 (30)
Round 6 :
*4 sc, 1 sc-inc* x6 (36)
Round 7-10 :
sc all the way around (36) = 4 rounds
Info :
Note that all of round 11 is crocheted in the back loop only.
Round 11 :
*5 sc in the back loop only, 1 sc-inc in the back loop only* x6 (42)
Info :
In round 12 you'll make some chains going out from the circle, in which you will make single crochets back to the circle - I recommend crocheting in the 'bump' on the back of the chains. When you come back to the circle, the first stitch is made in the SAME stitch as the last sc you made on the circle. In round 13 you have to crochet in the opposite side of these chains as normal stitches.
Round 12 :
*6 sc, 1 sc-inc* x2, 7 sc, 8 ch, skip the next stitch, 7 sc in the chains, 1 sc in the same stitch as the last sc on the circle, *6 sc, 1 sc-inc* x3 (62 not counting the ch you skipped at the tip)
Round 13 :
*7 sc, 1 sc-inc* x2, 6 sc, 1 hdc-dec, 5 sc, 3 sc in the same stitch, skip the chain at the tip, 3 sc in the same stitch, 5 sc, 1 hdc-dec, *7 sc, 1 sc-inc* x3 (69)
Round 14 :
*8 sc, 1 sc-inc* x2, 5 sc, 1 hdc, 1 hdc-dec, 1 hdc, 5 sc, 3 sc-inc, 5 sc, 1 hdc, 1 hdc-dec, 1 hdc, 6 sc, 1 sc-inc, *8 sc, 1 sc-inc* x2 (75)
Round 15 :
*9 sc, 1 sc-inc* x2, 4 sc, 1 hdc, 1 hdc-dec, 1 ch, skip the next stitch, 1 hdc, 5 sc, 1 sc-inc, 2 sc, 1 sc-inc, 4 sc, 1 hdc, 1 ch, skip the next stitch, 1 hdc-dec, 1 hdc, 7 sc, 1 sc-inc, *9 sc, 1 sc-inc* x2 (80 including ch)
Round 16 :
10 sc, 1 sc-inc, 13 sc, 8 hdc, 4 sc, 1 sc-inc, 3 sc, 1 sc-inc, 3 sc, 8 hdc, 16 sc, 1 sc-inc, 10 sc, 1 sc-inc (85)
Round 17 :
5 sc, 1 sc-inc, 11 sc, 1 sc-inc, 20 sc, 1 sc-inc, 4 sc, 1 sc-inc, 20 sc, 1 sc-inc, 11 sc, 1 sc-inc, 8 sc (91)
Info :
Finish off by making a slip st in the next stitch, cut the yarn, pull the end through and make an invisible finish. You should now have two pieces that look like picture 6 below.
— Dark green part/outside :
Round 3 :
*1 sc, 1 sc-inc* x6 (18)
Round 4 :
*2 sc, 1 sc-inc* x6 (24)
Round 5 :
*3 sc, 1 sc-inc* x6 (30)
Round 6 :
*4 sc, 1 sc-inc* x6 (36)
Round 7 :
*5 sc, 1 sc-inc* x6 (42)
Info :
In round 8 you'll make some chains going out from the circle, in which you will make single crochets back to the circle - I recommend crocheting in the 'bump' on the back of the chains. When you come back to the circle, the first stitch is made in the SAME stitch as the last sc you made on the circle. In round 9 you have to crochet in the opposite side of these chains as normal stitches.
Round 8 :
*6 sc, 1 sc-inc* x2, 7 sc, 8 ch, skip the next stitch, 7 sc in the chains, 1 sc in the same stitch as the last sc on the circle, *6 sc, 1 sc-inc* x3 (62 not counting the ch you skipped at the tip)
Round 9 :
*7 sc, 1 sc-inc* x2, 6 sc, 1 hdc-dec, 5 sc, 3 sc in the same stitch, skip the chain at the tip, 3 sc in the same stitch, 5 sc, 1 hdc-dec, *7 sc, 1 sc-inc* x3 (69)
Round 10 :
*8 sc, 1 sc-inc* x2, 5 sc, 1 hdc, 1 hdc-dec, 1 hdc, 5 sc, 3 sc-inc, 5 sc, 1 hdc, 1 hdc-dec, 1 hdc, 6 sc, 1 sc-inc, *8 sc, 1 sc-inc* x2 (75)
Round 11 :
*9 sc, 1 sc-inc* x2, 4 sc, 1 hdc, 1 hdc-dec, 2 hdc, 5 sc, 1 sc-inc, 2 sc, 1 sc-inc, 4 sc, 2 hdc, 1 hdc-dec, 1 hdc, 7 sc, 1 sc-inc, *9 sc, 1 sc-inc* x2 (80 including ch)
Round 12 :
10 sc, 1 sc-inc, 13 sc, 8 hdc, 4 sc, 1 sc-inc, 3 sc, 1 sc-inc, 3 sc, 8 hdc, 16 sc, 1 sc-inc, 10 sc, 1 sc-inc (85)
Round 13 :
5 sc, 1 sc-inc, 11 sc, 1 sc-inc, 20 sc, 1 sc-inc, 4 sc, 1 sc-inc, 20 sc, 1 sc-inc, 11 sc, 1 sc-inc, 8 sc, 1 sc-inc, 8 sc (91)
Round 14-18 :
sc all the way around (91) = 5 rounds
Info :
Finish off by making a slip st, do NOT cut the yarn, you have to continue crocheting the two pieces together, you'll find a guide for this on the next page.
— Joining inside and outside :
Step 1 :
Put the inside and outside part up against each other, so the last 4 single crochets on each part overlap, as shown on the picture above. TIP: On the pictures I have not made an invisible finish yet to make it easier to see where the last 4 stitches are, but I recommend making an invisible finish, as this gives the best result - you can follow the guide for an invisible finish on the next page.
Step 2 :
Insert the hook through the first of the 4 stitches - the hook should be inserted through the back loop only of the inside part and both loops of the stitch on the outside part. NOTE: You are going to crochet in the opposite direction than you did on the outside part and the 'right' direction on the inside part.
Step 3 :
Make a normal sc, continue making sc all the way around, always inserting the hook through the back loop of the inside part and both loops of the outside part. Add stuffing as you make your way around. Make sure the hole for the seed stays down. TIP: When you get to the slip st and invisible finish on the inside part, insert the hook through the back loop only as a normal stitch to get the best result.
Info :
When you have crocheted the two pieces together all the way around, you can finish off by making an invisible finish, as shown on the pictures. When you have done this for both halves, you should have two avocados like the pictures below.
Step 1 (invisible finish) :
Cut the yarn, pull the tail all the way through and put a needle on the tail. Pull the needle through the very first stitch you made from the inside part through to the outside part, as shown above.
Step 2 (invisible finish) :
Now pull the needle through the back loop only of the last stitch you made, going from the middle of the stitch through to the outside part.
Step 3 (invisible finish) :
Tighten it just enough to make it look like a regular stitch, then all there is left to do, is to weave in the end.
Info :
Insert and secure the safety eyes (10 mm), and embroider the details on the faces. Both avocados have a tiny light pink cheek right beneath the outside of the eyes, like on the pictures. Both avocados also have a small, happy mouth, and one of the avocados also have eyelashes on the outside of each eye - mouth and eyelashes are made with black yarn.
— Arms/legs :
Info :
Now you only need arms and legs for the avocados, all are made from the same pattern. You will need 8 pcs of this part - 4 pcs for each half of the avocado. They are all crocheted using dark green yarn. This part is crocheted in a spiral. Start off with a magic loop.
Round 2-4 :
sc all the way around (6) = 3 round
Info :
Finish off by cutting the yarn and pull the tail through. You should now have a total of 8 arms/legs, 4 for each avocado. Now you have to sew on the arms and legs; to make sure everything is placed where you like it, it can be a good idea to attach them with pins first.
Info :
The arms are placed so that the upper edge is just a little bit below the mouth. The legs are placed so that the outside edge of the legs are just a little bit closer to the center than the outside edge of the avocado itself. The arms and legs should be approximately aligned above each other.
— Seed :
Info :
The seed is only made from light brown yarn. The seed is crocheted from top to bottom. You will need 1 piece of this part. This part is crocheted in a spiral. Start off with a magic loop. Where you started/round 1 is the top of the seed.
Round 3 :
*1 sc, 1 sc-inc* x6 (18)
Round 4 :
*2 sc, 1 sc-inc* x6 (24)
Round 5 :
*3 sc, 1 sc-inc* x6 (30)
Round 6 :
*9 sc, 1 sc-inc* x3 (33)
Round 7-8 :
sc all the way around (33)
Info :
In round 9 you'll be making holes for the safety eyes, if you don't want to use safety eyes, you can make a sc instead of the hole. In round 10 you have to crochet in the holes as normal stitches.
Round 9 :
13 sc, 1 ch, skip the next stitch, 4 sc, 1 ch, skip the next stitch, 14 sc (33 incl ch)
Round 10-11 :
sc all the way around (33)
Info :
Insert and secure the safety eyes (6 mm) in the holes from round 9, and add stuffing. You might need to add more stuffing as the hole gets smaller.
Round 12 :
*9 sc, 1 sc-dec* x3 (30)
Round 13 :
*3 sc, 1 sc-dec* x6 (24)
Round 14 :
*2 sc, 1 sc-dec* x6 (18)
Round 15 :
*1 sc, 1 sc-dec* x6 (12)
Info :
Finish off by cutting the yarn, pull the end through and sew the hole together so it closes. Sew on small, light pink cheeks right underneath the outside of each eye. Sew on a little smiling mouth; for this split the cotton yarn into two strands to make a thinner mouth and place it on the round just below the eyes. You can now put the seed in the avocado!
— Finishing and final assembly :
Info :
Sew arms and legs in position with yarn needle and secure ends. Embroider mouth and eyelashes as desired with black yarn. Weave in all ends and make sure the seed fits and tucks down into the avocado cavity. Your Avocado Family is now finished!
This adorable Avocado Family pattern is perfect for gifts, decor, and playful little projects that warm the heart. 🥑
Make two halves and a removable seed to create a sweet set with personality and charm. 💚
Have fun, add your own facial details, and enjoy the smiles your handmade avocados will bring! ✨