🧢 Beautiful ✨ Detailed πŸ’ Adorable

Blue Tang Fish Amigurumi Pattern

Blue Tang Fish Amigurumi Pattern
4.4β˜… Rating
5-7 Hours Time Needed
2.0K Made This
βœ‚οΈ

Intermediate Level

Ideal for those with basic crochet experience, featuring slightly more advanced stitches and techniques to expand your skills.

⏱️

Weekend Treat

Takes 5-7 hours, making it an enjoyable project to finish over a couple of days.

🧸

Cute Companion

An adorable friend to cherish, handcrafted with love to bring comfort and joy for years to come.

About This Blue Tang Fish Amigurumi Pattern

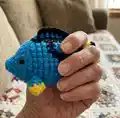
This pattern teaches you how to crochet a Blue Tang (Dory-style) amigurumi from the body up to the tail with no sewing required on the main seam. It features clear round-by-round instructions, color-change cues, and photos to guide the process. You will make dorsal fins, attach safety eyes and finish with tidy weaving of ends for a professional look.

Blue Tang Fish Amigurumi Pattern crochet pattern - detailed view of completed project

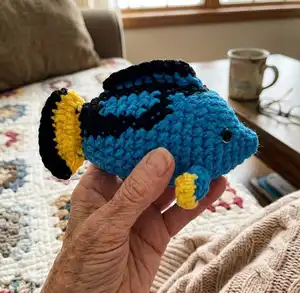
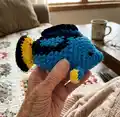
The piece is worked mostly in single crochet with increases and decreases to form the shape, then accented with black and yellow color details. Ideal for gifting or display, this amigurumi has friendly proportions and a fun textured finish.

Why You'll Love This Blue Tang Fish Amigurumi Pattern

I absolutely love this pattern because it combines simple shaping with charming color details to make a recognizable Blue Tang character. I enjoy how the no-sew body-to-tail construction keeps the piece tidy and durable for play or display. The dorsal fin pickup technique is clever and gives a neat, attached look without bulky seams. I also love that the pattern includes clear color-change cues so the striking black markings are easy to follow. It feels rewarding to see the fish come together quickly while still offering a satisfying crochet challenge.

Blue Tang Fish Amigurumi Pattern step 1 - construction progress Blue Tang Fish Amigurumi Pattern step 2 - assembly progress Blue Tang Fish Amigurumi Pattern step 3 - details and accessories Blue Tang Fish Amigurumi Pattern step 4 - final assembly and finishing

Switch Things Up

I love how easy it is to customize the colors in this pattern β€” try pastel blues and mint for a soft nursery-friendly fish.

You can change the yarn weight and hook to make a mini keychain version or a much larger plush; a thinner yarn with a smaller hook gives a tiny charm, while bulky yarn yields a chunky buddy.

I often experiment with different eye sizes to change expression; swap the 8mm safety eyes for smaller 6mm or embroider eyes for a baby-safe toy.

Try embroidering a small smile or spots instead of using safety eyes for a different personality on your fish.

For a sturdier toy, consider inserting a small piece of felt between the safety eye and fabric backing or use a washer if your eyes require extra security.

I sometimes add a tiny loop on top with a few chains to turn the fish into an ornament or keyring β€” handy for gifts or bag charms.

Mixing yarn textures can add interest; a boucle or plush yarn for the body with smooth yarn for fins creates a playful contrast.

If you want posable fins, insert a thin piece of wire wrapped in yarn when sewing the fins in place to allow slight movement.

Make a school of fish by varying colors and sizes β€” it is a great way to practice the pattern and create a set for decoration or gifting.

I recommend trying different finishing touches like a little felt seaweed base or tiny crocheted bubbles to style a display for your amigurumi fish.

Common Mistakes & How to Fix Them

βœ— Skipping the stitch marker when working continuous rounds leads to lost row starts; place a marker at the first stitch of each round and move it up after completing the round. βœ— Not stuffing at the right time can make shaping difficult; stuff progressively as you approach decreases so the body keeps its intended form without lumps. βœ— Pulling color change joins too tight will pucker the fabric; when switching yarns leave a little slack and weave ends neatly to keep the surface even. βœ— Forgetting to count stitches after increases or decreases causes the shape to go wrong; count every round, especially after groups of increases or decreases, to keep the stitch total correct. βœ— Attaching safety eyes too late or too close to the edge can distort the face; attach eyes between the recommended rounds (R5-R6) and space them apart as instructed to keep facial proportions accurate.

Blue Tang Fish Amigurumi Pattern

Create a cheerful Blue Tang (Dory) amigurumi with this friendly crochet pattern. You will follow step-by-step rounds, color changes and shaping instructions to make a bright, textured fish. The pattern includes dorsal fin construction, eye placement guidance, and finishing notes so your toy looks polished. Perfect for gifting or adding a playful touch to your handmade collection.

Intermediate 5-7 Hours

Materials Needed for Blue Tang Fish Amigurumi Pattern

β€” Main Fabric

  • 01
    Super Bulky yarn (Category 6) - Blue (main color), amount as needed for one small amigurumi
  • 02
    Super Bulky yarn (Category 6) - Black (accent color) - small amount for markings
  • 03
    Super Bulky yarn (Category 6) - Yellow (accent color) - small amount for fins
  • 04
    Fiberfill stuffing - small bag for one amigurumi
  • 05
    Plastic safety eyes 8mm (2 pieces)

β€” Tools Required

  • 01
    Crochet hook size 3.5mm (E)
  • 02
    Stitch marker
  • 03
    Sewing needle
  • 04
    Scissors
  • 05
    Hot gun glue
  • 06
    Plastic safety eyes 8mm (2 pieces)
  • 07
    Polyester stuffing (fiberfill)

Progress Tracker

0% Complete

β€” Body up to the Tail :

Infos :

Begin with Blue yarn. *When the text is bold and underlined, switch to BLACK yarn*

Round 1 :

5 SC in an MR (5)

Round 2 :

2SC, INC, 2SC (6)

Round 3 :

INC, SC, 2INC, SC, INC (10)

Round 4 :

SC, 7INC, 2SC (17)

Round 5 :

4SC, (INC, SC) 4 times, INC, 4SC (22)

Round 6 :

5SC, (INC, SC) 6 times, 5SC (28)

Round 7 :

8SC, INC, 10SC, INC, 8SC (30)

Round 8 :

14SC, 2SC, 14SC (30)

Round 9-10 :

13SC, 4SC, 13SC (30)

Round 11 :

10SC, 10SC, 10SC (30)

Round 12 :

9SC, 2SC, 2SC, 4SC, 2SC, 2SC, 9SC (30)

Round 13 :

9SC, SC, 3SC, 4SC, 3SC, SC, 9SC (30)

Round 14 :

3SC, DEC, 3SC, DEC, 3SC, DEC, 2SC, DEC, SC, DEC, SC, 2SC, DEC, 3SC, DEC (24)

Round 15-16 :

6SC, 2SC, 3SC, 3SC, 2SC, 2SC, 6SC (24)

Round 17 :

2SC, DEC, 2SC, (DEC, 2SC) 3 times, DEC, 2SC, DEC (18)

Round 18 :

5SC, 9SC, 4SC (18)

Round 19 :

(SC, DEC) 2 times, (SC, DEC) 3 times, SC, DEC

Info :

*Stuffing*

Info :

Cut the Black and Blue yarn

Info :

Change to Yellow yarn

Round 20 :

Crochet 2 side together with 6SC

Round 21 :

Turn, 2CH, DC-INC 6 times (12)

Info :

Change to Black yarn

Round 22 :

Turn, CH, 12SC (12)

Info :

Weave in the yarn end and cut

β€” Dorsal Fins :

Part 1 (P1) :

Begin with Blue yarn (Make 2) Pick up the yarn from row 7, apart 8 stitch Row 1: (Chains 1, HDC, 3DC, HDC) in one stitch (5) Change to Yellow yarn Row 2: Turn, CH, 5SC (5) Weave in the yarn end and cut

Part 2 (P2) :

Begin with Blue yarn Pick up the yarn from R8 to R16, in the vertical line from head to tail Row 1: (Chains 1, SC, 7DC, SC) in one stitch (9) Change to Black yarn Row 2: Turn, CH, 9SC (9) Weave in the yarn end and cut

Info :

Attach the eyes at R5-R6, apart 8 stitch

Assembly Instructions

  • Attach safety eyes at rounds R5-R6 spaced about 8 stitches apart; secure according to the safety eye manufacturer instructions.
  • Pick up yarn stitches for dorsal fin Part 1 from row 7 about 8 stitches apart and work the fin as instructed, then weave in ends.
  • Pick up yarn vertically from R8 to R16 for dorsal fin Part 2 along the line from head to tail and sew/weave to secure, then tidy ends.
  • Stuff the body before completing the final decreases so the shape forms correctly, then finish closing and weave in yarn ends.
  • After color changes and finishing rows, weave in the yarn tails and cut them flush; use hot glue sparingly for small accents if desired.

Important Notes

  • πŸ’‘Use a stitch marker to mark the start of each round when working continuous spirals to avoid losing your place.
  • πŸ’‘Stuff the fish gradually and firmly before finishing the final decreases to keep the body smooth and well-shaped.
  • πŸ’‘Weave and trim yarn ends neatly after each color change to prevent loose tails showing on the surface.
  • πŸ’‘When attaching safety eyes, ensure they are firmly secured and placed between the specified rounds to maintain proportions.

This adorable Blue Tang (Dory-style) amigurumi is a bright, cheerful project that makes a lovely handmade gift. The pattern combines simple shaping with exciting color changes for a fun intermediate challenge. Enjoy making your own underwater friend and display it with pride! 🧢🐟

You ask,

we answer.

FAQs

What size will the finished piece be?

The finished amigurumi measures approximately a small palm-sized fish when using Super Bulky yarn and a 3.5mm hook; exact size will vary with tension and yarn brand.

Can I use different yarn weights for this pattern?

Yes, you can substitute yarn weights, but your final size will change; adjust the hook size accordingly and be aware that stitch counts will result in a different finished dimension.

Do I need prior crochet experience for this pattern?

This pattern is rated intermediate because it includes color changes, picking up stitches for fins, and shaping with increases/decreases; familiarity with single crochet, increase and decrease is recommended.

How long does this project typically take to complete?

Most crocheters complete this project in 5-7 hours, depending on experience, speed, and how much time is spent on finishing and details.