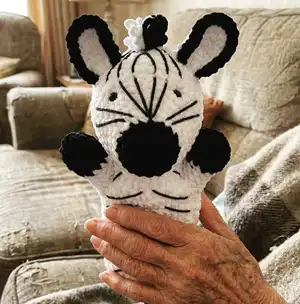
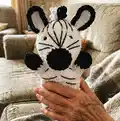
Make a charming zebra hand puppet using plush yarn and simple amigurumi techniques. This pattern guides you step-by-step through the head, ears, mane, arms and body with clear rounds and helpful assembly notes. You will learn loop stitches, embroidery details and how to attach parts for a professional finish. Perfect for gifting or playtime, this puppet brings handmade joy to little hands.
Progress Tracker
0% Complete
— Head :
Info :
Use the black yarn.
R 3 :
(1 sc, inc) * 6 (18)
Info :
Change the yarn to white
R 5 :
(2 sc, inc) * 6 (24)
R 6 :
6 sc, inc, 4 sc, inc, 4 sc, inc, 7 sc (27)
R 7 :
7 sc, inc, 5 sc, inc, 5 sc, inc, 7 sc (30)
R 8 :
8 sc, inc, 6 sc, inc, 6 sc, inc, 7 sc (33)
R 9 :
9 sc, inc, 7 sc, inc, 7 sc, inc, 7 sc (36)
R 10 :
10 sc, inc, 8 sc, inc, 8 sc, inc, 7 sc (39)
R 11 :
11 sc, inc, (4 sc, inc) * 4 times, 7 sc (44)
R 12-17 :
44 sc (6 rounds)
R 18 :
dec, (4 sc, dec) * 7 times (36)
R 19 :
(4 sc, dec) * 6 (30)
R 20 :
(3 sc, dec) * 6 (24)
Info :
Insert safe plastic eyes. Fix eyes between 10 and 11 rounds from MR on the nose. The distance between the eyes is 13 sc.
Info :
Stuff the piece with fiber filler
R 21 :
(2 sc, dec) * 6 (18)
R 22 :
(1 sc, dec) * 6 (12)
Info :
Draw the yarn through 6 front loops and tighten. Cut and secure the yarn.
Info :
HOW TO CLOSE A HOLE IN AMIGURUMI https://youtu.be/DdqCjjfLtXA
Info :
HOW TO INDENT AMIGURUMI EYES https://youtu.be/ta3Hl1hU8SY
Info :
Use the black cotton yarn. Take the thread. Pull it through the back of the head and pull it out above the right eye. Leave the tail on back head's part.
Info :
Pass the needle from below under the left eye and pull out under the right eye. Make sure that the yarn falls from the inside of the left eye.
Info :
Next, pass the needle from above the right eye, making sure that the thread lies on the inside of the eye. And pull out the needle in the same place behind the head. Tighten both threads so that the eyes are sunken. Tie a knot, hide the tail inside the head.
— Ears :
Info :
Use the white yarn.
R 2 :
(2 inc, 1 sc) * 2 times (10)
R 3 :
3 inc, 2 sc, 3 inc, 2 sc (16)
R 4 :
1 sc, 4 inc, 4 sc, 4 inc, 3 sc (24)
Info :
Cut the white yarn.
Info :
Skip 4 st, attach the black yarn, make 19 sc around ear, sl st. Cut the yarn. Make 2 ears.
Info :
Sew ears between 4-5 rounds from the eyes. Distance 11 st.
Info :
Sew the back of both ears closer to each other. Cut and secure all yarn tails.
— Face Embroidery :
Info :
Use the black cotton yarn and a large needle.
Info :
Embroider lines on the face as shown on pictures. Cut and secure the yarn.
— Mane :
Info :
Use the white plush yarn.
Info :
Make 20 ch. Starting in the second loop from the hook. Continue crocheting with loop stitches.
Info :
Leave the tail for sewing. Cut it.
Info :
Attach the black yarn to the first st in the round 1.
Info :
Cut the yarn. The mane is ready.
Info :
Sew the mane to the head.
— Arms :
Info :
Use the black plush yarn. Crochet hook 4.5 mm.
R 3 :
(2 sc, inc) * 4 (16)
Info :
Change the yarn to white
R 6 :
(2 sc, dec) * 4 (12)
Info :
Make sl st, cut the yarn. Don't stuff. Make 2 pieces.
— Body :
Info :
Use the white plush yarn. Crochet hook 4.5 mm.
Info :
Leave the tail for sewing, begin crochet without sl st. Make 24 ch, sl st in the first loop. Make a circle.
R 2 :
(3 sc, inc) * 6 (30)
R 3 :
(4 sc, inc) * 6 (36)
R 4 :
(5 sc, ins) * 6 (42)
R 5 :
crochet together with arm - 7 sc, 13 sc only on the body, 7 sc together with another arm, 15 sc only on the body (42)
Info :
Crochet sc2tog on both sleeves sides to avoid holes.
Info :
HOW TO CROCHET SC2TOG https://youtu.be/tZqOHv2NJhM
R 6 :
sc2tog, crochet only on the arm - 4 sc, sc2tog, 12 sc only on the body, sc2tog, 4 sc only on the another arm, sc2tog, 14 sc only on the body (38)
R 7 :
dec, 2 sc, dec, 12 sc, dec, 2 sc, dec, 14 sc (34)
Info :
Make 1 sc, 1 sl st, cut and secure the yarn.
Info :
Sew the body to the head as shown in the pictures and video below.
Info :
HOW TO SEW BODY WITH HEAD https://youtu.be/QTUIJCnqP6E
Info :
Use the black yarn and a large needle. Embroider lines on the body. Or don't embroider if you want.
— Final Notes :
Info :
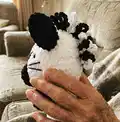
CONGRATULATIONS! Your hand puppet is ready
This soft zebra puppet pattern is a delightful project that blends plush texture with playful details for a lovable handmade toy. It makes a perfect gift or a meaningful addition to storytime puppets for kids. The pattern includes clear rounds, photos and helpful finishing tips so you can create a polished, expressive zebra. 🧶🦓