๐Ÿงถ Beautiful โœจ Detailed ๐Ÿ’ Adorable

WRN's Race Track Mat Pattern

WRN's Race Track Mat Pattern
4.2โ˜… Rating
5-7 Hours Time Needed
2.8K Made This
โœ‚๏ธ

Intermediate Level

Ideal for those with basic crochet experience, featuring slightly more advanced stitches and techniques to expand your skills.

โฑ๏ธ

Weekend Treat

Takes 5-7 hours, making it an enjoyable project to finish over a couple of days.

๐Ÿก

Cozy Accent

A warm touch for your space that transforms ordinary corners into inviting nooks filled with handmade charm.

About This WRN's Race Track Mat Pattern

This pattern creates a race track play mat with concentric ovals, bold color rounds, and a lane dividing dashed line. It uses worsted weight yarn with simple double crochet rounds and color changes for impact. The pattern includes step-by-step round instructions with photo guidance for color joins and carrying unused yarn.

WRN's Race Track Mat Pattern crochet pattern - detailed view of completed project

Finished mat measures approximately 56cm x 35cm (22"x14"). The pattern includes tips for a larger version using bulkier yarn and larger hook sizes.

Why You'll Love This WRN's Race Track Mat Pattern

I absolutely love this pattern because it turns simple rounds into a playful, practical piece for kids and car collectors. I enjoy the color-change moments โ€” they add personality and a lot of visual interest. I also love that it is adaptable: you can scale it up with bulkier yarn or change colors to match a nursery. Making this mat feels rewarding because it is quick to work and becomes a toy and decor item in one.

WRN's Race Track Mat Pattern step 1 - construction progress WRN's Race Track Mat Pattern step 2 - assembly progress WRN's Race Track Mat Pattern step 3 - details and accessories WRN's Race Track Mat Pattern step 4 - final assembly and finishing

Switch Things Up

I love to customize this mat by changing the colour palette โ€” try pastel tones for a nursery or bold primaries for a playroom.

I sometimes swap worsted yarn for bulky yarn and a larger hook to create a chunkier, cozier floor mat that doubles as a soft play surface.

I will make a miniature keychain version by using finer yarn and a smaller hook to create a tiny oval perfect for dollhouses or ornaments.

I like adding a non-slip rug backing or stitching on a felt base for extra durability when this mat will be used on smooth floors.

I often experiment with the width of the coloured rings: add additional dc rounds in the sections between increases for a wider track lane.

I sometimes replace the dashed lane with embroidery or chain-stitched lines for a different look and texture.

I also enjoy alternating different two-colour patterns around the edge (for instance blue/white) to coordinate with room decor or toy cars' colours.

I recommend trying different border finishes โ€” a round of crab stitch or a single crochet edge in contrasting colour gives a clean, finished look.

I occasionally carry the unused colour inside the last loop of the stitch as you work to keep the back neater and reduce ends to weave in later.

I encourage creating matching accessories such as small crash barriers (crocheted tubes) or tiny cones to make a full play set around the mat for imaginative play.

Common Mistakes & How to Fix Them

โœ— Missing stitch in the starting chain will offset your alternating colour round counts; double check your chain count and mark the first stitch before joining. โœ— Not placing stitch markers at increases makes locating the corners harder as the mat grows; place a marker at the first stitch of each increase to keep track. โœ— Carrying the unused colour incorrectly can create bulky strands along the edge; carry the yarn at the base of the stitches and tension it snugly but not tight. โœ— Changing colour on the wrong yarn over will create a loose or messy join; always bring in the new colour on the last yarn over (yo) of the last dc in the sequence as instructed.

WRN's Race Track Mat Pattern

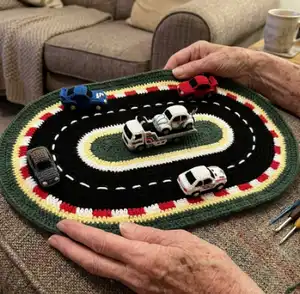
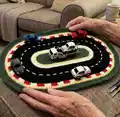
Make a playful race track mat that is perfect for playtime, nursery decor, or a display mat for toy cars. This project uses simple rounds and color changes to create a bold racetrack design with lane markings and an outer border. Follow the step-by-step round instructions and photos to create a sturdy, finished mat you and the kids will love.

Intermediate 5-7 Hours

Materials Needed for WRN's Race Track Mat Pattern

โ€” Main Fabric

  • 01
    Worsted/Medium weight yarn (#4) in Green (main center and final rounds) - quantity as needed (approx several hundred grams depending on mat size)
  • 02
    Worsted/Medium weight yarn (#4) in Black - majority of rounds for track (approx several hundred grams)
  • 03
    Worsted/Medium weight yarn (#4) in White - for inner ring and alternating stripe details (approx small skein)
  • 04
    Worsted/Medium weight yarn (#4) in Red - for alternating stripe details (approx small skein)
  • 05
    Note: For a larger version use Bulky weight yarn (5) and larger hooks as suggested in instructions.

โ€” Tools Required

  • 01
    Crochet hook size 3.5mm for main rounds (as used in pattern)
  • 02
    Crochet hook size 4mm for final rounds and edging
  • 03
    Stitch markers (to mark increases and start of rounds)
  • 04
    Darning needle / yarn needle for weaving in ends and for sewn lane dashes
  • 05
    Approx. 3 feet of white yarn for the lane dividing dash
  • 06
    Scissors

Progress Tracker

0% Complete

โ€” Main Mat :

Info :

Starting with GREEN yarn, Chain 43.

Round 1 :

dc in second chain from hook, dc in each stitch along the chain until the last chain. In the last chain place 4 dc, then place a dc in each stitch along the other side of the chain, on the end turning chain (shown below) place 4 dc, join with a slip stitch to the first dc

Round 2 :

Chain 2, dc in the same stitch as the chain and in each stitch until you reach the 4 end dc. Place 2 dc in each of the four end stitches., dc in each stitch until you reach the other end with 4 dc, place 2 dc in each of the four end stitches, slip stitch to the first dc of the round

Info :

When adding additional rounds, increases will be added at each end of the oval (dcINC = 2 dc in the same stitch to make an increase) The same pattern repeats along the sides, but the bolded sections increase on the ends. ***Placing a stitch marker in the first stitch of each increase helps in seeing where the next round of increases will be.

Round 3 :

Chain 2, dc in the same stitch as the chain. dc in each stitch across straight stretch, (dcINC, dc) x4, dc in each stitch across, (dcINC, dc) x4, ***on the last yo, of the last dc of the round, change your yarn to YELLOW*** (see photos below), sl st to the first dc of the round

Info :

From Round 4 onwards, 5 increases are added to each end of the oval to ensure the mat lags flat.

Round 4 :

Chain 2, dc in the same stitch as the chain. dc in each stitch across straight stretch, (dcINC, 2dc) x4, dcINC, dc across straight stretch, (dcINC, 2dc) x4, dcINC, ***on the last yo, of the last dc of the round, change your yarn to WHITE***, sl st to the first dc of the round

Round 5 :

Chain 2, dc in the same stitch as the chain. dc in each stitch across straight stretch, (dcINC, 3dc) x4, dcINC, dc across straight stretch, (dcINC, 3dc) x4, dcINC, dc in each st until end of round, ***on the last yo, of the last dc of the round, change your yarn to BLACK*** sl st to the first dc of the round

Round 6 :

Chain 2, dc in the same stitch as the chain. dc in each stitch across straight stretch, (dcINC, 4dc) x4, dcINC, dc across straight stretch, (dcINC, 4dc) x4, dcINC, dc in each st until end of round, sl st to the first dc of the round

Round 7 :

Chain 2, dc in the same stitch as the chain. dc in each stitch across straight stretch, (dcINC, 5dc) x4, dcINC, dc across straight stretch, (dcINC,5dc) x4, dcINC, dc in each st until end of round, sl st to the first dc of the round

Round 8 :

Chain 2, dc in the same stitch as the chain. dc in each stitch across straight stretch, (dcINC, 6dc) x4, dcINC, dc across straight stretch, (dcINC, 6dc) x4, dcINC, dc in each st until end of round, sl st to the first dc of the round

Round 9 :

Chain 2, dc in the same stitch as the chain and in each stitch across straight stretch, (dcINC, 7dc) x4, dcINC, dc across straight stretch, (dcINC, 7dc) x4, dcINC, dc in each st until end of round, sl st to the first dc of the round

Round 10 :

Chain 2, dc in the same stitch as the chain and in each stitch across straight stretch, (dcINC, 8dc) x4, dcINC, dc across straight stretch, (dcINC, 8dc) x4, dcINC, dc in each st until end of round, sl st to the first dc of the round

Round 11 :

Chain 2, dc in the same stitch as the chain and in each stitch across straight stretch, (dcINC, 9dc) x4, dcINC, dc across straight stretch, (dcINC, 9dc) x4, dcINC, dc in each st until end of round, sl st to the first dc of the round

Round 12 :

Chain 2, dc in the same stitch as the chain and in each stitch across straight stretch, (dcINC, 10dc) x4, dcINC, dc across straight stretch, (dcINC, 10dc) x4, dcINC, dc in each st until end of round, sl st to the first dc of the round

Round 13 :

Chain 2, dc in the same stitch as the chain and in each stitch across straight stretch, (dcINC, 11dc) x4, dcINC, dc across straight stretch, (dcINC, 11dc) x4, dcINC, dc in each st until end of round, ***on the last yo, of the last dc of the round, change your yarn to RED or WHITE***, sl st to the first dc of the round

Round 14 :

Use alternating red and white yarn every four stitches, carrying the unused colour along the round at the base of the stiches. Same as all the other colour changes, you'll want to bring in the new colour on the last yo of the last dc of the sequence. Chain 2, dc in the same stitch as the chain and in each stitch across straight stretch, (dcINC, 12dc) x4, dcINC, dc across straight stretch, (dcINC, 12dc) x4, dcINC, dc in each st until end of round, ***on the last yo, of the last dc of the round, change your yarn to YELLOW***, sl st to the first dc of the round

Info :

***In sample shown above a stitch was missed in the beginning chain, leaving me two stitches short for the alternating colour round. Double checking stitch counts and using stitch markers will avoid this issue ;)

Round 15 :

Chain 2, dc in the same stitch as the chain and in each stitch across straight stretch, (dcINC, 13dc) x4, dcINC, dc across straight stretch, (dcINC, 13dc) x4, dcINC, dc in each st until end of round, ***on the last yo, of the last dc of the round, change your yarn to GREEN*** sl st to the first dc of the round

Round 16 :

Chain 2, dc in the same stitch as the chain and in each stitch across straight stretch, (dcINC, 14dc) x4, dcINC, dc across straight stretch, (dcINC, 14dc) x4, dcINC, dc in each st until end of round, sl st to the first dc of the round

Round 17 :

Chain 2, dc in the same stitch as the chain and in each stitch across straight stretch, (dcINC, 15dc) x4, dcINC, dc across straight stretch, (dcINC, 15dc) x4, dcINC, dc in each st until end of round, sl st to the first dc of the round

Round 18 :

with a 4mm hook, Chain 1, sc in each st, slip stitch to the first stitch in the round.

Info :

Using a darning needle weave in all ends.

Item - Lane Dividing Dash (P1) :

Using a darning needle and approx. 3 feet of white yarn, create the lane dividing dash using the line between the four and fifth rounds of black as a guide. Dashes on the sample shown are woven through the space every two stitches from the front to the back, repeating this process until you meet the start and tie off. Weave in ends.

Info :

For a larger version, switch the yarn to a bulky weight(5) and use a 5mm hook for the main mat and 5.5mm or 6mm for the final edge single crochet round.

Info :

VROOM! Ready for some wheels to hit the track! Thanks so much for purchasing.

Assembly Instructions

  • Weave in all ends using a darning needle after completing the final round to create a tidy finish.
  • Create the lane dividing dash with approx. 3 feet of white yarn, weaving dashes through every two stitches from front to back along the guide line between rounds 4 and 5, then tie off and weave in ends.
  • Bring in new colours on the last yarn over (yo) of the last dc in the sequence to make neat colour joins and carry unused colours at the base of the stitches when alternating red and white.
  • Join each round with a slip stitch to the first dc of the round as directed to keep an even round join and align increases at the ends.

Important Notes

  • ๐Ÿ’กPlace a stitch marker in the first stitch of each increase to identify where each round's increases begin and to keep the shape consistent.
  • ๐Ÿ’กBring in the new colour on the last yarn over of the last dc in the sequence to ensure a clean, neat colour change.
  • ๐Ÿ’กCarry the unused colour along the base of the stitches when alternating red and white, keeping the carried strand snug but not tight.
  • ๐Ÿ’กWeave in ends as you go when possible and double check stitch counts to avoid running short during alternating colour rounds.

This Race Track Mat Pattern brings playful racing fun right into your home and makes a great gift for kids and car lovers alike! ๐Ÿ Use the step-by-step rounds and photos to get a smooth, flat oval with crisp colour changes. ๐Ÿš— Whether you keep it small or scale it up with bulky yarn, this mat is sure to spark joy and playtime. ๐Ÿงถ

You ask,

we answer.

FAQs

What size will the finished piece be?

The completed mat measures approximately 56cm x 35cm (22"x14") when using the recommended worsted weight yarn and hooks.

Can I use different yarn weights for this pattern?

Yes, you can change the yarn weight, but this will affect the finished size; for a larger mat use bulky weight (5) and 5mm hook for the main mat and 5.5mm or 6mm for the final edge.

Do I need prior crochet experience for this pattern?

This pattern is rated intermediate due to round shaping and multiple colour changes, so basic knowledge of double crochet, increases and slip stitch joins is recommended.

How long does this project typically take to complete?

Most crocheters complete this project in 5-7 hours, though time will vary based on experience level, yarn choice and interruptions.