🧢 Beautiful ✨ Detailed πŸ’ Adorable

Wolf Hand Puppet Amigurumi Pattern

Wolf Hand Puppet Amigurumi Pattern
4.2β˜… Rating
5-7 Hours Time Needed
3.0K Made This
βœ‚οΈ

Intermediate Level

Ideal for those with basic crochet experience, featuring slightly more advanced stitches and techniques to expand your skills.

⏱️

Weekend Treat

Takes 5-7 hours, making it an enjoyable project to finish over a couple of days.

🧸

Cute Companion

An adorable friend to cherish, handcrafted with love to bring comfort and joy for years to come.

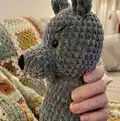
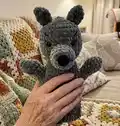
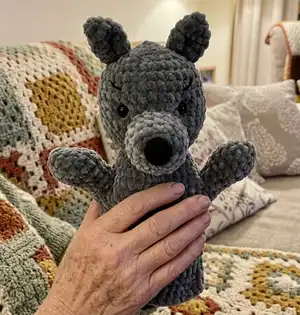
About This Wolf Hand Puppet Amigurumi Pattern

This pattern teaches you how to crochet a wolf hand puppet using super-bulky plush yarn and simple amigurumi techniques. It includes full round-by-round instructions for head, muzzle, nose, ears, arms and body, plus assembly tips and finishing touches. The puppet measures approximately 27 cm (10") tall when completed.

Wolf Hand Puppet Amigurumi Pattern crochet pattern - detailed view of completed project

You will use two different yarn weights for texture and small details with clear hook size recommendations. The pattern includes placement notes for eyes, sewing guidance and helpful links for common techniques.

Why You'll Love This Wolf Hand Puppet Amigurumi Pattern

I absolutely love this pattern because it transforms soft, super-bulky yarn into a charming, tactile puppet that kids and adults both adore. I enjoy how quickly the head and body grow with large stitches, making it satisfying to see progress fast. I also love the small finishing detailsβ€”like the indenting technique for eyes and the embroidered eyebrowsβ€”that bring personality to the wolf. This pattern balances simplicity with character so you can customize facial expressions and colors easily.

Wolf Hand Puppet Amigurumi Pattern step 1 - construction progress Wolf Hand Puppet Amigurumi Pattern step 2 - assembly progress Wolf Hand Puppet Amigurumi Pattern step 3 - details and accessories Wolf Hand Puppet Amigurumi Pattern step 4 - final assembly and finishing

Switch Things Up

I love changing colors to give each puppet its own personality; try warm browns, soft creams, or even playful pastels for a unique look.

Want a mini version? Use a lighter weight yarn and a smaller hook β€” your puppet will shrink and become perfect for keychains or tiny gifts.

To add posability, I sometimes insert a small wire in the arms so they can be posed; secure and wrap the wire carefully so it does not poke through the yarn.

I often swap the plastic eyes for embroidered eyes for a safer toy option for small children; this gives a softer, handcrafted appearance.

Try adding tiny accessories like a crocheted scarf, hat, or felt patches to make a themed character β€” seasonal colors work great for holiday gifts.

If you want more definition on the muzzle, use a contrasting yarn color for the muzzle rounds to create a two-tone snout effect.

For a different texture, use faux fur or boucle yarn for the body but keep plush yarn for facial features so eyes and nose stay secure.

I recommend experimenting with eyebrow shapes by changing the angle and length of stitches when embroidering; it changes the puppet's expression dramatically.

Try making a set of forest animals using the same body base and different head shapes β€” bunnies, bears, and foxes make a charming collection.

I also like to personalize puppets with tiny embroidered initials or a small sewn tag to make them special gifts.

Common Mistakes & How to Fix Them

βœ— Skipping the placement note for eyes leads to uneven facial features; follow the instruction to fix eyes between rounds 10 and 11 and measure 7 single crochets between them to ensure symmetry. βœ— Overstuffing the head causes distortion and makes sewing difficult; stuff gradually and stop when the shape is firm but still pliable, adding small amounts at a time. βœ— Not leaving tails for sewing results in weak joins; always leave the tail for sewing where the pattern instructs and use it to attach pieces securely. βœ— Crocheting arms without checking the sleeve join creates holes; work sc2tog on both sleeve sides as instructed to avoid gaps and maintain a neat join. βœ— Ignoring tension differences between plush and cotton yarn makes the muzzle or nose misfit; use the recommended hook sizes (4.5 mm for plush, 2.0 mm for cotton) and adjust tension to match the pattern.

Wolf Hand Puppet Amigurumi Pattern

Make a cuddly wolf hand puppet with this easy-to-follow amigurumi pattern. You will crochet a soft plush puppet using super-bulky yarn with clear step-by-step rounds, photos, and helpful tips. Perfect for gifts, puppet play, or a cozy handmade companion. Enjoy crocheting and customizing your own wolf puppet!

Intermediate 5-7 Hours

Materials Needed for Wolf Hand Puppet Amigurumi Pattern

β€” Main Fabric

  • 01
    Super bulky plush yarn - Himalaya Dolphin Baby (120m - 100g) or (131 yd - 3.52 oz), dark gray color (1 skein, β„–80369)
  • 02
    Cotton sport yarn - Yarn Art Jeans (160m - 50g) or (175 yd - 1.76 oz) for details
  • 03
    Black cotton yarn for nose and eyebrows (β„–53) - small amount
  • 04
    Plastic eyes (2 pieces), diameter 8 mm
  • 05
    Fiber filler - small amount for head, muzzle and nose

β€” Tools Required

  • 01
    Crochet hook size 4.5 mm
  • 02
    Crochet hook size 2.0 mm
  • 03
    Large needle (for sewing and embroidery)
  • 04
    Knitting markers (stitch markers)
  • 05
    Scissors

Progress Tracker

0% Complete

β€” Head :

Round 1 :

6 sc in MR (6)

Round 2 :

inc * 6 (12)

Round 3 :

(1 sc, inc) * 6 (18)

Round 4 :

(2 sc, inc) * 6 (24)

Round 5 :

(3 sc, inc) * 6 (30)

Round 6 :

(4 sc, inc) * 6 (36)

Round 7-13 :

36 sc (8 rounds)

Round 14 :

(4 sc, dec) * 6 (30)

Info :

Insert safe plastic eyes. Fix eyes between 10 and 11 rounds from the head's top. The distance between the eyes is 7 sc.

Round 15 :

(3 sc, dec) * 6 (24)

Info :

Stuff a piece with fiber filler

Round 16 :

(2 sc, dec) * 6 (18)

Round 17 :

dec * 9 (9)

Info :

Draw the yarn through 9 front loops and tighten. Cut and secure the yarn.

Info :

HOW TO CLOSE A HOLE IN AMIGURUMI https://youtu.be/DdqCijfLtXA

β€” Muzzle :

Info :

Use the dark gray plush yarn, hook 4.5 mm.

Round 1 :

6 sc in MR (6)

Round 2 :

inc * 6 (12)

Round 3 :

1 sc, 3 inc, 3 sc, 3 inc, 2 sc (18)

Round 4-6 :

18 sc - 3 rounds

Round 7 :

(4 sc, dec) * 3, sl st (15)

Info :

Stuff a piece with fiber filler. Leave the tail for sewing, cut the yarn.

Info :

Sew the muzzle under eyes in the middle.

β€” Nose :

Info :

Use the black cotton yarn and hook 2 mm.

Round 1 :

6 sc in MR (6)

Round 2 :

inc * 6 (12)

Round 3 :

12 sc

Round 4 :

(2 sc, inc) * 4 (16)

Round 5 :

16 sc

Round 6 :

(2 sc, dec) * 4 (12)

Info :

Leave 20 cm for sewing, cut the thread. Stuff the piece with fiber filler. Sew nose over the muzzle.

Info :

HOW TO INDENT AMIGURUMI EYES https://youtu.be/ta3HI1hU8SY

Info :

Use the black cotton yarn. Take the thread. Pull it through the back of the head and pull it out above the right eye. Leave the tail on back head's part.

Info :

Pass the needle from below under the left eye and pull out under the right eye. Make sure that the yarn falls from the inside of the left eye.

Info :

Next, pass the needle from above the right eye, making sure that the thread lies on the inside of the eye. And pull out the needle in the same place behind the head.

Info :

Tighten both threads so that the eyes are sunken. Tie a knot, hide the tail inside the head.

β€” Ears :

Info :

(2 pieces) Use the dark gray plush yarn, hook 4.5 mm.

Round 1 :

4 sc in MR (4)

Round 2 :

4 inc (8)

Round 3 :

(1 sc, inc) * 4 (12)

Round 4 :

12 sc

Round 5 :

(2 sc, inc) * 4 (16)

Round 6 :

16 sc

Info :

Leave 20 cm for sewing. Cut the thread. Sew ears on the head's top. Distance 6 rounds.

β€” Embroidery Eyebrows :

Info :

Use the black cotton yarn and a large needle. Embroider eyebrows.

β€” Arms :

Info :

Use the dark gray plush yarn. Crochet hook 4.5 mm.

Round 1 :

6 sc in MR (6)

Round 2 :

inc * 6 (12)

Round 3 :

(2 sc, inc) * 4 (16)

Round 4-5 :

16 sc (2 rounds)

Round 6 :

(2 sc, dec) * 4 (12)

Round 7-9 :

12 sc (3 rounds)

Info :

Make sl st, cut the yarn. Don't stuff. Make 2 pieces.

β€” Body :

Info :

Use the dark gray plush yarn. Crochet hook 4.5 mm. Leave the tail for sewing, begin crochet without sl st. Make 24 ch, sl st in the first loop. Make a circle.

Round 1 :

24 sc

Round 2 :

(3 sc, inc) * 6 (30)

Round 3 :

(4 sc, inc) * 6 (36)

Round 4 :

(5 sc, ins) * 6 (42)

Info :

HOW TO ATTACH ARM TO BODY https://youtu.be/Bq3PAUiOh2M

Round 5 :

crochet together with arm - 7 sc, 13 sc only on the body, 7 sc together with another arm, 15 sc only on the body (42)

Info :

Crochet sc2tog on both sleeves sides to avoid holes.

Info :

HOW TO CROCHET SC2TOG https://youtu.be/tZqOHv2NJhM

Round 6 :

sc2tog, crochet only on the arm - 4 sc, sc2tog, 12 sc only on the body, sc2tog, 4 sc only on the another arm, sc2tog, 14 sc only on the body (38)

Round 7 :

dec, 2 sc, dec, 12 sc, dec, 2 sc, dec, 14 sc (34)

Round 8 :

34 sc, ch

Round 9-14 :

34 dc (6 rounds)

Info :

Sew the body to the head as shown in the photos

β€” Finishing :

Info :

Sew the body to the head as shown in the photos. Embroider eyebrows with black cotton yarn. Make sure all tails are hidden and ends are secured.

Info :

CONGRATULATIONS! Your hand puppet is ready

Assembly Instructions

  • Sew the muzzle under the eyes in the middle using the tail left for sewing, securing it evenly so the muzzle sits centered under the eyes.
  • Sew ears on the head's top, spacing them about 6 rounds apart from each other as instructed, leaving 20 cm tails for sewing to secure position.
  • Attach arms to the body during Round 5 by crocheting together with the arms as described: 7 sc, 13 sc only on the body, 7 sc together with another arm, 15 sc only on the body (42), then continue shaping and sc2tog to avoid holes.
  • Sew the body to the head using a large needle and the tail left on the body; align the head opening to the top of the body and stitch firmly around the join for a neat finish.
  • Insert and secure plastic eyes between rounds 10 and 11 of the head, keeping 7 sc between the eyes; indent and sink eyes using black cotton thread as described, then hide tails inside the head.
  • Embroider eyebrows with black cotton yarn and a large needle to give the wolf its character, and weave in all ends securely.

Important Notes

  • πŸ’‘Leave tails for sewing where indicated to make assembly easier and stronger when joining parts together.
  • πŸ’‘Do not stuff the arms β€” the pattern specifies not to fill them so the puppet remains flexible for use.
  • πŸ’‘Place safety eyes before closing the head fully and follow the indenting steps carefully to achieve sunken eye placement.
  • πŸ’‘Use the recommended hook sizes (4.5 mm for plush yarn, 2.0 mm for cotton details) to match the pattern gauge and final size.
  • πŸ’‘Work sc2tog when joining sleeves to the body to avoid holes and maintain a tidy seam.

This sweet Wolf Hand Puppet pattern brings playful charm to your crochet projects and is perfect for storytelling and imaginative play. Make a set of forest friends or customize colors to match your style. Enjoy every stitch and share your handmade puppet with loved ones. 🧢✨

You ask,

we answer.

FAQs

What size will the finished piece be?

The finished hand puppet measures approximately 27 cm (10") tall when using the recommended super-bulky yarn and hook sizes.

Can I use different yarn weights for this pattern?

Yes, you can substitute yarn weights but the final size and texture will change; use an appropriate hook size and expect smaller yarn to produce a smaller, denser puppet.

Do I need prior crochet experience for this pattern?

This pattern is rated intermediate, so basic crochet knowledge (magic ring, sc, inc, dec, sl st) and some experience with joining and sewing amigurumi pieces is helpful.

How long does this project typically take to complete?

Most crocheters complete this project in 5-7 hours, depending on experience and how much time you spend on assembly and embroidery details.

Are the eye and nose instructions included?

Yes, the pattern includes full rounds for nose construction, eye placement guidance, and links to videos showing how to indent eyes and close holes.