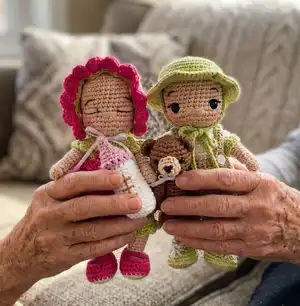
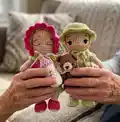
Create a charming Baby's Day Out set for your favorite amigurumi with this complete crochet pattern. Youll make a dress, bonnet, diaper cover with ruffles, sun hat, shorts with suspenders, shirt, shoes, and a matching diaper bag. The pattern uses small hooks and fingering/super-fine yarn for delicate, detailed accessories perfect for gifting or display. Clear step-by-step rows and rounds guide you through each piece so you can enjoy a creative, satisfying crochet session.
Progress Tracker
0% Complete
— Dress :
Info :
Using Yarn Over (v-stitch). Starting with 1.5mm hook. Starting with Light Lime Green yarn
Row 1 :
Starting in 2nd ch from hook, 6sc, INC, 10sc, INC, 6sc, ch4 (or number of chains required for button size), turn
Row 2 :
5sc, INC, 2sc, INC, 8sc, INC, 2sc, INC, 5sc, ch1, turn (Fig. 1)
Row 3 :
5sc, ((1sc, ch3, 1sc) in next sc) x5, 10sc, ((1sc, ch3, 1sc) in next sc) x5, 5sc, ch4 (or number required for button size), turn (Fig. 2)
Row 4 :
5sc, ch4 (sk 5 ruffle bumps), 10sc, ch4 (sk 5 ruffle bumps), 5sc, ch1, turn (Fig. 3)
Row 5 :
5sc, 4sc (across ch4 space), 10sc, 4sc (across ch4 space), 5sc, ch1, turn
Info :
Change to 2.0mm hook. Change to Bright Pink yarn
Row 6 :
sk 1sc, ((2dc, ch2, 2dc) in next sc, sk 2sc) x8, (2dc, ch2, 2dc) in next sc, sk 1sc, 1sc, ch2, turn (Fig. 4)
Row 7-8 :
((2dc, ch2, 2dc) in next ch2 space) x9, 1dc in last dc, ch2, turn
Row 9 :
((3dc, ch2, 3dc) in next ch2 space) x9, 1dc in last dc
Info :
Finish off. Sew in ends. Sew 2 small buttons (6mm).
— Bonnet :
Info :
Using Yarn Over (v-stitch). Starting with 1.5mm hook. Starting with Bright Pink yarn
Rnd 3 :
(1sc, INC) x6 (18)
Rnd 4 :
(2sc, INC) x6 (24)
Rnd 5 :
(3sc, INC) x6 (30)
Rnd 6 :
(4sc, INC) x6 (Fig. 5) (36)
Info :
Change to 2.0mm hook. Change to Light Lime Green yarn
Rnd 7 :
ch1, sk 4sc, ((2dc, ch2, 2dc) in next sc, sk 3sc) x5, (2dc, ch2, 2dc) in next sc, sk 4sc, 1sc, sk last 6sc, ch2, turn (Working in rows)
Row 8 :
((2dc, ch2, 2dc) in next ch2 space) x6, 1dc in last dc, ch2, turn
Row 9 :
((2dc, ch2, 2dc) in next ch2 space) x6, 1dc in last dc, ch5, turn (Fig. 6)
Row 10 :
(Fig. 7) (1sc in ch2 space, ch2, 1dc in space between dcs, ch2) x5, 1sc in ch2 space, ch2, 1dc in last dc, ch1, turn
Info :
Change to Bright Pink yarn
Row 11 :
((1sc, 3dc, 1sc) in ch2 space) x12 (Fig. 8 & 9)
Info :
Finish off. Sew in ends. Weave 1/8" ribbon through ch2 spaces on Row 10.
— Diaper Cover :
Info :
Using Yarn Over (v-stitch). Starting with 1.5mm hook. Using Light Lime Green yarn. Note: If you prefer no ruffles on the bottom, then for Rnds 4-7, do 36sc (no BLO).
Row 1 :
Starting in 2nd ch from hook, 4sc, ch1, turn (Fig. 10)
Row 2-25 :
BLO 4sc, ch1, turn (24 rows) (Fig. 11)
Info :
Fold ends together. (Fig. 12) Insert hook through beginning chain and last sc of Row 25 to make a slst. (Fig. 13) Continue 3 more times until you have sewn the waistband ends together with 4 slsts. (Fig. 14) Without cutting yarn, turn slst seam to the inside.
Info :
Change to 2.0mm hook
Rnd 1 :
(3sc in next ridge) x12 (Fig. 15) (36) (Place stitch marker)
Rnd 4 :
28sc, BLO 8sc (36)
Rnd 5 :
BLO 8sc, 28sc (36)
Rnd 6 :
28sc, BLO 8sc (36)
Rnd 7 :
BLO 8sc, 28sc (Fig. 16) (36)
Working on right leg opening :
Rnd 9: ch2 (Fig. 17), sk 18sc (Fig. 18), (4sc, inv DEC) x3 (17)
Rnd 10 :
(1sc in next ch) x2, (3sc, inv DEC) x3 (14)
Rnd 11 :
((1sc, ch3, 1sc) in next sc) x14
Info :
Finish off with invisible join. (Fig. 19)
Working on left leg opening :
Rnd 9: Join yarn to next sc (where you finished Rnd 8) (Fig. 20), (4sc, inv DEC) x3, (1sc in next ch) x2 (17)
Rnd 10 :
(3sc, inv DEC) x3, 2sc (14)
Rnd 11 :
((1sc, ch3, 1sc) in next sc) x14
Info :
Finish off with invisible join. Sew in all ends. (Fig. 21)
— Ruffles :
Info :
Using Bright Pink yarn. With Diaper Cover upside down, join yarn to exposed loops from Rnds 4-7. (Fig. 22)
Ruffle Row :
4sc in each loop (Fig. 23) (x16 loops) (64)
Info :
You will have 2 rows of ruffles across the back of the diaper cover. (Fig. 24) Finish off. Sew in ends.
— Mary Jane Shoes (make 2) :
Info :
Using Yarn Under (x-stitch). 1.5mm hook. Starting with Beige yarn
Rnd 1 :
1sc in 2nd ch from hook, 2sc, 3sc across end in last ch, (now working opposite side) 2sc, INC (Fig. 25) (10)
Rnd 2 :
INC, 2sc, (INC) x3, 2sc, (INC) x2 (Fig. 26) (16)
Rnd 3 :
1sc, INC, 3sc, (INC, 1sc) x2, INC, 3sc, INC, 1sc, INC (Fig. 27) (22)
Info :
Change to Bright Pink yarn
Rnd 4 :
BLO 22sc (Fig. 28) (22)
Rnd 6 :
6sc, (inv DEC) x4, 6sc, inv DEC (Fig. 29) (17)
Rnd 7 :
5sc, ch4, sk 7sc, 5sc (Fig. 30) (14)
Info :
Finish with invisible join. Sew in ends.
— Shirt :
Info :
Using Yarn Over (v-stitch). 1.5mm hook. Starting with White yarn
Ch :
Ch 28 (4 chains are for the button loop, so add chains as necessary for button size)
Row 1 :
Starting in the 5th ch from hook, 6sc, INC, 10sc, INC, 6sc, ch1, turn (Fig. 31) (26)
Row 2 :
5sc, INC, 2sc, INC, 8sc, INC, 2sc, INC, 5sc, ch1, turn (30)
Row 3 :
30sc, ch1, turn (Fig. 32) (30)
Row 4 :
5sc, ch5 (sk 5sc), 10sc, ch5 (sk 5sc), 5sc, ch4 (or number of chains required for button size), turn (30)
Row 5 :
5sc, (1sc in front loop of next ch) x5 (Fig. 33, 34), 10sc, (1sc in front loop of next ch) x5, 5sc, ch1, turn (Fig. 35) (30)
Row 6-10 :
30sc, ch1, turn (30)
Row 11 :
30sc (Fig. 36) (30)
Info :
Finish off. Sew in ends.
— Sleeves :
Info :
(make 2) Join yarn to inside arm opening (Fig. 37), 7sc across the top half of arm opening (Fig. 38), ch1, turn
Outside arm opening :
7sc (across the 7sc) (Fig. 39, 40), (1sc in next ch) x5 across the bottom of arm opening (Fig. 41)
Info :
Change to Light Lime Green yarn (Fig. 42). Continue for 2 more rounds: 12sc each. Finish off with invisible join. Sew in ends.
Neck border :
Join Light Lime Green yarn to front right side of neckline, and surface slst across neckline (23 slst). Finish off. Sew in ends. Sew on 2 buttons (6mm).
— Shorts :
Info :
Using Yarn Over (v-stitch). Starting with 1.5mm hook. Using Beige yarn
Row 1 :
Starting in 2nd ch from hook, 4sc, ch1, turn
Row 2-25 :
BLO 4sc, ch1, turn (24 rows) (Fig. 43)
Info :
Fold ends together. (Fig. 44) Insert hook through beginning chain and last sc of Row 25 to make a slst. (Fig. 45) Continue 3 more times until you have sewn the waistband ends together with 4 slsts. (Fig. 46) Without cutting yarn, turn slst seam to the inside.
Info :
Change to 2.0mm hook
Rnd 1 :
(3sc in next ridge) x12 (same as Diaper Cover, see pg. 6) (Fig. 47) (36)
Working on right leg opening :
Rnd 9: ch2, sk 18sc, 18sc (20). Rnd 10: (1sc in next ch) x2, 18sc (20). Finish off with invisible join.
Working on left leg opening :
Rnd 9: Join yarn to next sc (where you finished Rnd 8) (Fig. 49), 18sc, (1sc in next ch) x2 (20). Rnd 10: 20sc (Fig. 50). Finish off with invisible join. Sew in all ends.
Suspender Straps :
(Make 2) Note: You can modify the length of the straps for your doll if needed. Ch 20 (4 chains are for the button loop, so add chains as necessary for button size). Starting in 5th ch from hook, 16sc. Leave a tail for sewing. Sew straps inside back of shorts at an angle so they can cross in the back. The end with the 4 chains will attach to buttons in the front. Sew buttons (6mm) on either side of the front of shorts.
— Sun Hat :
Info :
Using Yarn Over (v-stitch). 2.0mm hook. Using Light Lime Green yarn
Rnd 3 :
(1sc, INC) x6 (18)
Rnd 4 :
(2sc, INC) x6 (24)
Rnd 5 :
(3sc, INC) x6 (Fig. 52) (30)
Rnd 7-9 :
30sc (Fig. 53) (30)
Rnd 10 :
(2dc in next sc) x30 (Fig. 54) (60)
Info :
Finish off with invisible join. Sew in ends.
Hat Ties :
Join yarn to inside hat brim on sides opposite each other, and ch30. Finish off and cut yarn leaving a very small tail. Sew in ends where hat tie meets the hat brim.
— Diaper Bag :
Info :
Using Yarn Under (x-stitch). 2.0mm hook. Main Body of Bag Starting with Beige yarn
Row 1 :
Starting in 2nd ch from hook, 25sc, ch1, turn (25)
Row 2-4 :
25sc, ch1, turn (25)
Row 5 :
INC, 23sc, INC, ch1, turn (27)
Row 6-8 :
27sc, ch1, turn (27)
Row 9 :
INC, 25sc, INC, ch1, turn (29)
Row 10-12 :
29sc, ch1, turn (29)
Row 13 :
INC, 27sc, INC, ch1, turn (31)
Row 14-20 :
31sc, ch1, turn (31)
Row 21 :
BLO 31sc, ch1, turn (31)
Row 22-28 :
31sc, ch1, turn (31)
Row 29 :
BLO 31sc, ch1, turn (31)
Row 30-36 :
31sc, ch1, turn (31)
Row 37 :
DEC, 27sc, DEC, ch1, turn (29)
Row 38-40 :
29sc, ch1, turn (29)
Row 41 :
DEC, 25sc, DEC, ch1, turn (27)
Row 42-44 :
27sc, ch1, turn (27)
Row 45 :
DEC, 23sc, DEC, ch1, turn (25)
Row 46-48 :
25sc, ch1, turn (25) (Fig. 59)
Info :
Change to Bright Pink yarn
Row 49-58 :
25sc, ch1, turn (25)
Row 59 :
5sc, sk 2sc, 5dc in next sc, sk 4sc, (4tr, ch2, 4tr) in next sc, sk 4sc, 5dc in next sc, sk 2sc, 5sc, ch1 (do not turn) (30)
Creating border :
Continuing with Bright Pink yarn, 10sc along ends of rows, change to Beige yarn, 48sc along ends of rows, 3sc in corner, 23sc across beginning chs, 3sc in corner, 48sc along ends of rows, change to Bright Pink yarn, 10sc along ends of rows, 2sc in corner. Finish with invisible join. Sew in ends.
— Sides/Strap :
Using Light Lime Green yarn. Ch 9. Row 1: Starting in 2nd ch from hook, 8sc, ch1, turn (8). Row 2: 8sc, ch1, turn (8). Row 3: INC, 6sc, INC, ch1, turn (10). Row 4-12: 10sc, ch1, turn (10). Row 13: DEC, 6sc, DEC, ch1, turn (8). Row 14-20: 8sc, ch1, turn (8). Row 21: DEC, 4sc, DEC, ch1, turn (6). Row 22-76: 6sc, ch1, turn (6). Row 77: INC, 4sc, INC, ch1, turn (8). Row 78-84: 8sc, ch1, turn (8). Row 85: INC, 6sc, INC, ch1, turn (10). Row 86-94: 10sc, ch1, turn (10). Row 95: DEC, 6sc, DEC, ch1, turn (8). Row 96: 8sc, ch1, (do not turn) (8).
Info :
Creating border: 95sc along ends of rows (NOTE: place a stitch marker at 76th sc), 8sc across beginning chs, 95sc along ends of rows (NOTE: place a stitch marker at 76th sc), 8sc across Row 96. Finish with invisible join. Sew in ends.
— Bottle Pocket (Make 2) :
Using Light Lime Green yarn. Ch 9. Row 1: Starting in 2nd ch from hook, 8sc, ch1, turn (8). Row 2: 8sc, ch1, turn (8). Row 3: INC, 6sc, INC, ch1, turn (10). Row 4: INC, 8sc, INC, ch1, turn (12). Row 5-11: 12sc, ch1, turn (12). Row 12: 12sc, ch1 (do not turn) (12).
Creating border :
11sc along ends of rows, ch1, 8sc along beginning chs, ch1, 11sc along ends of rows, ch1, 12sc along Row 12. Finish with invisible join. Sew in ends.
Diaper Bag Assembly: Note: It is important that the bottom of the bottle pocket and the bottom of the side/strap line up with each other (8sc), and these should both line up with the 8sc at the end of rows on the main body of the bag which fall between the exposed front loops of Row 21 and 29. The following instructions are designed to make this easier, but if you find your count has gotten off, and they are not lining up, then make adjustments as necessary to align these ends!
Assembly Instructions
- Weave 1/8" ribbon through the ch2 spaces on Row 10 of the bonnet and tie or sew ends securely to form bonnet ties.
- Sew the waistband seam of the diaper cover by inserting the hook through the beginning chain and last sc of Row 25 and making 4 slsts, then continue the body and sew ruffles to the exposed loops from Rnds 4-7 as instructed.
- Attach the suspenders to the back inside of the shorts and sew the strap ends at an angle so they can cross on the back; the end with 4 chains will button to the front of the shorts.
- For the diaper bag assembly, align the bottle pocket bottom and the bottom of the side/strap so they match the 8sc positions between the exposed front loops of Row 21 and Row 29, then join with slst and continue to sc across to create a clean seam.
- Finish the shoes by adding white shoelaces and tying a tiny bow; secure the knot with a dab of craft glue and trim ends to prevent fraying.
Important Notes
- 💡Use stitch markers to keep track of rounds and openings; place a marker at the start of every round and to mark leg and arm openings.
- 💡Pay attention to Yarn Over (v-stitch) versus Yarn Under (x-stitch) notes at the start of each item because these techniques change tension and appearance.
- 💡If parts are fitting too tightly, try increasing one hook size for those clothing pieces; conversely drop a hook size to achieve firmer structure for shaped items.
This Sweet Handfuls Baby's Day Out set brings tiny, wearable charm to your amigurumi collection with coordinated pieces that are full of personality. Whether youre gifting or decorating, these miniature clothes and accessories are made to delight and last. Make the full set and enjoy the detailed finishing touches that make each piece special. 🧶✨😊