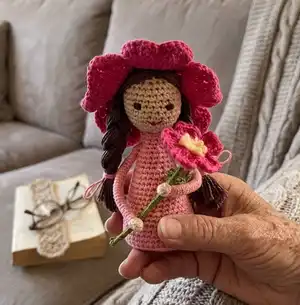
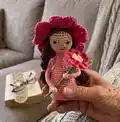
Create a tiny, hand-stitched Wild Rose Fairy full of charming details — from her petal hat to braided hair and a delicate flower. This pattern walks you through each part step-by-step so you can make a beautiful decorative amigurumi. Perfect as a thoughtful gift or a sweet shelf accent for your home. Follow the clear rounds and assembly notes to bring her to life.
Progress Tracker
0% Complete
— Head :
Round 1 :
2 ch and 6 sc into first ch (6 sts)
Round 2 :
(inc) X 6 (12 sts)
Round 3 :
(1 sc, inc) X 6 (18 sts)
Round 4 :
(2 sc, inc) X 6 (24 sts)
Round 5-11 :
sc around (24 sts)
Round 12 :
(2 sc, dec) X 6 (18 sts)
Round 13 :
(1 sc, dec) X 6 (12 sts)
Info :
Stuff the head tightly with filler after round 13. It is easier to push it inside with ends of the scissors. (I got a 2 cm (0,8 in) high doll's head)
Round 14 :
(dec) X 6 (6 sts)
Round 15 :
decrease and close the hole with a slip stitch.
Info :
ADVICE: Pull the initial thread end out between rounds 2 and 3, it would serve as the marker and help you to count the rounds. It works good for all pieces. One more thing here – when the piece becomes voluminous it is a good idea to fold it in half while working.
— Body :
Round 1 :
2 ch and 6 sc into first ch (6 sts)
Round 2 :
(inc) X 6 (12 sts)
Round 3 :
(1 sc, inc) X 6 (18 sts)
Round 4 :
(2 sc, inc) X 6 (24 sts)
Round 5 :
(3 sc, inc) X 6 (30 sts)
Round 6 :
(4 sc, inc) X 6 (36 sts)
Round 7 :
(5 sc, inc) X 6 (42 sts)
Info :
Our circle resembles a hexagon now. Now make a circular bottom from an old plastic card – outline the hexagon with a pencil and cut it out with a little less diameter.
Round 8 :
Make single crochets perpendicular to the previous round – you should work not in the top of the stitch but around the post of the single crochet; insert the hook perpendicular to the surface of the circle. (42 sts)
Round 9-10 :
sc around (42 sts)
Round 11 :
(5 sc, dec) X 6 (36 sts)
Round 12-14 :
sc around (36 sts)
Round 15 :
(4 sc, dec) X 6 (30 sts)
Round 16-18 :
sc around (30 sts)
Round 19 :
(3 sc, dec) X 6 (24 sts)
Info :
After round 19 place the circle inside!
Round 20-22 :
sc around (24 sts)
Round 23 :
(2 sc, dec) X 6 (18 sts)
Round 24-26 :
sc around (18 sts)
Round 27 :
(1 sc, dec) X 6 (12 sts)
Round 28-29 :
sc around (12 sts)
Info :
Stuff the finished "cone" with filler rather tightly with the ends of the scissors. (I got a 4 cm (1,6 in) high "cone" ).
Info :
Now sew the head to the body neatly in imperceptible stitches and be attentive! - sew the bottom part of the head; top part is worse looking (it will be covered with hair and a hat). Seam approximately between 2nd and 3rd rounds of the head. Use a beige thin thread like embroidery floss – it slides well and doesn’t get stuck.
Info :
The bottom of the "cone" is not flat and the body doesn’t stand straight. To solve this problem, wet the bottom a little and stand it to dry on an even surface while you are working the other pieces.
— HAT :
Info :
(Big flower of wild rose) It consists of 5 petals and a calyx with sepals - as a real flower)
Item Name (Petal) :
Petal (make 5). Bright pink thread. (Here I used 3 strands of embroidery floss because I liked the color shade, but it is much better to use the same cotton thread as for the rest of the project). Petal is crocheted according to the diagram. When it ready thread the yarn end into needle and stretch out it along the petal to hide this end.
Info :
Crochet Diagram Key: Chain stitch, Single crochet, Double crochet, Treble crochet, Slip stitch, Half double crochet, 2 double crochet in 1 stitch, 2 single crochet in 1 stitch.
Item Name (Calyx) :
Green thread. Calyx is crocheted according to the diagram: 8 ch, make sc in 7th ch, then make 6 sc around (not in) the long chain; then 5 sc in 3rd ch from the beginning. That is round 1. (5 sts) Then get around the "pedicle" that sticks out and make round 2 (5 inc - 10 sts); then make rounds 3 and 4: sc around. (10 sts)
Round 5 (Sepals) :
(8 ch, 3 sl st, 3 sc, 1 dc, 2 sc in 1st and 2nd sts of round 4) X 5.
Info :
Sew 2 petals together up to row 4, then sew back to the 1st row; sew all petals this way. Do not cut the bunch of long threads off! Place the calyx over so that the sepals are placed along the seams. Now sew them on in tiny imperceptible stitches with green thread; their ends stay loose. When the flower is sewed, twist the bunch of pink threads together and push them inside the green piece with scissors.
— HAIR AND HAIRDO :
Info :
Prepare 50 pieces of 10 cm (4 in) brown thread for hair. If your doll is larger, you might need longer hair. I made 50 wraps around my 4 fingers. (You can use a 5 cm (2 in) wide piece of cardboard and wrap the thread 50 times around it). Then stitch the wraps together on one side and cut on the other side. Secure both ends so they don’t interfere.
Info :
Turn the stitched part over and place on the head. If the seam is too short – pull it a little to stretch. Secure with pins and sew it carefully and neatly along the center line of the head from forehead to nape and in the opposite direction. When the hair is attached make braids on both sides and sew them to the head in small stitches. If something is not very neat, the head would be covered with hat. When hairdo is finished, put the hat on, fix with pins and sew it thoroughly to the head with pink thread by imperceptible stitches.
— ARM (make 2) :
Info :
Thread: Beige, Light pink. Prepare 2 pieces of wire 10 cm (4 in) long.
Info :
Wrap beige thread around 2 fingers 10 times and tie it tightly in the middle. Cut at other side. Fold in half so that the knot is at the place of fold, then put the wire around the bunch of threads at a 3-4 mm (~0,15 in) distance from the knot (that would be the hand and the wrist) twist the ends of the wire together. The wire should be twisted very tightly at the wrist. Cut the bunch of threads diagonally (not straight!) at a 3 cm (1,2 in) distance from the wired wrist.
Info :
Now take pink thread, leave a long tail, place it along the bunch up to the wrist, and start to wrap the thread around the arm (a little above the wire of the wrist) very tightly and neatly, placing the wraps side by side. That will be a pink sleeve. When you reach the end of beige threads, tie the pink thread very tightly in knot, leave long tails. Then repeat the step with pink thread again – the sleeve would be wrapped with pink thread twice. Tie the ends very tightly. Cut off the wire, leaving 1 cm (0,4 in) long tails. The length of arms should be ~3,5 cm (1,4 in) (if the body is 4 cm (1,6 in) high).
Item Name (Attaching the arms) :
Find spots for the arms – 3 rounds down from the neckline on both sides of the body. Mark with pins. Widen the chosen spot – the hole - with the crochet hook. Insert the end of arm's wire in the hole. Insert the tapestry needle in the same hole, thread the long pink threads in this needle. Pull the needle with threads on the other side. Pull the tail of threads to deepen the arm in the body. Do not cut the tail off!
Info :
Then sew the arm to the body around the shoulder very carefully and neatly with a sewing needle and embroidery floss - in very small and delicate stitches. When the arm is sewed, pull the tail of threads and cut it off.
— EYES AND MOUTH :
Info :
The eyes are embroidered with dark brown thread (or 3 strands of embroidery floss) between rounds 8 and 9. The distance between the eyes is 4 crochet stitches. The length of the eyes is 1 (or 1,5) single crochet. The height of the eyes is 4 sew stitches.
Info :
The mouth is embroidered with crimson embroidery floss in the 6th round by 2 sew stitches.
— SMALL FLOWER OF WILD ROSE :
Info :
(It consist of corolla, calyx and leaf) The corolla is crocheted with bright pink thread according to the diagram (I used 2-stranded embroidery floss). Prepare 7 pieces of 3,5 cm (1,4 in) light yellow thread for stamens. Fold one piece in half, pull half of the loop through the central hole and the 1st round, pull the ends through the loop and tighten. Repeat in round for all 7 pieces. Trim the stamens.
Info :
The calyx is crocheted according to the diagram: 3 ch, 2 sl st in the 2nd and in the 1st ch, (2 ch, 2 sl st in 1st and the previous ch) X 4.
Info :
The leaf is crocheted according to the diagram: 6 ch, sl st in 5th ch, hdc in 4th ch, sl st in 3rd ch; then 4 ch, sl st in 3rd ch, hdc in 2nd ch, 2 sl st in 1st and previous ch; 3 ch, sl st in 2nd ch, hdc in 1st ch, 3 sl st in 3 remaining ch.
Item Name (Assembly) :
Prepare 12 cm (4,7 in) piece of wire, pass it through some loops of the flower's center, fold in half and twist together to form the stem. String the calyx on the wire and press it close to the flower. All thread tails hang down along the wire.
Info :
Now take green thread and start to wrap it around the stem tightly, placing the wraps side by side as you did for the arm. When you wrap around 2 cm (0,8 in) of stem, place the leaf on the stem and go on wrapping around the stem and the leaf together. When you wrap around 1 more cm (0,4 in) of stem, cut all the non-working threads but one green thread off. When you wrap around 4,5 cm (1,8 in) of stem in total, tie the ends of the threads tightly in knot. Cut the wire off at a distance of 2-3 mm (0,1 in) from the knot, bend the wire upward and press it hard to the stem. Cut the threads at a 5 mm (0,2 in) distance from the knot and apply glue stick to the ends.
Info :
Now you can give flower to the girl - and your Wild Rose Fairy is ready!
This little Wild Rose Fairy is made with care and patience to become a sweet keepsake for any shelf or gift. Her flower hat and braided hair give her a storybook charm that’s perfect for collectors and crocheters alike. Make one for a friend, decorate a nursery, or keep her as a tiny reminder of slow, thoughtful crafting. 🧚♀️🌸