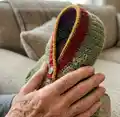
Knit a cozy, rustic baby hoodie with raglan shaping and playful elbow patches. This pattern guides you through steeks, colorwork patches, and a comfy rolled hem so your little one stays warm and stylish. Perfect for making a durable heirloom piece with character for everyday wear. Detailed sizes and clear instructions help you customize the fit and finish.
Progress Tracker
0% Complete
— Sizes :
Info :
Children : (0-3 m. ,3-6 m. , 9 m.)(12 m. 2, 4)( 6, 8, 10 ) years.
— Measurements of sweater :
Info :
Chest circumference: ( 49, 52, 56 )( 60, 69, 73)( 78, 82, 87) cm ( 19.3, 20.5, 22.1 )( 23.6, 27.2, 28.7 )( 30.7, 32.3, 34.3 ) in
Info :
Arm cirumference: ( 24, 26, 28 )( 30, 34, 37)( 39, 41, 43 ) cm ( 9.4, 10.2, 11.0 )( 11.8, 13.4, 14.6 )( 15.4, 16.1, 16.9 ) in
— Yarn :
Info :
Children : Lettlopi or Brooklyn Tweed Shelter or Tones or any other worsted weight yarn
Info :
Maincolor : (100, 150, 150) (200, 200, 200) (250, 250, 300) grams / yards of each color!
Infos :
Patch and edging of Hoodie: Col 1 (1, 1, 1) (1, 1, 1) (1, 1, 1) skeins or use leftover yarn (50 grams/109 yards max). Col 2 (1, 1, 1) (1, 1, 1) (1, 1, 1) skeins or use leftover yarn (50 grams/109 yards max).
— Needles :
Info :
Double pointed needles 3,5 and 4,5 mm (Double pointed needles size 4 and 7). Circular 60 cm 3,5 and 4,5 mm. (Circular 24 in size 4 and 7).
— Gauge :
— Notes :
Info :
Adjust needle size if necessary to obtain the correct gauge. The needle size is for guidance only. Begin by knitting a gauge swatch to determine which needle size you need to achieve the correct gauge before starting the project - note that the gauge needs to be correct for you to be able to achieve the measurements stated in the Pattern.
Info :
To block your knitted garment, soak it first in lukewarm water. I usually like to add wool soap and vinegar. You can also add silicone-free shampoo or fragrance oils if you wish. Leave the garment in the water for about 30 minutes. When removing the garment carefully from the water, wrap it in a towel to squeeze out as much water as possible. Then lay the garment flat to dry.
Info :
Magic tip! Do not let the garment dry on top of towels. The towels will stay damp and the garment will take longer to dry. If you do not have a mat to put the garment on, you can use a trash bag, plastic bag, or for example, an Ikea bag. The plastic will repel and not preserve the water. Voila!
Info :
If you are unsure which colors you want to use after choosing a recipe, you can get inspiration from my Instagram profile @loparefur, the hashtags for each individual recipe or design or the hashtag #Loparefur and #AnnaSofiaVintersol #Waya (#adventureknitting). Let me know if I can share your work!
Info :
Magic tip! If you want a specific contrast in the colors of the sweater and are unsure whether the colors you have chosen provide enough contrast, you can take a picture of all the skeins together and print it as a black-and-white-image or just add a black and white filter on the image. If the gray tones in the image provide good enough contrasts, it is a good combination!
Info :
Pay attention to color dominance and be consistent with holding the same color in the same position at all times. The dominant color is held in the left hand and the background color is held in the right hand. For better tension, I recommend catching the floats of the changing color when working 3-5 stitches in a different color. Should the colorwork pull together and produce a tighter fabric and higher gauge, consider going up a needle size.
— Body :
Info :
Cast on (88, 94, 100) (108, 124, 132) (140, 148, 156) stitches on needle size 3.5 mm with Maincolor. Place a stitch marker to mark the start of the round and after (44, 47, 50) (54, 62, 66) (70, 74, 78) sts to mark front and back side. Work rib the following: Knit 5 rounds for a rolledge. Purl 3 rounds. Change to needle size 4.5 mm. Continue in stockinette stitch until piece measures (18, 18, 18) (20, 20, 25) (30, 34, 37) cm (7.1, 7.1, 7.1) (7.9, 7.9, 10) (11.9, 13.4, 14.6) in. Place the first (3, 3, 3) (3, 3, 3) (3, 3, 3) and the last (3, 3, 3) (3, 3, 3) (3, 3, 3) stitches, total of (6, 6, 6) (6, 6, 6) (6, 6, 6) stitches on leftover yarn or stitchholder . The stitches for the second armhole are set off when you start on the support piece. Set aside and knit the sleeves.
— Arms :
Info :
Cast on (24, 24, 24) (24, 30, 30) (30, 30, 30) stitches on needle size 3.5 mm with Maincolor. Place a stitch marker to mark the start of the round. Work rib the following: Knit 5 rounds for a rolledge. Purl 3 rounds. Change to needle size 4.5 mm. Continue in stocking stitch and increase 2 stiches on the underside of the sleeve (1 st after the first st on round, and 1 st before the last mask on the round). Then repeat every (4th, 4th, 4th) (4th, 4th, 4th) round until you have (36, 37, 38) (38, 38, 42) (46, 50, 54) stitches. Knit until sleeve measures (18, 18, 20) (22, 24, 28) (32, 36, 40) cm (7.1, 7.1, 7.9) (8.7, 9.5, 11) (12.6, 14.2, 15.8) in. Place the first (3, 3, 3) (3, 3, 3) (3, 3, 3) and the last (3, 3, 3) (3, 3, 3) (3, 3, 3) stitches, total of (6, 6, 6) (6, 6, 6) (6, 6, 6) stitches on leftover yarn or stitchholder . Knit the second sleeve the same as the first. Knit one more sleeve like the first.
Info :
Choose if you would like to knit your Sweater with Hoodie or low Neckline!
— Yoke without Hoodie :
Info :
Join body and sleeves on a 4.5 mm (7) circular needle. Place a stitch marker at the first join to mark the start of the round. Work stockinette st over first sleeve. Then knit over front piece of the body (42, 46, 48) (52, 56, 64) (70, 76, 82) stitches and drop the next (6, 6, 6) (6, 6, 6) (6, 6, 6) the stitches on a sleeve holder for armholes. Knit over the other sleeve and back piece. (You should now have (136, 144, 152) (160, 176, 192) (208, 224, 240) stitches.) Make a mark at each merge = 4 stitches marked.
Info :
Raglan decreases: On each side of the marked stitches, decrease 1 to the left and 1 to the right for a total of 8 decreases per round. On the right side of the selected stitch, cast off on the left side by knitting two stitches together through the back loops of the stitches (two twisted stitches together). On the left side of the selected stitch, bind off on the right side by knitting two straight stitches. Change to a shorter circular needle if necessary. Repeat decreases every other round until you have (68, 68, 70) (70, 74, 74) (74, 78, 78) stitches.
— Neck :
Info :
Change to needle size 3.5 mm (4). Work 3 cm rib 1 straight, 1 purl with color 1. Knit 5 more rounds for a rolling edge. Bind off.
Assembly :
Sew sts under the sleeves from RS with stitches. Attach loose thread ends and cut them off.
— Yoke with Hoodie :
Info :
Join body and sleeves on a 4.5 mm (7) circular needle. Place a stitch marker at the first join to mark the start of the round. Work stockinette st over first sleeve. Then knit over front piece of the body (42, 46, 48) (52, 56, 64) (70, 76, 82) stitches and drop the next (6, 6, 6) (6, 6, 6) (6, 6, 6) the stitches on a sleeve holder for armholes. Knit over the other sleeve and back piece. (You should now have (136, 144, 152) (160, 176, 192) (208, 224, 240) stitches.) Make a mark at each merge = 4 stitches marked.
Info :
Raglan dec: On each side of the marked sts, decrease 1 to left and right a total of 8 decreases per round. On the right side of the selected stitch, bind off on the left side by knitting two stitches together through the back loops of the stitches (two twisted straight together. On the left side of the selected stitch, bind off on the right side by knitting two straight stitches. Change to shorter circular needle if necessary. Shape the hood after you have knitted (2, 3, 4)(5,6,7 )(8, 9,10 ) cm. Keep on decreasing until you have stitches remaining on your needles while we work the hoodie.
— Hoodie :
Info :
Bind off 6 stitches in the middle of the front of the sweater. This will be the new beginning of the round. From here on, the yoke is knit back and forth. (or can be knitted in a round if you prefer to steek the opening)
Info :
Repeat the decrease every other round and knit 4 cm or until (68, 68, 70) (70, 74, 74) (74, 78, 78) stitches remain on the needles. Place 1 stitch marker in the middle of the back. Knit until Hoodie measures (18, 18, 18) (20, 20, 23) (23, 25, 25) cm (7, 7, 7) (8, 8, 9) (9, 10, 10) in.
Info :
In the next (6, 6, 6) (8, 8, 8) (10, 10, 10) rows will shape the top backside of the hoodie. The decreases take place left and right from the stitchmarker placed at the middle back of the ,head, Decrease 1 sts on each side of the marker every 2nd round with a total of (3, 3, 3) (4, 4, 4) (5, 5, 5) times.
— Hoodie Button Band :
Info :
Pick up stitches for the button band as follows: Pick up 3 stitches, skip the 4th st, and repeat this pattern until you reach the other end of the hoodie. Make sure to end up with an even number of stitches. Knit 1 row in stockinette stitch, then work the ribbing as follows: Row 1: Purl 1, knit 1. Row 2: Knit 1, purl 1.
Info :
Repeat these rows until the button band measures 1.5 in (4 cm) on all sizes. If desired, knit buttonholes* on the left side of the hoodie; otherwise, skip this step for a hoodie without buttons. Bind off in a contrasting color and sew the bottom of the button band by laying it over each other. Hide the steeked edges.
Info :
*Buttonholes: After 0.8 in (2 cm), knit 2 stitches together and bind off 1 stitch. Binding off 1 stitch will fit well with 0.8-0.86 in (20–22 mm) buttons. Bind off more stitches if you want larger buttons.
— Finishing :
Info :
Cut steek and sew in and hide steekedging, if knitted in a round. Graft the underarm stitches and the hoodie to close. Kitchener stitch the top of the hoodie. Attach patch. Voila!
— Arm Patches :
Info :
Arm Patches!!! Sizes (3,6,9)(12) months.
Info :
Cast on 11 stitches on needle size 3.5 mm with contrast color 1 using only 1 strand. Do not join in a round but knit back and forth! Knit the Chart and increase and decrease accordingly. Bind of loosley. Attach Patch on the elbow of the sweater.
Info :
Sizes (2, 4)( 6, 8, 10 ) years.
Info :
Cast on 11 stitches on needle size 4.5 mm with contrast color 1 using 2 strands held together. Do not join in a round but knit back and forth! Knit the Chart and increase and decrease accordingly. Bind of loosley. Attach Patch on the elbow of the sweater.
Info :
Tip! If your prefer a cleaner look of the patches add an I-cord arround the patches.
— Chart Legend :
Info :
Symbols: Knit. left leaning decrease. right leaning decrease. increase one left leaning. right leaning increase. Colours: MC (red), CC2 (yellow).
Thank you for choosing the Waya Baby Sweater pattern — I hope you enjoy every stitch of the process! 🧶
This cosy raglan hoodie features playful elbow patches, an optional hood and a contrasting button band for a charming finish. 🧵
Happy knitting — may this little sweater bring warmth, comfort and many adventures to the child who wears it! ✨