🧢 Beautiful ✨ Detailed πŸ’ Adorable

Watermelon Coleus Pattern

Watermelon Coleus Pattern
4.2β˜… Rating
5-7 Hours Time Needed
2.9K Made This
βœ‚οΈ

Intermediate Level

Ideal for those with basic crochet experience, featuring slightly more advanced stitches and techniques to expand your skills.

⏱️

Weekend Treat

Takes 5-7 hours, making it an enjoyable project to finish over a couple of days.

🏑

Cozy Accent

A warm touch for your space that transforms ordinary corners into inviting nooks filled with handmade charm.

About This Watermelon Coleus Pattern

This pattern shows you how to crochet a realistic Watermelon Coleus plant with vibrant layered leaves and wired stems for shaping. The design uses a long-stitch technique to create the petal-like leaf texture and a scalloped edge for realism. You will learn to insert wire, work unusual long stitches, and finish stems for a potted display.

Watermelon Coleus Pattern crochet pattern - detailed view of completed project

Includes step-by-step photos, yarn color references, and full round-by-round instructions. Make multiple leaves to build a full plant and arrange them in a pot using floral tape and filler.

Why You'll Love This Watermelon Coleus Pattern

I absolutely love this pattern because it transforms simple crochet stitches into striking, lifelike foliage that brightens any room. I enjoy the mix of precise stitch work and creative shaping with wire, which makes each leaf feel sculptural and unique. The long stitch sequences provide a satisfying texture that really mimics real coleus leaves. I also appreciate how customizable the design isβ€”change colors or sizes to create your own variety of plants.

Watermelon Coleus Pattern step 1 - construction progress Watermelon Coleus Pattern step 2 - assembly progress Watermelon Coleus Pattern step 3 - details and accessories Watermelon Coleus Pattern step 4 - final assembly and finishing

Switch Things Up

I love how easy it is to customize the colors of this pattern; try softer pastels for a subtle houseplant or bold magenta and chartreuse for a showy display.

I often change yarn weight and hook size to make minis for keyrings or giant statement leaves for wall artβ€”experiment to find your favorite scale.

I like to mix yarn textures: use a slightly fuzzy cotton for a softer leaf or a glossy mercerized cotton for a crisp, defined edge.

For extra realism I embroider small veins with contrasting thread across the finished leaves; it adds a delicate natural detail that stands out.

I sometimes skip the wire and instead glue the leaves to felt backings for ornament-making if I want hangable decorations.

I also create clusters of different-sized leaves by varying stitch counts to make fuller rosettes for larger pots.

If you want posable stems, use thicker wire and add a second inner wire for strength before wrapping with floral tape for a professional finish.

Swap the scalloped edging for a picot border to soften the look, or add tiny seed bead accents along the edge for sparkle.

I enjoy assembling several plants in a tray to make a mini garden; try alternating color schemes to build a dynamic composition.

Don\'t be afraid to combine leaves with small crocheted flowers for a mixed planter; I often add tiny blooms to brighten the composition.

Common Mistakes & How to Fix Them

βœ— Skipping the wire insertion step will make leaves floppy and hard to shape; insert and crochet over florist wire as instructed and wrap the wire securely for stability. βœ— Not changing color at the correct round can flatten the leaf contrast; follow the color change directions exactly and secure tails neatly to preserve the leaf layers. βœ— Missing or miscounting chain stitches on the base can distort petal symmetry; always count your foundation chain and check the center stitch markers before working subsequent rounds. βœ— Working long stitches too tightly will hide the scalloped edge and reduce flexibility; maintain even, slightly loose tension when pulling up long hdc/dc/tc stitches to achieve the desired texture. βœ— Forgetting to slst into the correct base chain will create gaps at the leaf edge; locate and stitch into the specified base chain or row below as the pattern directs.

Watermelon Coleus Pattern

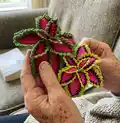
Create a realistic, colorful Watermelon Coleus plant using crochet techniques and wirework. This pattern guides you through making layered leaves with long stitch details and wired stems for shaping. Perfect for adding a vibrant, maintenance-free plant to your home or gifting to a friend. Follow the step-by-step photos and instructions to get beautiful, lifelike results.

Intermediate 5-7 Hours

Materials Needed for Watermelon Coleus Pattern

β€” Main Fabric

  • 01
    DMC Petra no5 (3ply) crochet cotton - main yarn used for all leaves
  • 02
    Color 53607 (pink tone) - used in Plant 1 details
  • 03
    Color 5550 (deep plum) - used in Plant 1 center/shade
  • 04
    Color 53803 (bright raspberry) - used in Plant 2/highlight
  • 05
    Color 5938 (brown/neutral) - optional accent from Plant 2
  • 06
    Color 5907 (light lime green) - used for bright leaf edging
  • 07
    Color 5905 (medium green) - used for green edging and stems
  • 08
    Alternative yarn recommendation: 4ply or crochet cotton 10 may be used with appropriate hook adjustment

β€” Tools Required

  • 01
    Crochet hook size 1.5mm
  • 02
    Alternative appropriate hook for 3ply/4ply cotton
  • 03
    Garden wire: 2mm, 3mm or 3.5mm (stem wire) optional; 3.5mm used in this model
  • 04
    Florist wire (thin) for leaf wiring
  • 05
    Green floral tape to finish stems
  • 06
    Florist sponge or styrofoam for potting
  • 07
    Scissors
  • 08
    Yarn needle for sewing and weaving ends
  • 09
    Pins for assembly
  • 10
    Optional: wooden garden stakes to support stems

Progress Tracker

0% Complete

β€” Pattern Notes :

Info :

Notes: When you see stitches in brackets, it means that all the ones in the bracket are worked in to one stitch. Example: (sc inc) means: 2sc worked in to one stitch. (3sc) means: 3sc in the same stitch. (3sc) x 2 means: 3sc in each of the next 2 stitches. Alternate (dc inc) and 1dc x 3 means: work 2dc in to the first stitch, then work 1dc in the next, then repeat the last 2 steps 2 more times.

Info :

Following the tutorial and using the recommended yarn, your finished plant will measure approx. 7\"(18cm) tall without plant pot and 9\"(23cm) in width Depending on how you shape the leaves. This plant is made of 12 leaves in total as shown in the image. However you can make it larger by making more leaves or smaller by making less leaves.

β€” Leaf A :

Round 1 :

Rnd.1: Ch25 Skip1 2sc 1hdc 1dc (dc inc) x 2 9dc 4hdc 3sc

Round 1 :

(3sc) in the last chain

Round 1 :

3sc 4hdc 9dc (dc inc) x 2 1dc 1hdc 2sc

Round 1 :

(3sc) in the skipped chain from the beginning

Round 2 :

Rnd.2: 2sc 2hdc 1dc (dc inc) (1dc, 1tc) 1tc (tc inc) repeat the last 2 steps 1 more time 3tc 4dc 4hdc 3sc (3sc) center stitch, Going down the other side, 3sc 4hdc 4dc 3tc (tc inc) 1tc repeat the last 2 steps 1 more time (1tc, 1dc) (dc inc) 1dc 2hdc 3sc slst base chain
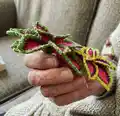
β€” Leaf A Wire :

Info :

We will now crochet over the florist wire. Cut a piece of approximately 20\"(50cm) and thread it through the stitch on your hook (p1 & 2). Crochet this whole next round over the wire (p3).

β€” Leaf A continued :

Round 3 :

Rnd.3: ch1 8sc (sc inc) 1sc repeat the last 2 steps 2 more times 17sc

Info :

Work all the following stitches in to the center stitch at the tip of the leaf: (p1, 2 & 3) (1hdc, ch4, skip1, 1sc, 1hdc down the chain, 1hdc) Pull the wire round and down equally

Round 3 :

17sc 1sc (sc inc) repeat the last 2 steps 2 more times 8sc Slst in 1st stitch on the opposite side, CHANGE COLOUR

β€” Leaf A - Long stitch explanation :

Info :

In this round I am using a few unusual stitches that I call the Long hdc, the Long dc and the Long tc. Those stitches are almost worked the same as the normal hdc, dc and tc just with a slight difference. On the following page I am explaining how to work the Long hdc. once you familiarised yourself with this one then you do exactly the same with the Long dc and Long tc once they come up in the round. Each of those Long stitches comes in a sequence of one normal hdc, dc or tc followed by the Long stitch. For example the hdc sequence will be described as (1hdc, 1Long hdc). The dc sequence (1dc, 1Long dc) and the tc sequence (1tc, 1Long tc). On average there will be a space of approximately 2 stitches on that previous round in between each long stitch see (p1). Sometimes it might be just one depending on the bends in the petal shape. Your finished round will look like in (p2).

Round 4 :

Rnd.4: ch1, 4sc, 1hdc Then work the first Long stitch sequence. Work 1hdc, Yarn over as to work another hdc but don\'t work it in to the next chain. Instead insert the hook in to the round below (underneath the wire round) and 1 stitch back (p1). So basically below and slightly diagonal from the last stitch you made. Pull the yarn through as you would usually do (p2) and pull the long stitch up (p3). Now pull through to complete the Long hdc the same as you would usually do (p4). So now you have done this sequence: (1hdc, 1Long hdc). In the next chain work 1slip stitch (p5), This chain may be hidden under the Long stitch so just check to make sure the slip stitch is worked in to the correct chain.

Round 4 :

Continue to work 1dc (1dc, 1Long dc) Slst

Round 4 :

1dc (1tc, 1Long tc) Slst Repeat 3 more times

Round 4 :

1dc (1dc, 1Long dc) Slst Repeat 1 more time

Round 4 :

1hdc (1hdc, 1Long hdc) Slst Repeat 1 more time 2sc (3sc) center stitch

Round 4 :

Going down the other Down the other side. Rnd.4: 2sc slst 1hdc (1hdc, 1Long hdc) Repeat 1 more time slst 1dc (1dc, 1Long dc) Repeat 1 more time slst 1dc (1tc Long tc) Repeat 3 more times slst (1dc, 1Long dc) 1dc slst (1hdc, 1Long hdc) 1hdc 5sc slst in 1st stitch on the opposite side,

Round 5 :

Rnd.5: ch1 4sc slst (in to the row below) (p1) 1sc (p2) 1hdc (p3) (hdc inc) (p4) slst (side of slst from the row below) (p1) Repeat 9 more times

Round 5 :

3sc (1sc, ch3, skip1, 1sc, 1sc) Center stitch. Going down the other side, 3sc

Round 5 :

slst (side of slst) (hdc inc) 1hdc 1sc Repeat 9 more times slst (row below) 5sc Change color

Round 6 :

Rnd.6: ch1 4sc Now work, 1dc next to the slip stitch from the previous round, So basically, push the hook in at the side of the slst we made in the previous round, pull the yarn up and complete the dc (p1). This stitch is repeated all around the petal where the slip stitches from the previous round are.

Round 6 :

Continue to work: 1hdc (p2) (sc dec) (p3) 1hdc (p4) 1dc (side of slst) (p1) Repeat the last 4 steps 9 more times 3hdc 2sc

Round 6 :

Work (3sc) in to the unworked skipped chain at the tip of the petal. Going DOWN the other side 2sc 3hdc 1dc (side of slst)

Round 6 :

1hdc (sc dec) 1hd 1dc (side of slst) Repeat 9 more times 5sc Slst in the 1st chain on the opposite side.

Round 7 :

Rnd.7: (ch1, 1sc) 7sc (slst, ch2, 1dc, ch1) (1dc, ch2, slst) 2slst Repeat the last 4 steps 10 more times (1dc, 1tc, ch1, slst, 1dc) center Going down the other side 2slst (slst, ch2, 1dc, ch1) (1dc, ch2, slst) Repeat the last 4 steps 10 more times 8sc Leave a long tail, Wrap tight around the wire To cover approx. 2\"(5cm).

β€” Leaf B :

Info :

Make 2

Round 1 :

Rnd.1: Ch20 Skip1 2sc 1hdc 1dc (dc inc) x 2 6dc 3hdc 2sc

Round 1 :

(3sc) last chain

Round 1 :

2sc 3hdc 6dc (dc inc) x 2 1dc 1hdc 2sc (3sc) in the skipped chain From the beginning

Round 2 :

Rnd.2: 2sc 2hdc 1dc (dc inc) x 2 1dc (dc inc) 1dc (dc inc) 3dc 3hdc 3sc (3sc) center 3sc 3hdc 3dc (dc inc) 1dc (dc inc) 1dc (dc inc) x 2 1dc 2hdc 3sc slst in to base chain

Info :

Insert Wire approx. 20\"(50cm)

Round 3 :

Rnd.3: ch1 5sc Alternate (sc inc) and 1sc x 3 15sc (1hdc, ch4, skip1, 1sc, 1hdc, 1hdc) center stitch 15sc 1sc and (sc inc) x 3 5sc Slst in 1st on opposite side. Change Color

Assembly Instructions

  • Cut floral wire to approximately 20\" (50cm) for each leaf, crochet the designated round over the wire and leave a long tail to wrap and secure the wire at the stem base.
  • Insert wired stems into a piece of styrofoam or dry florist sponge sized to fit your plant pot, starting with the central stem and arranging the other leaves in a circle around it for a natural look.
  • Wrap wires with green floral tape to finish stems and hide any exposed ends; use the long tails left on leaves to sew or wrap leaves in place before final taping.
  • Position larger leaves (Leaf A) toward the lower/outer area and smaller leaves (Leaf B and D) toward the top/center to recreate a natural layered appearance, securing each stem into the foam for stability.
  • Cover the foam with pebbles or soil to conceal the base and create a finished potted display; trim or bend wired stems to achieve the desired shape and fullness.

Important Notes

  • πŸ’‘Use stitch markers and count stitches frequently to maintain symmetry, especially during increases, decreases, and long stitch sequences.
  • πŸ’‘Crochet over the florists wire carefully and keep tension even so the wire is encased neatly and the leaf lies flat and shapeable.
  • πŸ’‘Change yarn color exactly where directed to preserve the layered visual effect; secure ends behind the stitches and weave in as you go to keep edges tidy.
  • πŸ’‘When wrapping wire stems, leave enough tail to insert into the foam and to wrap with floral tape for a secure and neat finish.

This Watermelon Coleus pattern brings the vibrant beauty of coleus leaves to your home with crochet and wirework. The layered colors and scalloped edges create a striking, lifelike plant you can style any way you like. Make a whole family of plants in different colors to brighten corners, shelves or as heartfelt handmade gifts. 🧢🌿

You ask,

we answer.

FAQs

What size will the finished piece be?

The finished plant measures approximately 7" (18 cm) tall without a plant pot and about 9" (23 cm) wide using the recommended yarn and hook, depending on how you shape the leaves.

Can I use different yarn weights for this pattern?

Yes, you can use different yarn weights but this will affect the final size and appearance; use an appropriate hook for your chosen yarn and expect larger or smaller leaves accordingly.

Do I need prior crochet experience for this pattern?

This pattern is rated intermediate, so basic knowledge of stitches (sc, hdc, dc, tc), increases/decreases and confidence with stitch counting is recommended for best results.

How long does this project typically take to complete?

Most crocheters complete this project in 5-7 hours, though time may vary based on experience level, the number of leaves you make, and how detailed you are with shaping.