Create a realistic, decorative Watermelon Coleus plant with this detailed crochet pattern. You will make layered, wired leaves with striking color changes and scalloped edges to reproduce the vibrant look of the coleus. Follow clear step-by-step rounds and photographic guidance to shape each leaf and assemble a potted display you'll be proud to show off.
Progress Tracker
0% Complete
— Pattern Notes :
Info :
Notes: When you see stitches in brackets, it means that all the ones in the bracket are worked in to one stitch. Example: (sc inc) means: 2 sc worked in to one stitch. (3sc) means: 3 sc in the same stitch. (3sc) x 2 means: 3 sc in each of the next 2 stitches. Alternate (dc inc) and 1dc x 3 means: work 2 dc in to the first stitch, then work 1 dc in the next, then repeat the last 2 steps 2 more times.
Info :
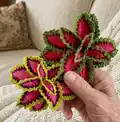
Following the tutorial and using the recommended yarn, your finished plant will measure approx. 7" (18cm) tall without plant pot and 9" (23cm) in width depending on how you shape the leaves. This plant is made of 12 leaves in total as shown in the image. However you can make it larger by making more leaves or smaller by making less leaves.
— Leaf A :
Make 4 :
Leaf A is worked from a foundation chain and shaped into a petal with long stitches and edge rounds. Wire is inserted later and one round is worked over the wire to secure it.
Round 1 :
Ch25. Skip 1, 2 sc, 1 hdc, 1 dc, (dc inc) x 2, 9 dc, 4 hdc, 3 sc. (3 sc) in the last chain.
Round 1 continued :
3 sc, 4 hdc, 9 dc, (dc inc) x 2, 1 dc, 1 hdc, 2 sc. (3 sc) in the skipped chain from the beginning.
Round 2 :
2 sc, 2 hdc, 1 dc, (dc inc), (1 dc, 1 tc), 1 tc, (tc inc) — repeat the last 2 steps 1 more time, 3 tc, 4 dc, 4 hdc, 3 sc.
Round 2 continued :
(3 sc) center stitch. Going down the other side: 3 sc, 4 hdc, 4 dc, 3 tc, (tc inc), 1 tc — repeat the last 2 steps 1 more time, (1 tc, 1 dc), (dc inc), 1 dc, 2 hdc, 3 sc, slst to base chain.
Info :
At this point you have completed the foundation shaping of Leaf A. You will insert the wire and then continue with the long-stitch rounds described below.
Leaf A (Wire insertion) :
We will now crochet over the florist wire. Cut a piece of approximately 20" (50cm) and thread it through the stitch on your hook (see photos p1 & p2). Crochet the whole next round over the wire.
Round 3 :
ch1, 8 sc, (sc inc), 1 sc — repeat the last 2 steps 2 more times — 17 sc.
Round 3 continued :
Work all the following stitches in to the center stitch at the tip of the leaf: (1 hdc, ch4, skip1, 1 sc, 1 hdc down the chain, 1 hdc). Pull the wire round and down equally.
Round 3 finished :
17 sc, 1 sc, (sc inc) — repeat the last 2 steps 2 more times, 8 sc, slst in 1st stitch on the opposite side. CHANGE COLOUR.
Section :
The Long stitch explanation: In this round the pattern uses Long hdc, Long dc and Long tc. Each long stitch follows a normal hdc/dc/tc and is worked slightly differently inserting the hook in to the previous round underneath the wire round and pulling the long loop up before completing the stitch. These are described below and in the photos p1-p5.
Round 4 :
ch1, 4 sc, 1 hdc. Then work the first Long stitch sequence: Work 1 hdc, yarn over as to work another hdc but don't work it in to the next chain. Instead insert the hook in to the round below (underneath the wire round) and 1 stitch back (p1). Pull the yarn through as you would usually do (p2) and pull the long stitch up (p3). Now pull through to complete the Long hdc the same as you would usually do (p4). So now you have done this sequence: (1 hdc, 1 Long hdc). In the next chain work 1 slip stitch (p5).
Round 4 continued :
Continue to work 1 dc, (1 dc, 1 Long dc), slst. Then 1 dc, (1 tc, 1 Long tc), slst — repeat 3 more times. Then 1 dc, (1 dc, 1 Long dc), slst — repeat 1 more time. Then 1 hdc, (1 hdc, 1 Long hdc), slst — repeat 1 more time.
Round 4 finish :
2 sc, (3 sc) center stitch.
Round 4 Notes :
You have already completed the stitches above this line on the previous page for the first leaf. Continue to work the long stitch sequences across the scalloped edge as shown in the photos, maintaining consistent spacing.
Round 5 :
ch1, 4 sc, slst (in to the row below) (p1). Then: 1 sc (p2), 1 hdc (p3), (hdc inc) (p4), slst (side of slst from the row below) (p1). Repeat the sequence 9 more times. 3 sc.
Round 5 continued :
(1 sc, ch3, skip1, 1 sc, 1 sc) center stitch. Going down the other side: 3 sc, slst (side of slst), (hdc inc), 1 hdc, 1 sc — Repeat 9 more times. Slst (row below), 5 sc. CHANGE COLOR.
Round 6 :
ch1, 4 sc. Now work 1 dc next to the slip stitch from the previous round. Push the hook in at the side of the slst we made in the previous round, pull the yarn up and complete the dc (p1). This stitch is repeated all around the petal where the slip stitches from the previous round are.
Round 6 continued :
Continue to work: 1 hdc (p2), (sc dec) (p3), 1 hdc (p4), 1 dc (side of slst) (p1). Repeat the last 4 steps 9 more times. 3 hdc, 2 sc.
Round 6 finish :
Work (3 sc) into the unworked skipped chain at the tip of the petal. Going DOWN the other side: 2 sc, 3 hdc, 1 dc (side of slst). Then 1 hdc, (sc dec), 1 hdc, 1 dc (side of slst). Repeat 9 more times. 5 sc. Slst in the 1st chain on the opposite side.
Round 7 :
(ch1, 1 sc), 7 sc. (slst, ch2, 1 dc, ch1) (1 dc, ch2, slst) 2 slst — Repeat the last 4 steps 10 more times. (1 dc, 1 tc, ch1, slst, 1 dc) center. Going down the other side: 2 slst, (slst, ch2, 1 dc, ch1) (1 dc, ch2, slst) — Repeat the last 4 steps 10 more times. 8 sc.
Finish :
Leave a long tail. Wrap tight around the wire to cover approx. 2" (5cm). This completes one Leaf A. Make 4 leaves in total (wire, shape and secure as instructed).
— Leaf B :
Make 2 :
Leaf B is a slightly different smaller shaped petal worked from a chain and finished with the same insertion of wire and scalloped edge rounds.
Round 1 :
Ch20. Skip1, 2 sc, 1 hdc, 1 dc, (dc inc) x 2, 6 dc, 3 hdc, 2 sc. (3 sc) last chain.
Round 1 continued :
2 sc, 3 hdc, 6 dc, (dc inc) x 2, 1 dc, 1 hdc, 2 sc. (3 sc) in the skipped chain from the beginning.
Round 2 :
2 sc, 2 hdc, 1 dc, (dc inc) x 2, 1 dc, (dc inc), 1 dc, (dc inc) x 2, 1 dc, 2 hdc, 3 sc. (3 sc) center. 3 sc, 3 hdc, 3 dc, (dc inc) 1 dc, (dc inc), 1 dc, (dc inc) x 2, 1 dc, 2 hdc, 3 sc. Slst in to base chain. CHANGE COLOUR.
Insert Wire :
Insert wire approx. 20" (50cm) and thread it through the stitch on your hook. Crochet the next round over the wire.
Round 3 :
ch1, 5 sc. Alternate (sc inc) and 1 sc x 3 — 15 sc. (1 hdc, ch4, skip1, 1 sc, 1 hdc, 1 hdc) center stitch.
Round 3 continued :
15 sc. 1 sc and (sc inc) x 3, 5 sc. Slst in 1st on opposite side. CHANGE COLOUR. Finish the scalloped edge rounds and bind off as you did for Leaf A to complete Leaf B. Make 2 leaves in total.
Info :
When inserting wire for Leaf B, follow the same method as Leaf A: thread the wire through the stitch on your hook and work the entire next round over the wire so it sits securely inside the leaf.
— Assembly & Potting :
Info :
If you are using a plant pot then use either styrofoam or dry florist sponge cut to the size of your pot. Place it inside and push the stem of your flowers in to it. Start from the centre and place the other flowers in a circle around it. Cover with pebbles or soil.
Item Name (P1) :
Attach leaves to florists wire stems: wrap the long yarn tail around the wire tightly to cover about 2" (5cm) of wire and hold the leaf securely in place. Use floral tape to cover exposed wire and create a natural stem look.
Item Name (P2) :
Arrange leaves: Start with larger leaves in the centre and smaller leaves around the outside to mimic natural coleus growth. Bend wired stems gently to create a pleasing canopy and secure stems into pot filling (styrofoam or dry sponge).
Item Name (P3) :
Finishing: Tuck tails and weave in ends on the back of leaves. Use a dab of craft glue if necessary to secure ends under the edge rounds. Cover pot surface with pebbles to give a finished look.
This Watermelon Coleus pattern brings botanical beauty to your home with delicate crocheted leaves full of color and texture. Follow the step-by-step rounds and photos to shape, wire, and assemble a realistic potted plant that will brighten any corner. Make a single plant or a whole collection for a lasting handmade display. 🧶🌿✨