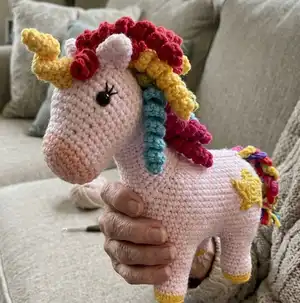
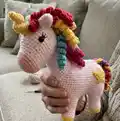
Make a charming unicorn and its tiny hatching baby with this step-by-step crochet pattern. Youll get clear round-by-round instructions for head, body, legs, mane, horn, tail, star and the little rainbow egg. Perfect for gifting or keeping as a whimsical handmade keepsake, the pattern includes assembly photos and tips to help you finish with confidence. Use any DK/aran weight yarn for size variations and bring a rainbow of curls to life.
Progress Tracker
0% Complete
— Baby Unicorn's Head :
Info :
Start in pale pink, make 1 piece. Work in joined rounds.
Round 1 :
In pale pink, ch 2, sc 6 into 2nd chain from hook. You can use the magic ring method if you prefer. Sl st into the 1st sc to join the round. (6)
Round 2 :
Ch 1, (starting in the same st that you just joined into) sc 6 changing to white in the last st, now working in white, join. (6)
Round 3 :
Ch 1, sc 2, inc x2, sc 2, join. (8)
Round 4 :
Ch 1, sc 8, join. (8)
Round 5 :
Ch 1, sc 2. To make the 1st ear, FLO sl st in the next st, ch 3, work back down the ch that you just made, starting in the 2nd ch from the hook: sl st, sc. Then FLO sl st back into the same st as before. Sc 2. To make the 2nd ear, FLO sl st in the next st, ch 3, work back down the ch that you just made, starting in the 2nd ch from the hook: sl st, sc. Then FLO sl st back into the same st as before. Sc 2, join. Add some stuffing to the head now (see photo). (6 + 2 ears)
Round 6 :
Ch 1, dec, sc 4 (please note - the 1st and 4th stitches will be worked by folding the ear forwards and working into the leftover back loop (see photo)), dec, join. (6)
Info :
FO, leaving a tail of yarn. Close the hole by passing the tail of yarn through just the front loop of each stitch and then pulling it tight. Keep the remaining tail of yarn for later assembly (see photos).
— Baby Unicorn's Body :
Info :
In white, make 1 piece. Work in continuous rounds (no joining).
Round 1 :
In white, ch 2, sc 6 into 2nd chain from hook. You can use the magic ring method if you prefer. (6)
Round 3 :
To make the 1st leg, FLO sl st in the next st, ch 3, work a 3trpop in to the same st (please refer to the stitch notes on page 2 if required). Then ch 3 and FLO sl st back into the same st once more. Sc. To make the 2nd leg, FLO sl st in the next st, ch 3, work a 3trpop in to the same st. Then ch 3 and FLO sl st back into the same st once more. (Sc 2, inc) x2, sc 3 (see photo). (12 + 2 legs)
Round 4 :
Skip the first leg, sc (this is worked into the st that is between the two legs), skip the 2nd leg, sc 4, inc x3, sc 4. (15)
Round 5 :
Inc, sc 5, skip 4 st (this is to create the shaping for the neck), then continue with sc 5 (see photos). (12)
Round 6-8 :
(3 rounds) sc 12. (12)
Round 9 :
To make the 3rd leg, FLO sl st in the next st, ch 3, work a 3trpop in to the same st. Then ch 3 and FLO sl st back into the same st once more. Sc. To make the 4th leg, FLO sl st in the next st, ch 3, work a 3trpop in to the same st. Then ch 3 and FLO sl st back into the same st once more. Sc 9. (10 + 2 legs)
Round 10 :
Skip the first leg, sc (this is worked into the st that is between the two legs), skip the 2nd leg, sc 9. Add some stuffing to the body section now. (10)
Info :
FO, leaving a tail of yarn. Close the hole by passing the tail of yarn through just the front loop of each stitch and then pulling it tight. Weave in the end (see photo).
— Baby Unicorn Assembly :
Info :
Using the tail of yarn that you left on the head section, sew the back of the head to just the couple of stitches on the front edge of the neck shaping. This will allow the head to be bent forwards so that your baby unicorn fits inside its rainbow egg. You may need to sew a small opening on the neck (behind the head) closed. Then weave in the end (see photos).
Info :
Using some yellow yarn, add a long French knot to form the unicorn's horn. I wrapped the yarn around my needle 5 times to achieve this effect (see photos).
Info :
Finally, add black French knots for the eyes and strands in any colour for the tail and mane—trim them to the desired length. Your baby unicorn should now look something like this (see photos).
— Egg (Bottom Section) :
Info :
Start in dark pink, make 1 piece. Work in joined rounds.
Round 1 :
In dark pink, ch 2, sc 6 into 2nd chain from hook. You can use the magic ring method if you prefer. Sl st into the 1st sc to join the round. (6)
Round 2 :
Ch 1, (starting in the same st that you just joined into) inc x6, join. (12)
Round 3 :
Ch 1, (inc, sc) x6 changing to purple in the last st, now in purple, join. (18)
Round 4 :
Ch 1, sc 18, join. (18)
Round 5 :
Ch 1, (sc, inc, sc) x6 changing to blue in the last st, now in blue, join. (24)
Round 6-7 :
(2 rounds) Ch 1, sc 24, join. (24)
Info :
FO and weave in the ends.
— Egg (Top Section) :
Info :
Start in red, make 1 piece. Work in joined rounds.
Round 1 :
In red, ch 2, sc 6 into 2nd chain from hook. You can use the magic ring method if you prefer. Sl st into the 1st sc to join the round. (6)
Round 2 :
Ch 1, (starting in the same st that you just joined into) inc x6, join. (12)
Round 3 :
Ch 1, (inc, sc 3) x3 changing to orange in the last st, now in orange, join. (15)
Round 4 :
Ch 1, (sc 2, inc, sc 2) x3, join. (18)
Round 5 :
Ch 1, sc 18, join. (18)
Round 6 :
Ch 1, (inc, sc 5) x3 changing to yellow in the last st, now in yellow, join. (21)
Round 7 :
Ch 1, (sc 3, inc, sc 3) x3, join. (24)
Round 8 :
Ch 1, sc 24 changing to green in the last st, now in green, join. (24)
Round 9 :
Ch 1, sc 24, join. (24)
Round 10 :
Ch 1, sc 24 changing to blue in the last st, now in blue, join. (24)
Round 11 :
Ch 1, sc 24, join. (24)
Infos :
At this point, you will join the two sections together... Put your hook through the FLO of the top section followed by the outer loop of the bottom section as shown (see photo) and work a sl st. Repeat this process for a total of 6 sl st's. Then, working through both loops on the top section of egg only, sl st 9. To make the buttonhole ch 5 (adjust this amount according to the size of your button), then sl st 9. FO and weave in the ends (see photo). Don't forget to attach your button (see photo).
— Unicorn's Internal Egg Pocket :
Info :
In white, make 1 piece. Work in continuous rounds (no joining).
Round 1 :
In white, ch 2, sc 6 into 2nd chain from hook. You can use the magic ring method if preferred. (6)
Round 3 :
(Inc, sc) x6. (18)
Round 4 :
(Sc, inc, sc) x6. (24)
Round 5 :
(Inc, sc 3) x6. (30)
Round 7-20 :
(14 rounds) Sc 30. (30)
Info :
FO and weave in the end (see photo).
— Unicorn's Body :
Info :
In white, make 1 piece. Work in continuous rounds (no joining).
Round 1 :
In white ch 13. Working back down the chain that you just made, starting in the 2nd st from the hook: inc, sc 10, inc. Continue around the other side of the chain with: inc, sc 10, inc. (28)
Round 2 :
*Inc x2, sc 10, inc x2. Repeat from the * once more. (36)
Round 3 :
*(Sc, inc) x2, sc 10, (inc, sc) x2. Repeat from the * once more. (44)
Round 4 :
*(Sc 2, inc) x2, sc 10, (inc, sc 2) x2. Repeat from the * once more. (52)
Round 5 :
*(Sc 3, inc) x2, sc 10, (inc, sc 3) x2. Repeat from the * once more. (60)
Round 6-7 :
(2 rounds) Sc 60 (see photo). (60)
Round 8 :
*(Sc 4, inc) x2, sc 10, (inc, sc 4) x2. Repeat from the * once more. (68)
Round 9-10 :
(2 rounds) Sc 68. (68)
Round 11 :
*(Sc 5, inc) x2, sc 10, (inc, sc 5) x2. Repeat from the * once more. (76)
Round 12-19 :
(8 rounds) Sc 76. (76)
Info :
At this point, sc 4. This is the new start point for your rounds from here onwards (see photo)...
Round 20 :
In this round you will make 4 spaces which you will add the legs to later on: Sc 5. To make the space for the 1st leg, ch 6, skip 12 st, then sc 4. To make the space for the 2nd leg, ch 6, skip 12 st, then sc 10. To make the space for the 3rd leg, ch 6, skip 12 st, then sc 4. To make the space for the 4th leg, ch 6, skip 12 st, sc 5 (see photo). (28 + 24 ch)
Round 21 :
Work into the sc and into the back loop of the chains that you made in the previous round (ignore the leg spaces for now)... (Dec x2, sc 18, dec x2) x2 (see photo). (44)
Round 22 :
(Dec x2, sc 14, dec x2) x2. (36)
Round 23 :
(Dec, sc 14, dec) x2. (32)
Round 24 :
(Dec, sc 14) x2 (see photo). (30)
Round 25 :
Insert the egg pocket into the centre of your body section now, and then working through both layers (see photos), sl st 7. To make the buttonhole ch 9 (adjust this amount according to the size of your button), then continue working through both layers with sl st 23. FO and weave in the end (see photo).
— Legs :
Info :
Firstly add some stuffing to your unicorn's egg pocket. Then add stuffing through the 4 leg holes until the body is evenly and firmly stuffed. You can then remove the stuffing from the central egg pocket - this just ensures the egg pocket doesn't get squashed when you stuff the body section (see photos).
Info :
Start in white, make 4 pieces. Work in joined rounds.
Round 1 :
Join your white yarn into the 1st available st on any of the leg spaces (see photo). Sc 18 all of the way around the edge of the leg space. Sl st into the 1st sc to join the round. (18)
Round 2 :
Ch 1, starting in the same st that you just joined into (sc 3, dec) x2, sc 8, join. (16)
Round 3 :
Ch 1, sc 16, join. (16)
Round 4 :
Ch 1, sc 2, dec, sc 3, dec, sc 7, join. (14)
Round 5-8 :
(4 rounds) Ch 1, sc 14, join. Start adding stuffing now. (14)
Round 9 :
Ch 1, sc 14 changing to yellow in the last st, now in yellow, join. (14)
Round 10 :
Ch 1, sc 14, join. (14)
Round 11 :
Ch1, (dec, sc 5) x2, join. Finish adding stuffing. (12)
Round 12 :
Ch 1, BLO dec x6, join. (6)
Info :
FO leaving a tail of yarn. Close the hole by passing the tail of yarn through just the front loop of each stitch and then pulling it tight. Then weave in the end (see photo). Repeat this process for each of the 4 legs.
— Horn :
Info :
In yellow, make 1 piece. Work in continuous rounds (no joining).
Round 1 :
In yellow, ch 2, sc 6 into 2nd chain from hook. You can use the magic ring method if you prefer. (6)
Round 2 :
Sc 5, make 5 sc all into the next st. (10)
Round 3 :
Dec x2, sc 5, make 5 sc all into the next st. (12)
Round 4 :
Dec x3, sc 5, make 5 sc all into the next st. (13)
Round 5 :
Dec x3, sc 6, make 5 sc all into the next st. (14)
Round 6-8 :
(3 rounds) Dec x4, sc 5, make 5 sc all into the next st. The horn does not require any stuffing. (14)
Round 9 :
Sc 5, leave the rest of the stitches un-worked. (5)
Info :
FO leaving a tail of yarn (see photo).
— Ears :
Info :
In white, make 2 pieces. Work in continuous rounds.
Round 1 :
In white, ch 2, sc 4 into 2nd chain from hook. You can use the magic ring method if you prefer. (4)
Round 2 :
(Inc, sc) x2. (6)
Round 3 :
(Sc, inc, sc) x2. (8)
Round 5 :
(Inc, sc 3) x2. (10)
Round 6 :
(Sc 2, inc, sc 2) x2. (12)
Round 8 :
(Inc, sc 5) x2. The ears do not require any stuffing. (14)
Info :
FO leaving a tail of yarn (see photo).
— Neck :
Info :
In white, make 1 piece. Work in joined rounds.
Round 1 :
In white, leaving a tail of yarn at the start of your work (this will be used later to join the neck to the head), ch 18, sl st into the 1st ch to form a loop. Ch 1, sc 18, sl st into the 1st sc to join the round. (18)
Round 2-4 :
(3 rounds) Ch 1, starting in the same st that you just joined into, ch 1, sc 18, join. (18)
Round 5 :
Ch 1, (inc, sc) x3, sc 6, (inc, sc) x3, join. (24)
Round 6 :
Ch 1, sc 24, join. (24)
Round 7 :
Ch 1, (inc, sc) x3, sc 12, (inc, sc) x3, join. (30)
Round 8 :
Ch 1, (inc, sc 2) x3, sc 12, (inc, sc 2) x3, join. (36)
Info :
FO leaving a tail of yarn for later assembly (see photo).
— Head :
Info :
Start in pale pink, make 1 piece. Work in continuous rounds (no joining).
Round 1 :
In pale pink, ch 2, sc 6 into 2nd chain from hook. You can use the magic ring method if you prefer. (6)
Round 3 :
(Inc, sc) x6. (18)
Round 4 :
(Sc, inc, sc) x6. (24)
Round 5-6 :
(2 rounds) Sc 24. FO and weave in the end. Re-join your white yarn into any stitch and then continue as follows:
Round 7-8 :
(2 rounds) Sc 24. (24)
Round 9 :
Sc 8, (inc, sc) x2, (sc, inc) x2, sc 8. (28)
Round 11 :
Sc 8, (inc, sc 2) x2, (sc 2, inc) x2, sc 8. (32)
Round 13 :
Sc 10, (inc, sc 2) x2, (sc 2, inc) x2, sc 10. (36)
Round 14-19 :
(6 rounds) Sc 36. (36)
Round 20 :
(Sc 2, dec, sc 2) x6. (30)
Round 21 :
(Dec, sc 3) x6. (24)
Info :
Insert the eyes between rounds 14 and 15, positioning them as shown (see photos). Add some stuffing to the head now and then continue as follows:
Round 22 :
(Sc, dec, sc) x6. (18)
Round 23 :
(Dec, sc) x6. Finish adding stuffing now. (12)
Info :
FO leaving a tail of yarn. Close the hole by passing the tail of yarn through just the front loop of each stitch and then pulling it tight. If you wish to indent the eyes, pass the tail of yarn backwards and forwards through the head a few times, bringing it out as close to each eye as possible. Pull it slightly tight to pull the eyes inwards (see photos). Then weave in the end (see photo).
— Mane - Red Section :
Info :
In red, make 1 piece.
Info :
To make the curly 1st curly strand: In red, ch 26. Work back down the ch that you just made, starting in the 2nd ch from the hook, with: inc x25.
Info :
To make the 2nd curly strand, continue with: Ch 31. Work back down the ch that you just made, starting in the 2nd ch from the hook, with: inc x30.
Info :
To make the 3rd curly strand, continue with: Ch 26. Work back down the ch that you just made, starting in the 2nd ch from the hook, with: inc x25.
Info :
To make the fringe section: *Ch 9. Work back down the ch that you just made, starting in the 2nd ch from the hook, with: sc 8. Repeat from the * a total of 4 times. FO leaving a tail of yarn (see photo).
— Mane - All other colours :
Info :
Repeat the same process in orange, yellow, green, blue, purple and pink, but in these colours, only make the 3 curly strands and then FO leaving a tail of yarn (see photo).
— Tail :
Info :
In red, orange, yellow, green, blue, purple & pink, make 1 piece in each colour. Worked in a single row.
Row 1 :
Ch 25. Work back down the ch that you just made, starting in the 2nd ch from the hook, with: sl st 24. FO leaving a tail of yarn (see photo).
— Star :
Info :
In yellow, make 1 piece. Work in joined rounds.
Round 1 :
In yellow, ch 2, sc 5 into 2nd chain from hook. You can use the magic ring method if you prefer. Sl st into the 1st sc to join the round. (5)
Round 2 :
Ch 1, (starting in the same st that you just joined into) inc x5, join. (10)
Round 3 :
*Ch 3, work back down the ch that you just made, starting in the 2nd ch from the hook with: sl st, sc. Then, continue around the star, sl st 2. Repeat from the * a total of 5 times. (5 points) FO leaving a tail of yarn for assembly (see photo).
— Unicorn Assembly... :
Info :
Attach the horn centrally, so that it covers rounds 13-16 on the Head & then weave in the end.
Info :
Next pin the ears into position, curving the bottom edge of each ear as shown, when you are happy with their position, sew them into place and then weave in the ends.
Info :
Using a piece of finer black yarn or embroidery thread, add three small lines to each eye as shown, to form the eyelashes. Then weave in the end.
Info :
Pin & then sew the wide end of the neck onto the body, positioning it as shown (don't position it any further forward than this otherwise your unicorn will be too forward heavy). Then, weave in the end. Be careful to not pass the needle through the internal egg pocket as you do this.
Info :
Firmly stuff the neck section and then attach the head. Ensure the face is straight as you do this. Then, weave in the end.
Info :
Next it's time to add the mane... start by attaching the top of the pink section at the base of the head as shown. Just above the pink curls, now add the purple, then the blue and then the green sections of mane. Continue in the same way to add the yellow and then the orange sections of mane.
Info :
The red section of mane is folded - the 3 curls are positioned at the back of the head as shown, while the 4 small strands of fringe point forwards, with two strands on either side of the horn. Sew this into place and weave in the end.
Info :
To make the tail, take a long piece of white yarn and thread the tail pieces onto it as shown. The tails of yarn on each piece should point downwards! Then pair the pieces together & knot the end. Trim the desired length. Finally, use the piece of white yarn to sew the tail onto your unicorn's body & weave in the ends.
Info :
Add the star as shown - once again please ensure that you don't pass the needle through the internal egg pocket as you do this.
Info :
Finally, using a piece of dark grey finer yarn or embroidery thread, add a curved line to the underside of each leg to form the hooves. Weave in the ends.
Assembly Instructions
- Attach the horn centrally over rounds 13-16 on the head and weave in the end.
- Pin the ears in position curving the bottom edge, sew them securely and weave in the ends.
- Insert the internal egg pocket into the body and tack it in place, then work through both layers to make the buttonhole and fasten the button.
- Pin and sew the wide end of the neck to the body, being careful not to pass the needle through the internal egg pocket, then stuff the neck and attach the head securely.
Important Notes
- 💡This pattern is worked in continuous rounds unless otherwise stated; check each section for joined or continuous round notes.
- 💡Use stitch markers to mark the first stitch of each round and the new start point when instructed, especially after shaping rows.
- 💡Stuff parts gradually and firmly for even shape; overstuffing can distort small features like the egg pocket or head.
- 💡Weave in ends as you go to keep assembly tidy and make final finishing easier.
This adorable Unicorn & Hatching Baby pattern brings a little rainbow magic to life with curly mane strands, a removable egg pocket and a tiny hatching companion. Make it in bright colours or pastels, and customise the mane and tail to suit your style. Whether youre gifting it or keeping it as a keepsake, this charming duo will bring smiles and a touch of handmade joy. 🧶✨