🧶 Beautiful ✨ Detailed 💝 Adorable

Bunny Bag Pattern

Bunny Bag Pattern
4.8★ Rating
2-4 Hours Time Needed
1.5K Made This
✂️

Intermediate Level

Ideal for those with basic crochet experience, featuring slightly more advanced stitches and techniques to expand your skills.

⏱️

Bite-Sized Project

Finishes in 2-4 hours—perfect for an afternoon of creative relaxation.

Stylish Touch

An elegant detail to elevate any look, combining traditional techniques with contemporary design sensibilities.

About This Bunny Bag Pattern

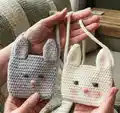
This pattern teaches you how to crochet a cute bunny-shaped bag with ears, embroidered face details, a small flap closure and a cord strap. It uses half double crochet rounds to create a neat textured fabric and a simple cord technique for a strong strap. The instructions include photo guidance and a video link for the cord method.

Bunny Bag Pattern crochet pattern - detailed view of completed project

Youll work with cotton yarn and three hook sizes to complete the project. The finished bag is small, giftable, and ideal for practicing shaping and simple assembly.

Why You'll Love This Bunny Bag Pattern

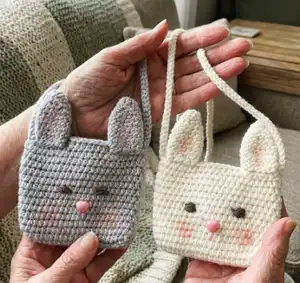
I absolutely love this pattern because it turns simple stitches into a delightful bunny bag that feels handmade and personal. I enjoy how the half double crochet fabric creates a soft, structured surface perfect for embroidery. The ear construction and flap give the bag real character and let you practice shaping in small pieces. Sewing everything together and adding the tiny embroidered nose is genuinely satisfying and gives a lovely finished result.

Bunny Bag Pattern step 1 - construction progress Bunny Bag Pattern step 2 - assembly progress Bunny Bag Pattern step 3 - details and accessories Bunny Bag Pattern step 4 - final assembly and finishing

Switch Things Up

I love how easily you can customize this pattern by changing yarn colors to create different character bags; try pastels for a soft look or bright colors for playful style.

I sometimes use a thicker cotton yarn and a larger hook to make a chunkier, more durable version for older kids.

If you want a tiny keychain version, swap to a finer yarn and smaller hook and shorten the strap drastically.

I often line the bag with lightweight cotton fabric for extra strength and to stop small items falling through the stitches.

Try alternative closures like magnetic snaps, velcro, or a loop-and-button instead of the flap if you prefer quicker access.

I like embroidering different faces or adding felt appliques to make each bag unique and personalized as gifts.

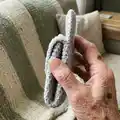
For a sturdier strap, you can crochet two cords and braid them together, or use a purchased cotton cord and cover it with a decorative crocheted sleeve.

I recommend practicing the cord technique on a small sample to get consistent tension before making a full strap for a neater finish.

Experiment with ear shapes and sizes to give different personalities—long floppy ears, short round ears, or asymmetrical ears all look charming.

Finally, add small accessories like a tiny bow, pompom or appliqued heart to the flap for an extra sweet finishing touch.

Common Mistakes & How to Fix Them

✗ Skipping the slip stitch at the end of rounds can make your edges misaligned; always finish rounds with a slst and begin the next round with ch2 as instructed. ✗ Not counting chains and stitches carefully when starting the rectangular base will produce the wrong width; recount the initial Ch22 and check stitch counts listed for each round. ✗ Sewing ears incorrectly onto loops can make them sit crooked or loose; attach each ear to the 7 loops on both sides of the flap, sewing the back of the ear to the back loop and the front to the front loop for stability. ✗ Making the strap too short or uneven will affect wearability; measure as you work and crochet until you reach approximately 85cm in length, leaving yarn ends for sewing. ✗ Using inconsistent tension during the cord technique creates a lumpy strap; practice the cord technique on a small sample and keep a steady, slightly firm tension throughout.

Bunny Bag Pattern

Create an adorable bunny-shaped bag with this clear, photo-supported crochet pattern. Youll make a small rectangular bag, cute bunny ears, embroidered face details, and a cord strap. The pattern uses half double crochet construction and a simple cord technique for the strap. Perfect for gifting or making a charming accessory for little ones.

Intermediate 2-4 Hours

Materials Needed for Bunny Bag Pattern

— Main Fabric

  • 01
    Alize Cotton Gold Practica yarn - Color 63 Cream - 220m/100g (or different brand yarn of the same thickness) - main quantity for one bag
  • 02
    Small amount of Catania brand pink yarn (or similar) for nose and cheek coloring (small scrap)
  • 03
    Small amount of Catania brand brown yarn (or similar) for embroidered eyes (small scrap)

— Tools Required

  • 01
    Crochet hook size 3.0mm (for body and ears instructions use 3mm hook)
  • 02
    Crochet hook size 3.5mm (for strap cord technique use 3.5mm hook)
  • 03
    Crochet hook size 2.2mm (for embroidered eyes use 2.2mm hook)
  • 04
    Wooden button (for the flap closure)
  • 05
    Needle for sewing and embroidery
  • 06
    Scissors
  • 07
    Stitch markers (useful to mark round beginnings)
  • 08
    Powder crayon or powder blush for cheek and ear coloring (optional)

Progress Tracker

0% Complete

— Bunny Body :

Info :

Make a slst at the end of each round and begin with ch2 at the beginnings new round. With cream color yarn and 3mm hook;

Info :

Ch22, turn back and starting from 3rd

Round 1 :

19hdc, into same st; 4hdc, Continue with otherside 18hdc, into last st; 3hdc (44)

Round 2 :

(20hdc, 2hdcinc)*2 (48)

Round 3-14 :

(12 rounds) 48hdc (48)

Info :

Fasten off and cut the yarn.

— Closure Piece :

Info :

Now we're going to crochet a tiny closure piece for the bag. Make a slst at the end of each round and begin with ch2 at the beginnings new round.

Info :

Count back at the finishing point and add yarn to the 15th stitch.

Round 1-6 :

(6 rounds) 8hdc

Round 7 :

2hdc, ch3 (skip 3sts) starting from 4th; 3hdc.

Info :

Now sew a wooden button on the back. Now you can close your bag whenever you want ☺

— Bunny Ears :

Info :

Make 2 of them. With cream color yarn and 3mm hook; Make a slst at the end of each round and begin with ch2 at the beginnings new round.

Round 1 :

Into MR 6hdc (6)

Round 2 :

(2hdc, 1hdcinc)*2 (8)

Round 3 :

(3hdc, 1hdcinc)*2 (10)

Round 4 :

(1hdc, 1hdcinc)*5 (15)

Round 5-10 :

(6 rounds) 15hdc (15)

Info :

Fasten off with a slst and cut the yarn long for sewing.

Info :

Fasten the ears to the 7 loops on both sides of the tiny flap in the middle of the bag. Sew the back of the ear to the back loop and the front to the front loop. You can get support from the photos.

— Bag Strap :

Info :

With cream color yarn and 3.5mm hook; I crocheted with the cord technique. When starting, leave enough yarn for sewing.

Instruction :

Ch2, skip first st and crochet 1sc. Rotate the cord and crochet 1sc into the loop shown in the photo. Turn it again and from two loops insert your hook under them, crochet 1sc. Repeat this cord technique until you reach 85cm in length.

Info :

You can get support from photos and a video link for the cord technique.

Info :

Sew the strap just side the ears. Don't cut the yarn! Sew the strap with two rows of ears and fasten them together. This way the ears will not fall off.

— Bunny Eyes :

Info :

Make 2 of them. With brown color yarn and 2.2mm hook;

Round 1 :

Into MR 6sc

Info :

Fasten off and cut the yarn long for sewing. Count from top to bottom. Sew the eyes to the 7th row with a distance of 7hdc.

— Nose :

Info :

Embroider a tiny nose as in the photo with pink yarn and needle.

— Finishing :

Info :

Finally, you can color the cheeks and ears if you want. I used make-up blush because I didn't want it to be permanent.

Assembly Instructions

  • Fasten the ears to the 7 loops on both sides of the tiny flap in the middle of the bag, sewing the back of each ear to the back loop and the front to the front loop so the ear sits securely.
  • Sew the strap to the bag just beside the ears; do not cut the yarn and fasten the strap with two rows around the ear base so the ears are reinforced and will not fall off.
  • Sew the small closure piece to the top center of the bag flap and attach a wooden button to the back of the bag so the flap can be closed over it.
  • Sew the two embroidered/brown yarn eyes onto the 7th row of the bag front, spacing them 7hdc apart as indicated, then embroider the pink nose centered below the eyes.
  • Weave in all loose ends and trim excess yarn; pin parts in place before sewing to ensure symmetry and even placement.

Important Notes

  • 💡Chains at the beginning of the rounds won't be counted as hdc — always start rounds as instructed and treat starting ch2 as turning chain only.
  • 💡It can be useful to use a stitch marker or different colored yarn to see the beginning of each round and keep your counts accurate.
  • 💡The bag measures approximately 11cm (4.33 inch) length and 13cm (5.11 inch) width using the same materials listed (except ears may vary).
  • 💡Fasten off with a slst at the end of small pieces and leave a long tail for sewing to make assembly easier.

You did it — your adorable Bunny Bag is finished and ready to love! 🐰 This little project combines simple shaping, tiny embroidery and a neat cord strap to create a charming accessory. Perfect for gifting or keeping as a sweet handmade keepsake. 🧶✨

You ask,

we answer.

FAQs

What size will the finished piece be?

The finished bag measures approximately 11 cm length by 13 cm width when made with the recommended yarn and hooks (except ears may vary slightly).

Can I use different yarn weights for this pattern?

Yes, you can use different yarn weights but the final size and stitch gauge will change; if you choose a different weight, adjust hook sizes accordingly and expect a larger or smaller bag.

Do I need prior crochet experience for this pattern?

This pattern is rated intermediate—basic knowledge of sc, hdc, increases, working in rounds and simple sewing skills are recommended for best results.

How long does this project typically take to complete?

Most crocheters complete this project in 2-4 hours depending on experience and how much time you spend on embroidery and assembly.