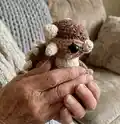
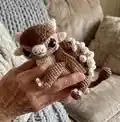
Make your own chubby Ankylosaurus Bruno with this detailed amigurumi pattern. You'll crochet a cute tank-like dinosaur with spikes, plates and a movable tail using small hooks and assembly hardware. Clear step-by-step rounds, photos and finishing instructions guide you through every part. Perfect for gifting or adding to your handmade collection.
Progress Tracker
0% Complete
— Head :
Round 1 :
Yarn A: 11 loops, turning, 10sc (starting from the 2nd loop from the hook) (10l)
Round 2 :
1 loop, turning, inc, 8sc, inc (12l)
Round 3 :
1 loop, turning, 12sc (12l)
Round 4 :
1 loop, turning, inc, 10sc, inc (14l)
Round 5 :
1 loop, turning, 14sc only through front loops (14l)
Round 6-7 :
1 loop, turning, 14sc (14l)
Round 8 :
1 loop, turning, dec, 10sc, dec (12l)
Round 9 :
1 loop, turning, 12sc only through front loops (12l)
Round 10-11 :
1 loop, turning, 12sc (12l)
Round 12 :
1 loop, turning, inc, 10sc, inc (14l)
Round 13 :
1 loop, turning, 14sc only through front loops (14l)
Round 14-15 :
1 loop, turning, 14sc (14l)
Round 16 :
1 loop, turning, dec, 10sc, dec (12l)
Round 17 :
1 loop, turning, 12sc only through front loops (12l)
Round 18 :
1 loop, turning, dec, 8sc, dec (10l)
Round 19 :
1 loop, turning, [dec]x2, 2sc, [dec]x2 (6l)
Round 20 :
1 loop, turning, 6sc (6l)
Round 21 :
1 loop, turning, 6sc only through front loops (6l)
Round 22 :
1 loop, turning, dec, 2sc, dec (4l)
Info :
Next change the color to yarn B. To get a beautiful line when changing color in the next row crochet part of the sc in this way - half of the sc with dark-brown (yarn A), and the other half with light-brown (yarn B).
Round 23 :
22sc up; 10sc straight; 22sc down; 4sc straight (58l)
Info :
Next cut the yarn A and continue crocheting with yarn B only!
Round 24 :
4sc, dec, 10sc, dec, 18sc, dec, 10sc, dec, 8sc (54l)
Round 28 :
[7sc, dec]x6 (48l)
Round 29 :
[6sc, dec]x6 (42l)
Round 30 :
[5sc, dec]x6 (36l)
Round 31 :
[sc, dec]x12 (24l)
Muzzle (Yarn C) :
1: 5 loops, turning, 4sc (starting from the 2nd loop from the hook), 4sc (from the back of the chain) (8l)
Round 2 :
[sc, inc]x4 (12l)
Round 3 :
12sc, sl st in the 1st sc (12l)
Info :
Cut and fix the thread, leaving a long end for sewing. Sew the muzzle to the head as shown in photos. Insert safety eyes between the rounds 26 and 27, the distance between them is approximately 12 stitches, don’t fix yet.
Info :
Completely fill the head. Insert cotter pin into shim. Place cotter pin between 31 and 32 round of the head as shown in photos and secure the disk.
Info :
Trim the thread. Pass the thread through all the loops using a yarn needle. Tighten and secure.
— Spikes (Yarn C) :
Info :
Crochet spikes with a hook 1,5 mm, split Yarn C in half!
SMALL, 2 pcs - Round 1 :
2 loops, 4sc in 2nd loop from hook (amigurumi ring) (4l)
Round 4 :
[3sc, inc]x2 (10l)
Round 6 :
[4sc, inc]x2 (12l)
Info :
Cut and fix the thread, leaving a long end for sewing. Slightly stuff the spikes with synthepus and sew it to the head.
BIG, 2 pcs - Round 1 :
2 loops, 3sc in 2nd loop from hook (amigurumi ring) (3l)
Round 2 :
sc, inc, sc (4l)
Round 3 :
[sc, inc]x2 (6l)
Round 5 :
[2sc, inc]x4 (16l)
Round 7 :
[7sc, inc]x2 (18l)
Info :
Cut and fix the thread, leaving a long end for sewing. Slightly stuff the spikes with synthepus and sew it to the head.
— Tail (Yarn A) :
Info :
Tail club is crocheted in two identical details. Crochet the first detail as follows below:
Round 1 :
2 loops, 6sc in 2nd loop from hook (amigurumi ring) (6l)
Round 2 :
[sc, inc]x3 (9l)
Info :
Cut and fix the thread. Crochet the second detail according to the same scheme, do not cut the thread. To connect the details insert the hook initially into the first detail (from the inside to the outside), and then into the second detail (from the outside to the inside).
Round 6 (incomplete round) :
crochet 3sc of the first detail together with 3sc of the second detail, then crochet 6sc along the second detail
Round 7 :
crochet 6sc on the first part, crochet 6sc on the second part (12l)
Round 6 :
[4sc, dec]x2 (10l)
Round 7 :
[3sc, dec]x2 (8l)
Round 8 :
[2sc, dec]x2 (6l)
Round 11 :
sc, [inc]x2, 3sc (8l)
Round 13 :
2sc, [inc]x2, 4sc (10l)
Round 15 :
3sc, [inc]x2, 5sc (12l)
Round 16 :
5sc, [inc]x2, 5sc (14l)
Round 17 :
7sc, [inc]x2, 5sc (16l)
Round 18 :
8sc, [inc]x2, 6sc (18l)
Info :
Cut a piece of decorative wire approximately 12 cm (4.7 inches). Twist one end of the wire into a loop, and twist the other end into the ring (of diameter equal to the tail opening) with the help of round nose pliers. Wrap the place of twisting with electrical tape. Insert crochet tail to the wire or stuff with synthepus if not using wire.
Info :
Cut and fix the thread. Mark with a pin the place where the tail connect to the back - move the pin to the 12th loop right from the beginning of the round.
— Body (Back, Yarn A) :
Round 1 :
14 loops, turning, 13sc (starting from the 2nd loop from the hook) (13l)
Round 2 :
1 loop, turning, 13sc (13l)
Round 3 :
1 loop, turning, inc, 11sc, inc (15l)
Round 4 :
1 loop, turning, 15sc only through front loops (15l)
Round 5 :
1 loop, turning, inc, 13sc, inc (17l)
Round 6 :
1 loop, turning, 17sc (17l)
Round 7 :
1 loop, turning, inc, 15sc, inc (19l)
Round 8 :
1 loop, turning, 19sc only through front loops (19l)
Round 9-11 :
1 loop, turning, 19sc (19l)
Round 12 :
1 loop, turning, 19sc only through front loops (19l)
Round 13 :
1 loop, turning, 19sc (19l)
Round 14 :
1 loop, turning, dec, 15sc, dec (17l)
Round 15 :
1 loop, turning, 17sc (17l)
Round 16 :
1 loop, turning, 17sc only through front loops (17l)
Round 17 :
1 loop, turning, dec, 13sc, dec (15l)
Round 18 :
1 loop, turning, dec, 11sc, dec (13l)
Round 19 :
1 loop, turning, dec, 9sc, dec (11l)
Round 20 :
1 loop, turning, dec, 7sc, dec only through front loops (9l)
Round 21 :
1 loop, turning, dec, 5sc, dec (7l)
Round 22 :
1 loop, turning, dec, 3sc, dec (5l)
Round 23 :
1 loop, turning, crochet 5sc of the back together with 5sc of the tail (to join tail to back)
Info :
Next change the color to yarn B. To get a beautiful line when changing color in the next row (the same way as for the head) crochet part of the sc in this way - half of the sc with dark-brown (yarn A), and the other half with light-brown (yarn B). Crochet the body around the perimeter in a counter-clockwise direction from the point 'Start'.
Round 24 :
crochet 22sc, 13sc, 22sc on the back; crochet 13sc on the tail (70l)
Info :
Sew the holes between the tail and the back using extra thread.
Round 28 :
[5sc, dec]x10 (60l)
Round 29 :
[8sc, dec]x6 (54l)
— Neck (Yarn C) :
Round 1 :
5 loops, turning, 4sc (starting from the 2nd loop from the hook) (4l)
Round 2 :
1 loop, turning, inc, 2sc, inc (6l)
Round 3 :
1 loop, turning, inc, 4sc, inc (8l)
Round 4 :
1 loop, turning, inc, 6sc, inc (10l)
Round 10 :
8sc down; 4sc straight; 8sc up, 10sc straight (30l)
Info :
Mark with a pin the place where the neck connect to the body - move the pin for 1 loop right from the beginning of the round. Cut and fix the thread. Continue crochet the body, change the thread to yarn C. Connect the body with the neck in the next round by crocheting the parts together.
Round 30 :
crochet 9sc, dec, 7sc along the body; crochet 10sc of the body together with 10sc of the neck; then crochet 2sc, dec, [9sc, dec]x2 along the body (60l)
Info :
Insert cotter pin between 6 and 7 row of the neck (in the middle). Put the disk on cotter pin and wrap the ends in the 'rings' with the help of round-nosed pliers.
Round 34 :
[3sc, dec]x12 (48l)
Round 35 :
[2sc, dec]x12 (36l)
Info :
Start stuffing the body with synthepus.
Round 36 :
[sc, dec]x12 (24l)
Round 37 :
[2sc, dec]x6 (18l)
Round 38 :
[sc, dec]x6 (12l)
Info :
Completely fill the body.
— Plates (Yarn C) :
Info :
Crochet plates with a hook 1,5 mm, split Yarn C in half!
SMALL, 8 pcs - Round 1 :
2 loops, 4sc in 2nd loop from hook (amigurumi ring) (4l)
Round 2 :
[sc, inc]x2 (6l)
Info :
Cut and fix the thread, leaving a long end for sewing.
MIDDLE, 10 pcs - Round 1 :
2 loops, 6sc in 2nd loop from hook (amigurumi ring) (6l)
Round 2 :
[2sc, inc]x2 (8l)
Round 4 :
[3sc, inc]x2 (10l)
Info :
Cut and fix the thread, leaving a long end for sewing.
BIG, 4 pcs - Round 1 :
2 loops, 6sc in 2nd loop from hook (amigurumi ring) (6l)
Round 2 :
[sc, inc]x3 (9l)
Round 3 :
[2sc, inc]x3 (12l)
Info :
Slightly stuff the plates with synthepus. Cut and fix the thread, leaving a long end for sewing. Sew the plates to the back, placing them on the lines of the remaining back loops in a checkerboard pattern.
— Legs (Yarn B) :
FRONT, 2 pcs - Round 1 :
5 loops, turning, 4sc (starting from the 2nd loop from the hook), 4sc (from the back of the chain) (8l)
Round 2 :
3sc in the next loop, 6sc, 3sc in the next loop (12l)
Round 3 :
only through back loops 12sc (12l)
Round 4-5 :
[inc]x2, 3sc, {sc3tog}*, 4sc (12l) *{sc3tog} – sc next 3 stitches together (single crochet decrease)
Round 6 :
[dec]x2, 3sc, [inc]x2, 3sc (12l)
Info :
Start stuffing the leg with synthepus.
Round 8 :
[dec]x2, 3sc, [inc]x2, 3sc (12l)
Round 15 :
[sc, dec]x4 (8l)
Round 16 :
[2sc, dec]x2 (6l)
Info :
Trim the thread. Pass the thread through all the loops using a yarn needle. Tighten and secure.
BACK, 2 pcs - Round 1 :
5 loops, turning, 4sc (starting from the 2nd loop from the hook), 4sc (from the back of the chain) (8l)
Round 2 :
3sc in the next loop, 6sc, 3sc in the next loop (12l)
Round 3 :
only through back loops 12sc (12l)
Round 4-5 :
[inc]x2, 3sc, {sc3tog}*, 4sc (12l)
Round 6 :
[dec]x2, 3sc, [inc]x2, 3sc (12l)
Round 8 :
[dec]x2, 3sc, [inc]x2, 3sc (12l)
Round 13 :
[sc, dec]x4 (8l)
Round 14 :
[2sc, dec]x2 (6l)
Info :
Trim the thread. Pass the thread through all the loops using a yarn needle. Tighten and secure. THOES, 3 pcs on each leg (Yarn C, in two folds). Embroider 3 toes on each leg with French knot.
— Assemblage :
Info :
Sew your crocheted legs to the body with a threaded bracing (use round-nosed pliers to make it easier to pull the needle). For this, it is necessary: 1. Attach the legs using needles for cutting (front legs between 29 and 30 rounds of body, distance between legs approx 24 stitches, back legs between 25 and 26 rounds of body, distance between legs approx 16 stitches - view from above).
Info :
2. Insert the needle through the back into the front leg attachment point (leaving the loose end of the thread outside). 3. Thread the needle through two loops on the inner surface of the leg (the needle for cutting must be in the middle). 4. Insert the needle into the body at the leg attachment point and pull out it at the point of attachment of the second leg. Repeat and secure so the dinosaur stands steadily.
Info :
Sew the head to the body using the cotter pin assembly: insert cotter pin through shim and disk to allow the head to turn. Sew plates and spikes as shown, placing plates in checkerboard pattern. Embroider nostrils and mouth with black threads, stitch white highlights and attach cheeks (crochet cheeks with hook 1.5 mm: 2 loops, 6sc in 2nd loop from hook, sl st in 1st sc (6l)).
This little Ankylosaurus Bruno is full of character and handmade charm — perfect for collectors and gift givers. Follow the detailed rounds, photos and finishing tips to create a sturdy, poseable toy with a movable head and textured shell. Enjoy stitching tiny plates and spikes that make this dino extra lovable. 🧶🐾