🧢 Beautiful ✨ Detailed πŸ’ Adorable

Unicorn Hand Puppet Amigurumi Pattern

Unicorn Hand Puppet Amigurumi Pattern
4.3β˜… Rating
5-7 Hours Time Needed
3.8K Made This
βœ‚οΈ

Intermediate Level

Ideal for those with basic crochet experience, featuring slightly more advanced stitches and techniques to expand your skills.

⏱️

Weekend Treat

Takes 5-7 hours, making it an enjoyable project to finish over a couple of days.

🧸

Cute Companion

An adorable friend to cherish, handcrafted with love to bring comfort and joy for years to come.

About This Unicorn Hand Puppet Amigurumi Pattern

This pattern makes a soft, handmade unicorn hand puppet with a hinged mouth, spiral mane ringlets, large expressive eyes and a crocheted horn. It uses DK weight yarn and a 2.5mm hook to create a neat, dense fabric suitable for a puppet. The pattern is worked in continuous rounds and includes color change notes for the eyes and instructions for making mane spirals.

Unicorn Hand Puppet Amigurumi Pattern crochet pattern - detailed view of completed project

You will crochet separate pieces (tongue, top and bottom mouth, eyes, horn and mane) and join them to form the puppet. Full assembly instructions and finishing tips are included to help you place the eyes, horn and mane symmetrically.

Why You'll Love This Unicorn Hand Puppet Amigurumi Pattern

I absolutely love this pattern because it combines playful details like a curly mane and big, characterful eyes that bring the puppet to life. I enjoy the mix of small, quick pieces (like the ringlets) and the rewarding assembly that transforms them into a cohesive puppet. The construction is thoughtful β€” the separate tongue and mouth pieces create a realistic mouth opening that children love to use. I also like how easy it is to customize the mane colours or horn size, which makes each finished puppet unique. Seeing the finished puppet on a child's hand is always the best part for me.

Unicorn Hand Puppet Amigurumi Pattern step 1 - construction progress Unicorn Hand Puppet Amigurumi Pattern step 2 - assembly progress Unicorn Hand Puppet Amigurumi Pattern step 3 - details and accessories Unicorn Hand Puppet Amigurumi Pattern step 4 - final assembly and finishing

Switch Things Up

I love how easy it is to customise this unicorn puppet by changing the mane colours to suit any theme or palette.

I often make a pastel version for baby gifts or a bright neon set for playful, modern looks.

If you want a smaller puppet reduce hook size and use a thinner yarn; for a chunkier puppet use a larger hook and bulkier yarn.

I sometimes replace the crocheted horn with a felt or embroidered horn for a different texture and finish.

Try adding embroidery around the eyes or tiny stitched eyelashes to vary expression and personality.

You can add thin wire inside a couple of mane strands to make them poseable for extra character during play.

To make a non-slip version for performers, stitch a small piece of non-slip fabric to the inside cuff of the puppet.

I like to create themed puppets by changing the tongue colour or adding a little felt tongue decoration for special occasions.

For secure eyes on toys for older children, sew the eyes with a long tail and reinforce with an extra stitch; for adult collectors, safety eyes can be used instead of crocheted eyes.

Experiment with different stuffing amounts in the head and eyes to find the perfect balance between firmness and softness for your preferred hand feel.

Common Mistakes & How to Fix Them

βœ— Skipping stitch markers while joining the mouth pieces can cause misaligned seams; place a stitch marker at the start of the seam to keep your joins even and centred. βœ— Forgetting to insert the squeaker before closing the tongue will make it impossible to add later; insert the squeaker before you sew the tongue closed and check placement before final stitching. βœ— Overstuffing the eyes or horn changes their shape and makes sewing them to the head awkward; stuff these small pieces lightly and evenly, then add a little more stuffing only if needed. βœ— Not checking stitch counts after increases and decreases will lead to uneven shaping; count your stitches at the end of each round, especially after rounds with increases or decreases to maintain the correct stitch totals.

Unicorn Hand Puppet Amigurumi Pattern

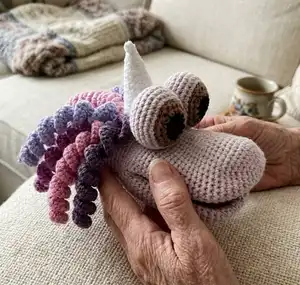
Create a whimsical unicorn hand puppet perfect for storytelling and imaginative play. This intermediate amigurumi pattern guides you through the mouth, tongue, eyes, horn and curly mane with clear step-by-step rounds and assembly notes. You will love how the colourful mane and expressive eyes give this puppet character. Make it as a gift or a playful addition to your craft collection.

Intermediate 5-7 Hours

Materials Needed for Unicorn Hand Puppet Amigurumi Pattern

β€” Main Fabric

  • 01
    Deramores Studio DK Frost - 100g (main pale colour; used for head and mouth)
  • 02
    Deramores Studio DK Citrine - 50g (horn colour)
  • 03
    Deramores Studio DK Ruby - 50g (tongue colour)
  • 04
    Deramores Studio DK Burnt Orange - 50g (alternative/one mane colour)
  • 05
    Deramores Studio DK Peridot - 50g (alternative/one mane colour)
  • 06
    Deramores Studio DK Lapis - 50g (alternative/one mane colour)
  • 07
    Deramores Studio DK Purple - 50g (mane colour)
  • 08
    Deramores Studio DK Gingerbread - 50g (eye detail colour)
  • 09
    Deramores Studio DK Ebony - small amount (eye centre/black detail)

β€” Tools Required

  • 01
    Crochet hook size 2.5mm
  • 02
    Fibrefill / toy stuffing
  • 03
    Toy squeaker (optional)
  • 04
    Stitch markers
  • 05
    Yarn needle for sewing and weaving ends
  • 06
    Pins for positioning pieces while sewing
  • 07
    Scissors

Progress Tracker

0% Complete

β€” Tongue :

Info :

Using Ruby yarn. Ch 2.

Round 1 :

6 sc in 2nd ch from (6 sts)

Round 2 :

hook inc in all 6 sts (12 sts)

Round 3 :

(1 sc, inc in next st) x6 (18 sts)

Round 4 :

(2 sc, inc in next st) x6 (24 sts)

Round 5 :

(3 sc, inc in next st) x6 (30 sts)

Round 6-20 :

30 sc (30 sts)

Info :

Insert your squeak into the tongue if you are adding one.

Round :

15 sc through both sides of the tongue to close. Sl last st and finish.

β€” Top of Mouth :

Info :

Using Frost yarn. Ch 2.

Round 1 :

6 sc in 2nd ch from hook (6 sts)

Round 2 :

inc in all 6 sts (12 sts)

Round 3 :

(1 sc, inc in next st) x6 (18 sts)

Round 4 :

(2 sc, inc in next st) x6 (24 sts)

Round 5 :

(3 sc, inc in next st) x6 (30 sts)

Round 6 :

(4 sc, inc in next st) x6 (36 sts)

Round 7 :

(5 sc, inc in next st) x6 (42 sts)

Round 8 :

(6 sc, inc in next st) x6 (48 sts)

Round 9-26 :

48 sc (48 sts)

Info :

Sl last st, cut yarn.

β€” Bottom of Mouth :

Info :

Using Frost yarn. Ch 2.

Round 1 :

6 sc in 2nd ch from hook (6 sts)

Round 2 :

inc in all 6 sts (12 sts)

Round 3 :

(1 sc, inc in next st) x6 (18 sts)

Round 4 :

(2 sc, inc in next st) x6 (24 sts)

Round 5 :

(3 sc, inc in next st) x6 (30 sts)

Round 6 :

(4 sc, inc in next st) x6 (36 sts)

Round 7 :

(5 sc, inc in next st) x6 (42 sts)

Round 8 :

(6 sc, inc in next st) x6 (48 sts)

Round 9-23 :

48 sc (48 sts)

Info :

Do not cut yarn, we will now join the mouth and tongue pieces together as follows.

Info :

Place the top and bottom mouth pieces on top of one another with your yarn from the bottom mouth piece at the side. 5 sc through both pieces along what will be the middle seam to join both of the mouth pieces. Place a marker at the 1st st.

Info :

Now it is time to add the tongue, to do this 15 sc through the bottom of mouth, tongue and top of mouth, this will join them altogether along the same middle seam that you had started, now 5 sc through the top and bottom mouth pieces only. This will be the new beginning of your rnds. Replace your marker here.

Info :

You should now have a total of 54 sts around the outside of the puppets mouth.

Round 24 :

54 sc (54 sts)

Round 25 :

(7 sc, dec) x6 (48 sts)

Round 26-50 :

48 sc (48 sts)

Info :

If you would like to make your puppet longer or shorter adjust the amount of rows worked here.

Info :

Sl last st, tie off and finish.

β€” Eyes (Make 2) :

Info :

Using Ebony yarn. Ch 2.

Round 1 :

6 sc in 2nd ch from hook (6 sts)

Round 2 :

inc in all 6 sts (12 sts)

Info :

Change to gingerbread yarn.

Round 3 :

(1 sc, inc in next st) x6 (18 sts)

Round 4 :

(2 sc, inc in next st) x6 (24 sts)

Info :

Change to frost yarn.

Round 5 :

(3 sc, inc in next st) x6 (30 sts)

Round 6-9 :

30 sc (30 sts)

Round 10 :

(3 sc, dec) x6 (24 sts)

Round 11 :

(2 sc, dec) x6 (18 sts)

Info :

Start to stuff.

Round 12 :

(1 sc, dec) x6 (12 sts)

Round 13 :

dec x6 (6 sts)

Info :

Finish stuffing and close hole, leave enough yarn to sew to puppet later.
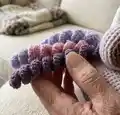
β€” Mane Ringlets (Make 8) :

Info :

Make 8 ringlets (1 of each colour, and 2 extra in the colour of your choice). Using selected yarn work in rows, note ch1 turn does not count as a stitch. Ch 31.

Row 1 :

sc in 2nd ch from hook, sc 29, ch 1 turn (31 sts)

Row 2 :

Inc x30, ch 1 turn (60 sts)

Row 3 :

Inc x 60 (120 sts)

Info :

Tie off leaving enough thread to sew to head later. If you would like a fuller mane simply keep adding more spirals.

β€” Horn :

Info :

Using Citrine yarn.

Round 1 :

Start 4 sc in a magic ring (4 sts)

Round 2 :

4 sc (4 sts)

Round 3 :

(1 sc, inc) x2 (6 sts)

Round 4 :

(1 sc, inc) x3 (9 sts)

Round 5 :

9 sc through back of the loop only (9 sts)

Round 6 :

(2 sc, inc) x3 (12 sts)

Round 7 :

12 sc (12 sts)

Round 8 :

12 sc through back of the loop only (12 sts)

Round 9 :

(3 sc, inc) x3 (15 sts)

Round 10 :

15 sc (15 sts)

Round 11 :

15 sc through back of the loop only (15 sts)

Round 12 :

(4 sc, inc) x3 (18 sts)

Round 13 :

18 sc (18 sts)

Round 14 :

18 sc through back of the loop only (18 sts)

Round 15 :

(5 sc, inc) x3 (21 sts)

Round 16 :

21 sc (21 sts)

Round 17 :

21 sc through back of the loop only (21 sts)

Round 18-19 :

21 sc (21 sts)

Info :

Sl last st, cut yarn leaving enough thread to close off and weave remaining thread in to finish. Fill with a stuffing.

β€” Making Up :

Info :

Start by pinning the Eyes and Horn onto the top of the unicorn head. Try to make them as symmetrical as possible. Check this by putting it on your hand. Once happy with placement start to sew them on. Be careful not to sew through both sides of the puppet as this will close the hole and you won't be able to get your hand in. I sew around twice and also catch the two eyes together up through the back where they meet. Tie off and weave in any loose threads as you go.

Info :

Now you can add the Mane Ringlets. Sew them in place and tie off your loose ends on the inside of the puppet.

Info :

Your Unicorn Puppet is Complete!

Assembly Instructions

  • Place the top and bottom mouth pieces on top of one another and join the middle seam with 5 sc through both pieces to start the seam; place a marker at the 1st stitch.
  • Join the tongue by working 15 sc through the bottom mouth, tongue and top mouth to join them together, then 5 sc through top and bottom mouth pieces only to finish the seam; replace your marker to mark the new rnd start.
  • Sew the eyes and horn onto the top of the head, checking symmetry by trying the puppet on your hand before permanently stitching; sew around pieces twice and catch both eyes together through the back seam where they meet.
  • Sew mane ringlets into place along the head seam and tie off all loose yarn ends inside the puppet for a tidy finish.

Important Notes

  • πŸ’‘This pattern is written using American terminology and is worked in continuous rounds unless otherwise stated.
  • πŸ’‘Using the specified yarn and 2.5mm hook produces a finished puppet approximately 19cm long; changing yarn weight or hook size will change the finished size.
  • πŸ’‘Place stitch markers when joining seams and when starting new rounds to maintain correct stitch counts and symmetry.

This cheerful unicorn hand puppet brings playful magic to story time and imaginative play. The spiral mane and expressive eyes make each puppet unique and full of personality. Whether you gift it or keep it for creative fun, it is sure to delight both kids and grown-ups alike. πŸ§ΆπŸ¦„

You ask,

we answer.

FAQs

What size will the finished puppet be?

The finished hand puppet measures approximately 19 cm long when made with the specified DK yarn and 2.5mm hook.

Can I change the colours of the mane and horn?

Yes, you can mix and match any DK weight colours for the mane ringlets and horn; just use the same number of ringlets and follow the same instructions.

Do I need to use a toy squeaker?

No, a toy squeaker is optional. If you choose to add one, insert it into the tongue before closing the tongue piece.

Is this pattern suitable for beginners?

This pattern is rated intermediate due to assembly and shaping steps; basic amigurumi skills and experience with continuous rounds are recommended.

How long will this project take to complete?

Most crocheters complete this puppet in about 5-7 hours, depending on experience level and the amount of time spent on assembly and finishing.