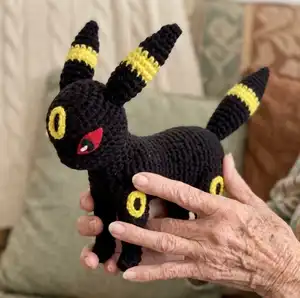
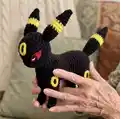
Create an adorable Umbreon plushie with this step-by-step crochet pattern. You will enjoy shaping the body, head, legs, ears and tail while adding felt details for expressive eyes and yellow rings. Perfect for fans and amigurumi makers who love a slightly challenging, rewarding project.
Progress Tracker
0% Complete
— Body :
Round 1 :
6 sc in magic ring (6)
Round 2 :
2 sc in each sc around (12)
Round 3 :
sc in next sc, 2 sc in next sc around (18)
Round 4 :
sc in next 2 sc, 2 sc in next sc around (24)
Round 5 :
sc in next 3 sc, 2 sc in next sc around (30)
Round 6 :
sc in next 4 sc, 2 sc in next sc around (36)
Round 7-12 :
sc in each sc around (36)
Round 13 :
sc in next 10 sc, dec over next 2 sc around (33)
Round 14-15 :
sc in each sc around (33)
Round 16 :
sc in next 9 sc, dec over next 2 sc around (30)
Round 17-20 :
sc in each sc around (30)
Info :
This is a fairly good place to begin stuffing and shaping if you haven't already. Stuff fairly firmly while also shaping the body. Continue stuffing and shaping as you progress.
Round 21 :
sc in next 9 sc, 2 sc in next sc around (33)
Round 22 :
sc in next 10 sc, 2 sc in next sc around (36)
Round 23-25 :
sc in each sc around (36)
Round 26 :
sc in next 4 sc, dec over next 2 sc around (30)
Round 27 :
sc in next 3 sc, dec over next 2 sc around (24)
Round 28 :
sc in next 2 sc, dec over next 2 sc around (18)
Round 29 :
sc in next sc, dec over next 2 sc around (12)
Round 30 :
dec over next 2 sc around (6)
Info :
F/O. Add any stuffing needed to finish the shaping and weave the tail thread through the final round, pull gently to close up the small opening. Secure and weave in the tail yarn.
— Head/Neck :
Round 1 :
8 sc in magic ring (8)
Round 2 :
2 sc in each sc around (16)
Round 3 :
sc in next sc, 2 sc in next sc around (24)
Round 4 :
sc in next 2 sc, 2 sc in next sc around (32)
Round 5-6 :
sc in each sc around (32)
Round 7 :
sc in next 16 sc, 2 sc in next sc, sc in remaining 15 sc (33)
Round 8 :
sc in each sc around (33)
Round 9 :
sc in next 16 sc, 3 sc in next sc, sc in next 16 sc (35)
Round 10 :
sc in next 17 sc, 2 sc in next sc, sc in next 17 sc (36)
Round 11 :
sc in next 14 sc, *dec over next 2 sc*, repeat * * 3 more times, sc in remaining 14 sc (32)
Round 12 :
sc in next 2 sc, dec over next 2 sc around (24)
Round 13 :
repeat rnd 12 (18)
Round 14 :
sc in next 8 sc, 2 sc in next sc, sc in next 8 sc, 2 sc in next sc (20)
Round 15 :
sc in next 9 sc, 2 sc in next sc, sc in next 9 sc, 2 sc in next sc (22)
Round 16 :
sc in next 10 sc, 2 sc in next sc, sc in next 10 sc, 2 sc in next sc (24)
Info :
Stuff head firmly while shaping, pay particular attention to the 'nose' area. The head should be pinned to the upper portion of the body (roughly rnds 24-30) with nose area facing forward (the two 'points' of the neck shaping create the cape that create the gentle curve of the neckline.) See photos to help with placement.
— Front Legs :
Round 1 :
6 sc in magic ring (6)
Round 2 :
sc in next 2 sc, 2 sc in next sc, sc in next 2 sc, 2 sc in next sc (8)
Round 3 :
sc in each sc around (8)
Round 4 :
dec over next 2 sc, sc in next sc, 2 sc in each of next 2 sc, sc in next sc, dec over last 2 sc (8)
Round 5 :
repeat Rnd 4 (8)
Info :
Begin stuffing at this point, foot and leg should be stuffed moderately firm, without overstuffing. You'll want a little bit of play in the leg to position the feet as you prefer. Continue stuffing as you progress.
Round 6-8 :
sc in each sc around (8)
Round 9 :
sc in next 3 sc, 2 sc in next sc, sc in next 3 sc, 2 sc in last sc (10)
Round 10 :
sc in next 4 sc, 2 sc in next sc, sc in next 4 sc, 2 sc in last sc (12)
Row 11-12 :
sc in each sc around (12)
Info :
Do not fasten off at this point, continue with shoulder and either right or left leg instructions:
Item Name (Begin Shoulder) :
Right leg:
Row 13 :
sc in next 6 sc, leave remaining sc unworked, ch 1 and turn (6)
Row 14 :
sc in each sc across, ch 1 and turn (6)
Row 15 :
sc in next 4 sc, dec over last 2 sc, ch 1 and turn (5)
Row 16 :
sc in next 3 sc, dec over last 2 sc (4)
Item Name (Left Leg) :
Turn work so that the 'inside' of the leg (wrong side of work) is facing you. Complete rows 13 through 16 as described for right leg.
— Back Legs :
Round 1-5 :
Same as for front leg
Round 6-7 :
sc in each sc around (8)
Info :
Begin stuffing at this point, foot and leg should be stuffed moderately firmly, without overstuffing. You'll want a little bit of play in the leg to position the feet as you prefer. Continue stuffing as you progress.
Round 8 :
sc in next sc, 2 sc in next sc around (12)
Round 9 :
sc in each sc around (12)
Round 10 :
Repeat rnd 8 (18)
Round 11-12 :
sc in each sc around (18)
Info :
Do not fast off, continue with 'cape/shoulder' for either right or left leg:
Item Name (Right Leg cape/shoulder) :
Row 1: Sc 9, leave remaining sc unworked, ch1 and turn (9)
Row 2 :
sc in next 7 sc, dec over last 2 sc, ch1 and turn (8)
Row 3 :
sc in next 6 sc, dec over last 2 sc, ch1 and turn (7)
Row 4 :
sc in next 5 sc, dec over last 2 sc, ch1 and turn (6)
Row 5 :
sc in next 4 sc, dec over last 2 sc, ch1 and turn (5)
Row 6 :
sc in next 3 sc, dec over last 2 sc, (4)
Item Name (Left Leg) :
Turn work so that inside of leg (wrong side of work) is facing you. Continue with shoulder as described for Right Leg.
— Ears (make 2) :
Round 1 :
3 sc in magic ring (3)
Round 2 :
sc in first 2 sc, 2 sc in last sc (4)
Round 3 :
sc in first sc, 2 sc in next sc, sc in next sc, 2 sc in last sc (6)
Round 4 :
sc in next sc, 2 sc in next sc around (9)
Round 5 :
sc in next 2 sc, 2 sc in next sc around (12)
Round 6 :
sc in each sc around, change to yellow yarn in last sc of round, drop black to back of work but do not fasten off
Round 7-9 :
sc in each sc around, change back to black yarn in last sc of round 9, cut yellow leaving a tail of several inches, (carry tail along with work for the first several stitches of the next round to secure it) (12)
Info :
Begin stuffing at this point, ears should be stuffed fairly firmly. Continue to stuff as you progress.
Round 10-12 :
sc in each sc around (12)
Round 13 :
sc in next 2 sc, dec over next 2 sc around (9)
Round 14 :
sc in next sc, dec over next 2 sc around (6)
Info :
F/O. Add any stuffing needed to finished out the shape of the ear.
— Tail :
Round 1 :
3 sc in magic ring (3)
Round 2 :
sc in first 2 sc, 2 sc in last sc (4)
Round 3 :
sc in first sc, 2 sc in next sc, sc in next sc, 2 sc in last sc (6)
Round 4 :
sc in next sc, 2 sc in next sc around (9)
Round 5 :
sc in next 2 sc, 2 sc in next sc around (12)
Round 6 :
sc in next 3 sc, 2 sc in next sc around (15)
Round 7-8 :
sc in each sc around, change to yellow yarn in last sc of round (15)
Info :
Begin stuffing at this point, tail should be stuffed fairly firmly. Continue to stuff as you progress.
Round 9-11 :
sc in each sc around, change to black in last sc of round 11, f/o yellow yarn (15)
Round 12-14 :
sc in each sc around (15)
Round 15 :
sc in next 3 sc, dec over next 2 sc around (12)
Round 16 :
sc in each sc around (12)
Round 17 :
sc in next 2 sc, dec over next 2 sc around (9)
Round 18 :
sc in each sc around (9)
Round 19 :
sc in next sc, dec over next 2 sc around (6)
Round 20 :
sc in each sc around (6)
Info :
F/O. Add any stuffing needed to finalize the shaping and weave in tail.
— Final Assembly :
Info :
I highly recommend that you pin all parts together before you begin to sew them, to make certain all parts are as you like and in the position you prefer.
Info :
Head is sewn to body as shown, take your time and pin the head on first, making sure that the neck is adequately stuffed, and that the 'nape' of the neck is positioned so as to create the curve of the neck. (See the pictures to help you position the head)
Info :
For the yellow markings, cut 5 oval shapes from yellow felt, then cut out the center of each to make the 'rings'. Pin one of them to the head, between the ears and slightly to the front. The other four are each sewn onto the 'shoulders' of the leg pieces. You can do this before you sew the legs to the body, but I would recommend that you first pin the legs in the positions you want on the body, and then pin the markings to the legs as you prefer them, then unpin the legs and sew on the markings (or you can wait to add the markings after sewing on the legs.)
Info :
When sewing the legs on, you will probably want to add a little stuffing under each 'shoulder'. Not much stuffing is generally required here, just enough to give a very slight 'roundness' to the shoulder/hip area - and make a smooth transition from leg to 'body'.
Info :
Ears and tail are positioned and sewn on as shown.
Info :
Eyes are cut from red and black felt scraps, in shapes as shown. Catch lights are very small pieces of white felt.
This Umbreon plushie pattern brings a beloved character to life with charming details and classic amigurumi shaping. It combines crochet techniques and felt accents for expressive eyes and iconic rings. Make one for yourself or as a thoughtful handmade gift that shows off your crafting skills. 🧶😊