About This Harry Potter Amigurumi Pattern
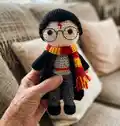
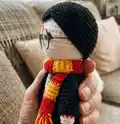
This pattern makes a Harry Potter amigurumi complete with hair, embroidered lightning scar, cloak, scarf and glasses. You will work separate pieces—arms, legs, body, hair and cloak—and assemble them for a polished finish. Techniques include color changes, working in BLO, simple surface embroidery and sewing pieces together.

Designed for intermediate crocheters comfortable with increases, decreases and basic shaping. The finished toy measures about 20–30 cm depending on yarn and hook choices.
Why You'll Love This Harry Potter Amigurumi Pattern
I absolutely love this pattern because it captures Harry Potters signature look in a small, handmade toy that feels magical to make. I enjoy the mix of amigurumi shaping and simple garment work for the cloak and scarf, which keeps the project varied and fun. The hair and embroidered lightning scar are my favorite finishing touches that give the doll personality. I also love that it is customizable — you can change colors and details to create different characters or sizes.
Switch Things Up
I love how easy it is to personalize this pattern by changing yarn colours; try pastels for a soft, whimsical version instead of the classic red and yellow.
I often make the doll bigger by switching to a bulkier yarn and a larger hook for a cuddlier companion.
I like to add wire in the arms for slight posability when I want a character that can hold tiny props or pose better on a shelf.
For a mini keychain, use fingering or sport weight yarn with a 2.75 mm or smaller hook to scale the pattern down.
I sometimes stitch different facial expressions by moving the eyes or embroidering a small smile to change the character's personality.
Try different hairstyles by adapting the hair rounds or adding longer yarn strands for a more textured look.
I enjoy making themed outfits by crocheting small accessories like a hat, wand, or backpack to match the character.
For a realistic finish, embroider subtle shading on the jersey or add tiny buttons and trims on the cloak edges.
I recommend experimenting with safety eyes or embroidered eyes depending on whether the doll is for a child or display; embroidered eyes are safer for kids.
Don't be afraid to mix fibres — cotton gives a different drape for the cloak while acrylic is easy to wash and keeps the shape of the amigurumi well.
Common Mistakes & How to Fix Them
✗ Not placing safety eyes at the correct round position can ruin facial symmetry; place safety eyes between rounds 24 and 25, centred and 8 stitches apart as indicated.
✗ Forgetting to stuff as you go will create lumps and misshaped sections; stuff gradually during body and head shaping to keep an even form.
✗ Skipping stitch count checks during increases and decreases leads to uneven shaping; count stitches at the end of each round to make sure numbers match the pattern.
✗ Changing colour without securing ends can cause messy joins; carry yarn neatly or weave in ends immediately after completing colour change rounds.