🧢 Beautiful ✨ Detailed πŸ’ Adorable

Turtles Amigurumi Pattern

Turtles Amigurumi Pattern
4.5β˜… Rating
8-10 Hours Time Needed
1.8K Made This
βœ‚οΈ

Advanced Level

Designed for experienced crocheters, these patterns involve intricate designs and complex techniques to challenge and inspire.

⏱️

All-Day Adventure

Requires 8-10 hours, ideal for a full day of immersive crocheting.

πŸ₯

Charming Critter

Delightful animal designs with sweet details that capture the essence of your favorite woodland and farmyard friends.

About This Turtles Amigurumi Pattern

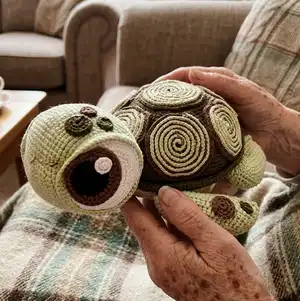
This pattern teaches you how to crochet a small turtle amigurumi with a textured carapace assembled from multiple spiraled pieces. You will work rounds in spiral, change colors and use BLO/FLO for layered effects to make realistic shell details. The instructions include stitch counts, shaping and step-by-step assembly notes with photos.

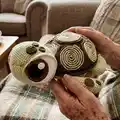
Turtles Amigurumi Pattern crochet pattern - detailed view of completed project

The finished toy features layered spiral shell details and a separate head and tail for a polished look. The pattern is photo-supported and meant for crocheters comfortable with increases, decreases and sewing pieces together.

Why You'll Love This Turtles Amigurumi Pattern

I absolutely love this pattern because the shell is built from small spiral motifs that come together into a stunning textured surface. I enjoy the careful shaping and color changes β€” they make each piece feel like a tiny sculpture. The assembly steps let you control placement and stuffing, so you can fine tune how your turtle looks. Working the eyelids and eyelid contraction is such a satisfying detail that brings the face to life.

Turtles Amigurumi Pattern step 1 - construction progress Turtles Amigurumi Pattern step 2 - assembly progress Turtles Amigurumi Pattern step 3 - details and accessories Turtles Amigurumi Pattern step 4 - final assembly and finishing

Switch Things Up

I love how this turtle pattern can be customized with color swaps β€” try pastel shades for a nursery-friendly look or bright contrasts for a playful toy.

I often change the shell accent color to metallic or variegated yarn to make each spiral pop differently.

If you want a larger turtle, use a heavier yarn and larger hook and increase rounds proportionally to keep the shell shape balanced.

For a tiny keychain version, use thinner thread and a small hook, and skip some carapace pieces so it stays lightweight.

You can add embroidery or felt spots to change the turtle's expression and personality easily.

I sometimes stuff a small bell or beads inside the shell for a gentle rattle β€” secure them inside a small fabric pouch before closing the toy.

Try adding wire to the flippers or neck if you want a poseable figure β€” wrap wire with yarn ends before stuffing for safety.

Consider stitching on small accessories like a tiny scarf, hat, or a sewn-on leaf to give your turtle a seasonal theme.

Mix and match yarn textures: a fuzzy yarn for the head with a smooth cotton shell can create an interesting tactile contrast.

I recommend testing placement of the spiral pieces with pins before sewing; this little step makes the final layout much cleaner and helps you avoid rework.

Common Mistakes & How to Fix Them

βœ— Skipping stitch markers during spiral rounds can make it hard to find the beginning of the round; place a marker at the start and move it each round to avoid losing track. βœ— Forgetting to work BLO or FLO as instructed will change the layered effect on shell pieces; follow the BLO/FLO notes exactly to get the correct texture and placement. βœ— Overstuffing the carapace will distort the shape and make assembly difficult; stuff gradually and leave a small opening to add or compress fiber until the shell fits neatly. βœ— Sewing all pieces together before checking placement can create uneven gaps; temporarily pin or baste pieces first to adjust spacing, then permanently sew once satisfied.

Turtles Amigurumi Pattern

Make a charming crochet turtle with this detailed pattern. You will work several fitted carapace pieces, a soft head, tail and layered eye details to create a cute finished toy. The pattern uses YarnArt Jeans cotton blend and includes clear rounds, color instructions and step-by-step assembly photos. Perfect for experienced crocheters who love tiny textured details and a beautiful handmade result.

Advanced 8-10 Hours

Materials Needed for Turtles Amigurumi Pattern

β€” Main Fabric

  • 01
    YarnArt Jeans - 50 g / 150 m (approx 1.76 oz / 174 yds) - 55% cotton / 45% polyacrylic, fine 2
  • 02
    Color 01 - White (small amounts for eyes and details)
  • 03
    Color 11 - Light green (main body/head and carapace inner details) - approx 50-100g
  • 04
    Color 82 - Dark green (carapace main color) - approx 50-100g
  • 05
    Color 40 - Brown (shell spiral outlines and small pieces) - approx 30-50g
  • 06
    Color 53 - Black (pupil details) - small amount
  • 07
    Color 67 - Light yellow (carapace second layer pieces) - approx 30-50g

β€” Tools Required

  • 01
    Crochet hook size 2.25 mm (recommended)
  • 02
    Crochet hook Gamma 1.5 mm (alternative for finer details)
  • 03
    Scissors
  • 04
    Stitch markers
  • 05
    Tapestry/yarn needle for sewing and weaving ends
  • 06
    Polyester stuffing (fiberfill)
  • 07
    Beads (optional) for eye highlight
  • 08
    Pins for temporary placement during assembly

Progress Tracker

0% Complete

β€” Introductory Lesson :

Info :

The toy is made in spiral, without any SL ST or CH. Front side and wrong side photos provided.

Info :

You must know some basic crochet skills. The pattern doesn't include tutorial lessons. The pattern is for advanced crocheters.

β€” Carapace (1) (Basic color 82 Dark Green) :

Round 1 :

8 SC IN MR (8)

Round 2 :

8 INC (16)

Round 3 :

(1 SC, INC)*8 (24)

Round 4 :

1 SC, INC, (2 SC, INC)*7, 1 SC (32)

Round 5 :

(3 SC, INC)*8 (40)

Round 6 :

2 SC, INC, (4 SC, INC)*7, 2 SC (48)

Round 7 :

(5 SC, INC)*8 (56)

Round 8-9 :

56 SC (56)

Round 10 :

3 SC, INC, (6 SC, INC)*7, 3 SC (64)

Round 11 :

(7 SC, INC)*8 (72)

Round 12 :

4 SC, INC, (8 SC, INC)*7, 4 SC (80)

Round 13-14 :

80 SC (80)

Round 15 :

(9 SC, INC)*8 (88)

Round 16 :

5 SC, INC, (10 SC, INC)*7, 5 SC (96)

Round 17 :

(11 SC, INC)*8 (104)

Round 18-19 :

104 SC (104)

Round 20 :

6 SC, INC, (12 SC, INC)*7, 6 SC (112)

Round 21 :

(13 SC, INC)*8 (120)

Round 22 :

7 SC, INC, (14 SC, INC)*7, 7 SC (128)

Round 23-27 :

128 SC (128)

Round 28 :

BLO: 128 SC (128)

Round 29 :

FLO: 128 SC (128)

Round 30 :

(15 SC, INC)*8 (136)

Round 31 :

136 SC (136)

Round 32 :

(15 SC, DEC)*8 (128)

Round 33 :

128 SC (128)

β€” Carapace (2) (Basic color 67 Light Yellow) :

Round 1 :

8 SC IN MR (8)

Round 2 :

BLO: 8 INC (16)

Round 3 :

BLO: (1 SC, INC)*8 (24)

Round 4 :

BLO: 1 SC, INC, (2 SC, INC)*7, 1 SC (32)

Round 5 :

BLO: (3 SC, INC)*8 (40)

Round 6 :

BLO: 2 SC, INC, (4 SC, INC)*7, 2 SC (48)

Round 7 :

BLO: (5 SC, INC)*8 (56)

Round 8 :

BLO: 56 SC (56)

Round 9 :

BLO: 3 SC, INC, (6 SC, INC)*7, 3 SC (64)

Round 10 :

BLO: (7 SC, INC)*8 (72)

Round 11 :

BLO: 4 SC, INC, (8 SC, INC)*7, 4 SC (80)

Round 12 :

BLO: 80 SC (80)

Round 13 :

BLO: (9 SC, INC)*8 (88)

Round 14 :

BLO: 5 SC, INC, (10 SC, INC)*7, 5 SC (96)

Round 15 :

BLO: (11 SC, INC)*8 (104)

Round 16 :

BLO: 104 SC (104)

Round 17 :

BLO: 6 SC, INC, (12 SC, INC)*7, 6 SC (112)

Round 18 :

BLO: (13 SC, INC)*8 (120)

Round 19 :

BLO: 7 SC, INC, (14 SC, INC)*7, 7 SC (128)

Round 20 :

BLO: 128 SC (128)

β€” Carapace (3) (Basic color 67 Light Yellow) :

Round 1 :

8 SC IN MR (8)

Round 2 :

8 HDC INC (16)

Round 3 :

(1 HDC, HDC INC)*8 (24)

Round 4 :

1 HDC, HDC INC, (2 HDC, HDC INC)*7, 1 HDC (32)

Round 5 :

(3 HDC, HDC INC)*8 (40)

Round 6 :

2 HDC, HDC INC, (4 HDC, HDC INC)*7, 2 HDC (48)

Round 7 :

48 HDC (48)

Round 8 :

(5 HDC, HDC INC)*8 (56)

Round 9-21 :

56 HDC (56)

Round 22 :

56 SC (56)

β€” Carapace (4) (7 Pieces) (Basic color 40 Brown) :

Round 1 :

8 SC IN MR (8)

Round 2 :

BLO: 8 INC (16)

Round 3 :

BLO: (1 SC, INC)*8 (24)

Round 4 :

BLO: (2 SC, INC)*8 (32)

Round 5 :

BLO: (3 SC, INC)*8 (40)

Round 6 :

BLO: (4 SC, INC)*8 (48)

Round 7 :

BLO: (5 SC, INC)*8 (56)

Info :

Change color into light-green one (color 11) and work slip stitch. FLO from 6-1 rows.

β€” Assembly Prep for Shell :

Info :

Return to the 1st piece, sew the 33rd row to the 28th one. See the photo.

Info :

The rest of pieces are attached with temporary seam. If you can't allocate all the pieces, sew in 1 piece less. See the photo.

Info :

Attach piece (4) to piece (1). Begin from the top, but firstly fold the piece to make 1st rows together.

Info :

Attach all pieces (4) to piece (1).

Info :

Fold piece (3) in halves. Place the marker to the folded edge as it's shown in the photo.

Info :

Then attach line AB of piece (3) to piece (2). Make some stitches between piece (2) and piece (3) to attach them to each other.

Info :

Sew piece (1) to piece (2). Attention! Don't attach all the pieces at once. Leave a small hole to fill the piece with fiber. Don't fill too much fiber. Carapace must be filled with fiber a bit to insert an egg with a little turtle inside. It's better to put an egg in piece (3) to find out fiber density.

β€” Tail (Basic color 11 Light Green) :

Round 1 :

6 SC IN MR (6)

Round 2 :

6 INC (12)

Round 3-6 :

12 SC (12)

Info :

Fold the piece in halves and work SC. Sew the tail to the carapace.

β€” Head (Basic color 11 Light Green) :

Round 1 :

8 SC IN MR (8)

Round 2 :

8 INC (16)

Round 3 :

(1 SC, INC)*8 (24)

Round 4 :

1 SC, INC, (2 SC, INC)*7, 1 SC (32)

Round 5 :

(3 SC, INC)*8 (40)

Round 6 :

40 SC (40)

Round 7 :

2 SC, INC, (4 SC, INC)*7, 2 SC (48)

Round 8 :

48 SC (48)

Round 9 :

BLO: 48 SC (48)

Round 10 :

48 SC (48)

Round 11 :

48 SC (48)

Round 12 :

(5 SC, INC)*8 (56)

Round 13-14 :

56 SC (56)

Round 15 :

3 SC, INC, (6 SC, INC)*7, 3 SC (64)

Round 16-19 :

64 SC (64)

Round 20 :

(6 SC, DEC)*8 (56)

Round 21-22 :

56 SC (56)

Round 23 :

(5 SC, DEC)*8 (48)

Round 24 :

BLO: 48 SC (48)

Round 25-26 :

48 SC (48)

Round 27 :

(4 SC, DEC)*8 (40)

Round 28 :

40 SC (40)

Round 29 :

(3 SC, DEC)*8 (32)

Round 30 :

(2 SC, DEC)*8 (24)

Round 31 :

(1 SC, DEC)*8 (16)

Round 32 :

8 DEC (8)

Info :

Fasten off leaving a tail about 15 cm long and cut the yarn.

Info :

Using a tapestry needle, weave the yarn tail through the front loop of each stitch and pull tight to close.

β€” Eyes (1 Detail) (2 Pieces) (Basic color 01 White) :

Round 1 :

8 SC IN MR (8)

Round 2 :

8 INC (16)

Round 3 :

(1 SC, INC)*8 (24)

Round 4 :

1 SC, INC, (2 SC, INC)*7, 1 SC (32)

Round 5 :

(3 SC, INC)*8 (40)

Round 6 :

40 SC (40)

Round 7 :

2 SC, INC, (4 SC, INC)*7, 2 SC (48)

Round 8 :

48 SC (48)

Info :

FO, weave in ends.

β€” Eyes (2 Detail) (2 Pieces) (Basic color 53 Black, Color 40 Brown) :

Round 1 :

8 SC IN MR (8)

Round 2 :

8 INC (16)

Round 3 :

(1 SC, INC)*8 (24)

Round 4 :

12 SC, 18 HDC (30)

Info :

Fasten and cut the thread, leave a yarn tail. New thread brown.

Round 3 (brown) :

BLO: 12 CC, (1 HDC, HDC INC)*6 (30)

Info :

Sew details 2 to details 1 as photo shows. Sew small brown detail to white eye background and sew pupil centered.

β€” Head Assembly :

Info :

Sew eyes to head beki. Return to the 9th row and work FLO with a new light green thread (color 11). Work 3 rows - 48 SC.

Info :

Work the 2nd eyelid in the same way, beginning from the 46th row. See photos for eyelid placement and contraction technique.

Info :

Make contraction: insert thread in point A and pull thread out point C. Leave a long rail thread in point A. Pull a needle outside eyelid in point D. Insert a needle in point E and pull it out point F. Skip 1 SC and insert a needle in point B. Insert a needle through the eyelid in the opposite side and pull thread out point G. Hide tail threads. Tighten thread and make some strong knot to have constriction. Embroider a mouth with thin black thread.

β€” Final Assembly :

Info :

Attach piece (3) to piece (1) from point A to point B but make some stitches between piece (2) and piece (3) first. Sew piece (1) to piece (2) leaving a small hole to fill fiber. Insert egg or stuffing as desired then close seam securely.

Info :

Attach tail to carapace and fold small pieces to make the shell rim. Attach head into body opening and sew firmly. Weave in all ends.

Assembly Instructions

  • Attach the seven brown spiral pieces (Carapace (4)) to the folded top of Carapace (1) starting from the top; pin or temporary baste them first to check spacing before sewing permanently.
  • Fold Carapace (3) in half and align the folded edge to the top of Carapace (1); use markers to align and sew the 33rd row of piece (1) to the 28th row of piece (3) as shown in the photos.
  • Sew piece (3) line AB to piece (2) and add a few stitches between piece (2) and piece (3) to secure them together; do not close the seam completelyβ€”leave a small hole for stuffing.
  • Insert fiber (or an egg for the nested effect) into the carapace before closing; adjust stuffing density so the carapace keeps shape and has room for the egg if used, then finish sewing and hide tails.
  • Sew the tail to the bottom back of the carapace and sew the head into the body opening; sew eyes and create eyelid contractions following the photo steps, then embroider a small mouth with thin black thread.

Important Notes

  • πŸ’‘Work in continuous spiral unless otherwise stated; do not join rounds with slip stitch unless specified.
  • πŸ’‘Use stitch markers to mark the beginning of your rounds for accurate counting and consistent shaping.
  • πŸ’‘Stuff parts gradually and check fit during assembly; leave a small opening to add or redistribute stuffing before final closure.
  • πŸ’‘When changing colors or working BLO/FLO, check the photos to ensure the layered texture of the shell pieces is correct.

This adorable turtle amigurumi combines spiral motifs and careful shaping for a wonderfully textured shell and sweet face. The pattern uses YarnArt Jeans cotton-blend yarn for a neat, durable finish and soft feel. Make one for a gift, nursery display, or as a collectible keepsake. 🐒🧢

You ask,

we answer.

FAQs

What size will the finished piece be?

The finished turtle measures approximately 12-15 cm across the shell depending on yarn tension and stuffing; using the recommended yarn and hook sizes will give the pictured size.

Can I use different yarn weights for this pattern?

Yes, you can use different yarn weights but the final size will change; choose an appropriate hook for the yarn and expect to adjust stitch counts for proportions.

Do I need prior crochet experience for this pattern?

This pattern is rated advanced and assumes you are comfortable working in spiral, using BLO/FLO, increases/decreases, and basic assembly techniques.

How long does this project typically take to complete?

Most crocheters complete this project in 8-10 hours, though time will vary depending on experience, speed and how much time you spend on assembly and finishing.