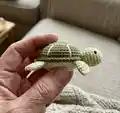
🧢 Beautiful ✨ Detailed πŸ’ Adorable

Turtles Amigurumi Pattern

Turtles Amigurumi Pattern
4.1β˜… Rating
5-7 Hours Time Needed
3.3K Made This
βœ‚οΈ

Intermediate Level

Ideal for those with basic crochet experience, featuring slightly more advanced stitches and techniques to expand your skills.

⏱️

Weekend Treat

Takes 5-7 hours, making it an enjoyable project to finish over a couple of days.

🧸

Cute Companion

An adorable friend to cherish, handcrafted with love to bring comfort and joy for years to come.

About This Turtles Amigurumi Pattern

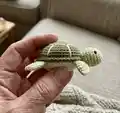
This pattern guides you through crocheting small, realistic turtle toys with a textured carapace and separate head, paws and tail. Clear round-by-round instructions and photos show how to shape each piece and finish with embroidery for shell details. You will assemble the pieces to create a compact, collectible turtle perfect for gifts or decor.
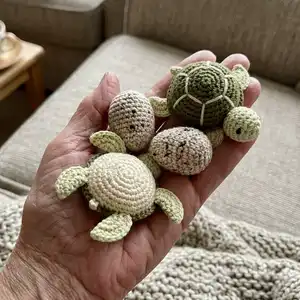
Turtles Amigurumi Pattern crochet pattern - detailed view of completed project

The project uses YarnArt Jeans (fine 2) and a small hook for tight stitches and neat shaping. Techniques include working in spiral, back/front loop detail and simple embroidery to highlight the shell.

Why You'll Love This Turtles Amigurumi Pattern

I absolutely love this pattern because it turns simple stitches into a tiny character full of charm. I enjoy how the carapace details add texture and personality without complicated shaping. I love that each turtle is made from small parts which makes assembly satisfying and customizable. Sewing and embroidering the final details is one of my favorite relaxing steps and always brings a smile when the turtle is finished.

Turtles Amigurumi Pattern step 1 - construction progress Turtles Amigurumi Pattern step 2 - assembly progress Turtles Amigurumi Pattern step 3 - details and accessories Turtles Amigurumi Pattern step 4 - final assembly and finishing

Switch Things Up

I love how easy it is to personalize these turtles by changing the yarn colors; try warmer tones or pastels for a different mood.

I sometimes use a slightly larger hook and bulky yarn to create a chunky cuddle-sized turtle with the same stitch counts.

I often add tiny felt accents or a small shell applique for added texture and character when making gifts.

I like to experiment with embroidery patterns on the shell β€” try spiral lines, hexagon outlines, or dotted accents for different looks.

I sometimes replace button eyes with French knots or small safety eyes for a softer facial expression.

I recommend using a slightly firmer stuffing for a firm carapace, or lighter stuffing if you prefer a softer, squishier toy.

I also enjoy making a family of turtles in graduated sizes by changing yarn weight and hook sizes to create a set.

I add a small loop of yarn to the top of the carapace to turn the turtle into a keychain or ornament if desired.

I sometimes insert a tiny bell or rattle in the body for a baby-safe toy β€” just make sure it is securely enclosed.

I encourage you to try combining two yarns held together for a marled effect on the carapace for a unique texture.

I like swapping the carapace BLO detail to FLO for a subtly different shell texture if I want less pronounced ridges.

I also enjoy crocheting matching accessories like a tiny scarf, hat or mini shell mat to display the turtles together.

Common Mistakes & How to Fix Them

βœ— Skipping the instruction to work in a continuous spiral can create visible joins and uneven texture; always work rounds in spiral without slip stitch or chained joins. βœ— Forgetting to stuff the carapace before closing will make it hard to shape; fill the carapace with small amounts of stuffing as you go so the shape stays smooth. βœ— Not counting stitches after increases and decreases causes incorrect stitch counts in later rounds; count your stitches after each round and mark the start of rounds with a stitch marker. βœ— Pulling yarn too tight when closing the head or carapace can distort the shape; weave the tail through front loops and pull gradually to close evenly. βœ— Skipping the BLO rounds for the carapace detail will remove the ridge effect; follow the BLO instructions exactly to get the layered shell detail.
Turtles Amigurumi Pattern

Make a charming set of tiny crochet turtles with this clear, photo-supported pattern. You will create a detailed carapace, head, paws and tail using simple amigurumi techniques. The pattern is organized into small pieces so you can follow step-by-step and assemble them into an adorable toy. Perfect for gifting or decorating, these turtles are small, sweet and full of personality.

Intermediate 5-7 Hours

Materials Needed for Turtles Amigurumi Pattern

β€” Main Fabric

  • 01
    YarnArt Jeans (50 g / 150 m) fine 2 - Basic Color 01 (approx. 50 g)
  • 02
    YarnArt Jeans (50 g / 150 m) fine 2 - Basic Color 11 (approx. 50 g)
  • 03
    YarnArt Jeans (50 g / 150 m) fine 2 - Basic Color 82 (approx. 50 g)
  • 04
    Small amounts of contrast yarn for embroidery (10-20 g)
  • 05
    Polyester stuffing (SYNTEPUH) - small bag for filling carapace and head

β€” Tools Required

  • 01
    Crochet hook size 2.25 mm (or 1.5 mm Gamma as alternative)
  • 02
    Scissors
  • 03
    Tapestry/yarn needle for sewing and weaving ends
  • 04
    Stitch markers
  • 05
    2 small buttons for eyes (or small safety eyes)
  • 06
    Beads (optional for decoration)
  • 07
    Pins for assembly
  • 08
    Polyester stuffing (syntephuh)

Progress Tracker

0% Complete

β€” Introductory Lesson :

Info :

The toy is made in spiral, without any SL ST or CH

Info :

Front side and wrong side photos shown to help you identify the spiral direction

β€” Carapace (1 detail) (Basic Color 82) :

Round 1 :

8 SC IN MC (8)

Round 2 :

8 INC (16)

Round 3 :

(1 SC, INC)*8 (24)

Round 4 :

1 SC, INC, (2 SC, INC)*7, 1 SC (32)

Round 5 :

(3 SC, INC)*8 (40)

Round 6 - 8 :

40 SC (40)

β€” Carapace (2 detail) (Basic Color 11) :

Round 1 :

BLO: 8 SC IN MC (8)

Round 2 :

BLO: 8 INC (16)

Round 3 :

BLO: (1 SC, INC)*8 (24)

Round 4 :

BLO: 1 SC, INC, (2 SC, INC)*7, 1 SC (32)

Round 5 :

BLO: (3 SC, INC)*8 (40)

Round 6 :

BLO: 40 SC (40)

Info :

Now you should crochet 2 details around (Detail 1 + Detail 2).

Info :

!!! Here you need to fill the carapace with SYNTEPUH (polyester stuffing) before closing and joining details.

β€” Head (Basic Color 11) :

Round 1 :

6 SC IN MC (6)

Round 2 :

6 INC (12)

Round 3 :

(1 SC, INC)*6 (18)

Round 4 - 7 :

18 SC (18)

Round 8 :

(1 SC, DEC)*6 (12)

Round 9 :

6 DEC (6)

Infos :

Fasten off leaving a tail about 15 cm long and cut the yarn. Using a tapestry needle, weave the yarn tail through the front loop of each stitch and pull tight to close. Weave in the end.

β€” Paws (4 pieces) (Basic Color 11) :

Round 1 :

8 SC IN MC (8)

Round 2 :

8 INC (16)

Info :

Fold the piece in halves and work SC across the folded edge to shape the paw as shown in photos.

β€” Tail (Basic Color 11) :

Round 1 :

5 CH (5)

Round 2 :

1 SC IN THE SECOND CH FROM HOOK, 3 SC (4)

β€” Assembly and Embroidery :

Item - Sew Paws :

Sew the paws to the carapace in the positions shown in the photos, spacing them evenly around the body.

Item - Sew Head :

Sew the head to the carapace using the long tail left on the head; position centrally at the front as shown in photos.

Item - Eyes :

Sew your eyes to your head or attach buttons/safety eyes securely before final sewing to the carapace.

Item - Embroidery :

Embroider shell lines and decoration on the carapace with contrasting yarn as shown in the reference photos to create shell segments.

β€” Egg (1 detail) (Color 01) :

Round 1 :

8 SC IN MC (8)

Round 2 :

8 INC (16)

Round 3 :

(1 SC, INC)*8 (24)

Round 4 :

1 SC, INC, (2 SC, INC)*7, 1 SC (32)

Round 5 :

32 SC (32)

Round 6 :

(3 SC, INC)*8 (40)

Round 7 :

2 SC, INC, (4 SC, INC)*7, 2 SC (48)

Round 8 - 14 :

48 SC (48)

Round 15 :

(4 SC, DEC)*8 (40)

Round 16 - 17 :

40 SC (40)

Info :

Fasten and cut the thread, leave a long yarn tail for sewing the egg details or joining.

β€” Egg (2 detail) (Color 01) :

Round 1 :

8 SC IN MC (8)

Round 2 :

8 INC (16)

Round 3 :

16 SC (16)

Round 4 :

(1 SC, INC)*8 (24)

Round 5 - 6 :

24 SC (24)

Round 7 :

1 SC, INC, (2 SC, INC)*7, 1 SC (32)

Round 8 - 9 :

32 SC (32)

Round 10 :

(3 SC, INC)*8 (40)

Round 11 - 12 :

40 SC (40)

Round 13 :

7 CH ... (follow chain and work sc into chain as shown in photo)

Info :

...1 SC IN THE EIGHTH CH FROM HOOK ... Finish the round counts shown in the photos. Fasten and cut the thread, leave a long yarn tail. Sew Detail 1 and Detail 2 together as shown.

Info :

When assembly is complete, fasten and cut the thread and leave long yarn tails for sewing pieces together.

β€” Button (Color 01) :

Round 1 :

8 SC IN MC (8)

Assembly Instructions

  • Sew the paws to the carapace using the long tails from each paw, spacing them evenly around the opening so the turtle sits balanced.
  • Attach the head to the front of the carapace using the long tail from the head; sew through corresponding stitches of the carapace for a secure join.
  • Sew eyes or buttons to the head before final attachment, ensuring they are positioned symmetrically and secured with extra stitches or thread.
  • Fill the carapace and head with polyester stuffing (SYNTEPUH) before closing, then stitch the opening closed and weave in the yarn tail.
  • Embroider the shell pattern on the carapace with a contrasting color yarn after all pieces are sewn in place to highlight shell segments.

Important Notes

  • πŸ’‘Work in a continuous spiral throughout this patternβ€”do not join rounds with slip stitches or chain unless explicitly instructed.
  • πŸ’‘Use stitch markers to mark the start of each round to keep track of your increases and decreases.
  • πŸ’‘Stuff pieces gradually while shaping to avoid lumps and to achieve a smooth, even form.
  • πŸ’‘Weave yarn tails through the front loops when closing round openings to get a neat, tight closure.
  • πŸ’‘Follow BLO instructions exactly for the second carapace detail to get the layered shell texture.

Create a tiny turtle friend that you can gift, display, or make as a thoughtful keepsake. Each turtle is built piece-by-piece and finished with simple embroidery for a charming shell. These little amigurumi turtles are relaxing to make and delightful to share. 🐒🧢✨

You ask,

we answer.

FAQs

What size will the finished piece be?

The finished turtle measures approximately 6-8 cm (2.5-3 in) across depending on yarn tension and hook size when using the recommended YarnArt Jeans and 2.25 mm hook.

Can I use different yarn weights for this pattern?

Yes, you can use different yarn weights but the final size will change; choose a hook that matches your yarn and expect the turtle to be larger with thicker yarn and smaller with thinner yarn.

Do I need prior crochet experience for this pattern?

This pattern is rated intermediate, so basic knowledge of amigurumi techniques, working in spiral, increases and decreases is recommended for best results.

How long does this project typically take to complete?

Most crafters complete a single turtle in about 5-7 hours, depending on experience, customization and assembly time.