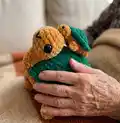
🧶 Beautiful ✨ Detailed 💝 Adorable

Turtle Memory Game Amigurumi Pattern

Turtle Memory Game Amigurumi Pattern
4.3★ Rating
5-7 Hours Time Needed
3.8K Made This
✂️

Intermediate Level

Ideal for those with basic crochet experience, featuring slightly more advanced stitches and techniques to expand your skills.

⏱️

Weekend Treat

Takes 5-7 hours, making it an enjoyable project to finish over a couple of days.

🧸

Cute Companion

An adorable friend to cherish, handcrafted with love to bring comfort and joy for years to come.

About This Turtle Memory Game Amigurumi Pattern

This pattern makes a large plush turtle plus multiple tiny baby turtles that fit inside the shell for a memory game. It uses plush HIMALAYA Dolphin Baby yarn for a soft, velvety finish and clear photo instructions. The pattern includes full round-by-round instructions for head, legs, shell and baby turtles.
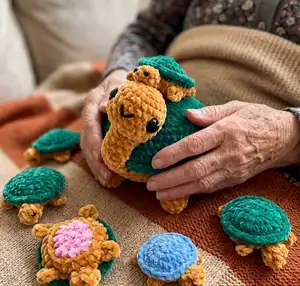
Turtle Memory Game Amigurumi Pattern crochet pattern - detailed view of completed project

You will need one skein of beige and one skein of green to make a full set of one big turtle and 9–12 babies. Perfect for gifting, nursery play, or a handmade keepsake.

Why You'll Love This Turtle Memory Game Amigurumi Pattern

I absolutely love this pattern because it turns simple stitches into a playful, interactive toy that kids adore. I enjoy how the plush yarn creates a super-soft texture that makes every turtle cuddly and durable. I love designing pieces that have a function — these babies tuck into the shell for a delightful surprise. I always get excited by the color-play possibilities for baby tummies and the tiny details that bring each baby to life.

Turtle Memory Game Amigurumi Pattern step 1 - construction progress Turtle Memory Game Amigurumi Pattern step 2 - assembly progress Turtle Memory Game Amigurumi Pattern step 3 - details and accessories Turtle Memory Game Amigurumi Pattern step 4 - final assembly and finishing

Switch Things Up

I love customizing this pattern with color variations for the baby tummies; try pastels for a softer nursery set or bright jewel tones for a playful game.

I often change the yarn weight and hook size to make mini keychain turtles or a giant chunky turtle for a display piece — adjust stuffing and eye size accordingly.

I sometimes replace bead eyes with embroidered eyes for a fully child-safe version and I make sure to hide the knots well inside the head.

I like adding tiny accessories like a little crocheted flower, ribbon, or a felt scarf to give each baby its own personality.

For a different texture, I alternate between front loop and back loop rounds to create a ridged shell effect; play with one or two rounds of texture for variety.

I make matching sets in themed colors (holiday, pastels, or ocean tones) to turn them into seasonal gifts or party favors.

To make the turtles poseable, I sometimes insert a short wire into the neck (securely wrapped and padded) to adjust the head angle for display.

Try embroidering tiny spots or patterns on the baby tummies before stuffing to make each baby unique and easier to match in the memory game.

I recommend swapping beads for larger safety eyes for toddlers, or gluing felt behind small beads for a more finished look.

When I want a sturdier toy, I stitch an internal felt disk into the shell base before closing to help the turtle sit flat and steady during play.

Common Mistakes & How to Fix Them

✗ Skipping stitch markers during rounds with attachments can result in misplaced legs or head; use markers and count stitches before attaching each piece. ✗ Not stuffing pieces gradually leads to lumps or uneven shaping; stuff a little at a time and shape as you go to maintain a smooth silhouette. ✗ Changing colors or loops without securing ends will cause unraveling later; fasten off and weave in ends neatly when you change colors. ✗ Forgetting to crochet the specified loops (front/back) will alter the shell texture and fit; carefully follow front-loop/back-loop instructions and check photos for reference.
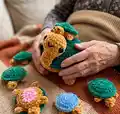
Turtle Memory Game Amigurumi Pattern

Create a charming turtle and a set of tiny baby turtles for a delightful memory game. This pattern walks you through each piece with clear step-by-step rounds and helpful photos. You will make a cuddly large turtle and 9–12 baby turtles using plush Dolphin Baby yarn. Perfect as a gift or a playful toy for kids and collectors.

Intermediate 5-7 Hours

Materials Needed for Turtle Memory Game Amigurumi Pattern

— Main Fabric

  • 01
    HIMALAYA DOLPHIN BABY plush yarn, 131 yards / 3.5 oz (120 m/100 g) — Beige — 1 skein (approximate for big turtle and babies)
  • 02
    HIMALAYA DOLPHIN BABY plush yarn, 131 yards / 3.5 oz (120 m/100 g) — Green — 1 skein (approximate for big turtle and babies)
  • 03
    Small amounts of colored yarn for baby turtle tummies (various colors, scraps)
  • 04
    A piece of black yarn for embroidered mouth/eyelashes

— Tools Required

  • 01
    Crochet hook size 7 (4.5 mm)
  • 02
    Polyester stuffing (fiberfill)
  • 03
    Black beads for eyes 8-10 mm (2 pcs for big turtle)
  • 04
    Small black beads or safety eyes for baby turtles (pair per baby)
  • 05
    Transparent glue
  • 06
    Sewing needle
  • 07
    Yarn needle for sewing pieces
  • 08
    Scissors
  • 09
    Stitch markers
  • 10
    Elastic band for hair - diameter 2" (5 cm)

Progress Tracker

0% Complete

— Necessary Materials :

Info :

The main yarn: HIMALAYA DOLPHIN BABY 131 yards / 3.5oz (120 m/100 g), beige and green color. Stuffing. Hook 7 (4,5 mm). Eyes. Black beads for eyes 1/3 inch (8-10 mm) - 2 pcs. Transparent glue. A sewing needle. A piece of any black yarn, some colored yarn for baby turtle tummies. Stitch markers. Elastic band for hair - diameter 2" (5 cm). The size of the toy is 12 x 5 inches (30 x 12 cm), baby turtles - 4 x 2 1/2 inches (9 x 4 cm). Attention! You will need 1 skein of beige and 1 skein of green yarn to crochet a big turtle and 9-12 baby turtles.

— Abbreviation :

Infos :

MR - magic ring (you can make 2 ch and crochet 6 sc in the second chain from the hook). sc - single crochet. sl st - slip stitch. inc - increase. dc - double crochet. dec - decrease. tc - treble crochet. ch - chain. (...) * N - repeat N times.

— Legs :

Round 1 :

5 sc in MR (5)

Round 2 :

5 inc (10)

Round 3-5 :

10 sc (3 rounds)

Round 6 :

(3 sc, dec) x 2 (8)

Info :

Stuff the detail.

Info :

Fold the detail in half and crochet 3 sc, grasping the stitches of the both edges.

Info :

Fasten off and cut the yarn, hide the end.

Info :

Crochet the rest of the legs in the same way.

— Head :

Round 1 :

6 sc in MR (6)

Round 2 :

6 inc (12)

Round 3 :

(1 sc, inc) x 6 (18)

Round 4 :

(inc, 2 sc) x 6 (24)

Round 5-8 :

24 sc (4 rounds)

Round 9 :

12 dec (12)

Round 10 :

(4 sc, dec) x 2 (10)

Round 11-17 :

10 sc (7 rounds)

Info :

Stuff the detail.

Info :

Fold the detail in half and crochet 4 sc, grasping the stitches of the both edges.

Info :

Fasten off and cut the yarn, hide the end.

— Shell / Body :

Round 1 :

24 sc in elastic (picture 1-2)

Round 2 :

(3 sc, inc) x 6 (30)

Round 3 :

(inc, 4 sc) x 6 (36)

Round 4 :

(5 sc, inc) x 6 (42)

Round 5 :

(inc, 6 sc) x 6 (48)

Round 6 :

(7 sc, inc) x 6 (54)

Round 7 :

(inc, 8 sc) x 6 (60)

Info :

In the next round crochet together the stitches of the body, legs and head (pic.4).

Round 8 :

7 sc, 3 sc with leg, 10 sc, 3 sc with leg, 5 sc, 4 sc with head, 5 sc, 3 sc with leg, 10 sc, 3 sc with leg, 7 sc, crochet the tail: 4 ch, sl st in 2nd ch from hook, 2 sc, sl st

Info :

Change the color to green.

Round 9 :

60 sc

Round 10 :

crochet for the front loops only (pic. 5): (9 sc, inc) x 6 (66), crochet for the back loops only (pic. 6): 60 sc (60)

Round 11-15 :

60 sc (5 rnds)

Round 16 :

(dec, 8 sc) x 6 (54)

Round 17 :

(7 sc, dec) x 6 (48)

Round 18 :

(dec, 6 sc) x 6 (42)

Round 19 :

(5 sc, dec) x 6 (36)

Round 20 :

(dec, 4 sc) x 6 (30)

Round 21 :

(3 sc, dec) x 6 (24)

Round 22 :

(dec, 2 sc) x 6 (18)

Round 23 :

(1 sc, dec) x 6 (12)

Round 24 :

6 dec

Info :

Cut the yarn, tighten the hole. Fasten the yarn, hide the end inside. Sew the neck to the shell. Glue or sew eyes. You can add black felt circles. Embroider eyelashes and mouth.

— Baby Turtle :

Round 1 :

6 sc in MR (6)

Round 2 :

6 inc (12)

Round 3 :

(1 sc, inc) x 6 (18)

Round 4 :

(inc, 2 sc) x 6 (24)

Round 5 :

24 sc for the front loops only (pic. 2)

Info :

Change the color to beige.

Round 6 :

crochet the body, legs and head for the back loops only of the 4th round (pic. 4-6): 2 sc, 1st leg: (1 sc, 4 ch, 1 sc) in one loop, 5 sc, 2nd leg: (1 sc, 4 ch, 1 sc) in one loop, 2 sc, head: (1 sc, 2 ch, 2 tc) in one loop, (1 tc, 1 dc, sl st) in one loop, 2 sc, 3rd leg: (1 sc, 4 ch, 1 sc) in one loop, 5 sc, 4th leg: (1 sc, 4 ch, 1 sc) in one loop, 2 sc

Round 7 :

(1 sc, dec) x 7, 1 sc, sl st (16)

Info :

Do not crochet the legs and head, leave them between the stitches of the decrease (pic. 7).

Info :

Change the color to blue (or any other).

Round 8 :

crochet for the back loops only 8 dec (8)

Info :

Stuff the body. Cut the yarn, leaving a long end enough for sewing the hole. Tighten the hole (pic. 8-9). You can glue on the eyes.

Info :

Baby is ready! Crochet 9-12 of these babies with tummies of different colors.

Assembly Instructions

  • Sew the neck (head) to the shell securely after cutting yarn and tightening the hole; position the neck at the opening and whipstitch through the body rounds to secure.
  • Attach each leg to the body by crocheting the body together with the legs in Round 8 of the shell: align legs in the sequence stated (3 sc with leg segments) and sew any additional reinforcement stitches as needed.
  • Sew the baby legs, heads and tummies into place when crocheting Round 6 of the baby turtle by crocheting into the back loops and leaving legs/head between stitches; stuff and tighten hole before finishing.
  • Glue or sew on the eyes after assembling the head; use transparent glue for beads if desired, and consider adding small felt circles behind eyes for a finished look.
  • Embroider eyelashes and mouth with black yarn and hide all ends inside the toy; use glue sparingly and weave in ends securely for safety.

Important Notes

  • 💡Use stitch markers to mark the beginning of rounds and the placement of legs and head for accurate assembly.
  • 💡Stuff pieces firmly but not overstuffed to preserve shape and allow the shell to close around the babies.
  • 💡Change colors exactly at the points indicated (shell Round 8 to green; baby Round 5 change to beige) to achieve the intended look.
  • 💡When working front loops only or back loops only, check photos to ensure correct shell texture and edge finish.
  • 💡Secure eyes with glue or sew them on and hide all yarn ends inside to keep the toy safe for handling.

This delightful Turtle Memory Game set makes a thoughtful handmade gift that delights both kids and grown-ups. The plush yarn gives a wonderfully soft finish that is fun to play with and easy to care for. Make a whole family of baby turtles in colorful tummies and create your own memory game to share and enjoy. 🧶🐢✨

You ask,

we answer.

FAQs

What size will the finished piece be?

The finished large turtle measures approximately 12 x 5 inches (30 x 12 cm); each baby turtle measures about 4 x 2.5 inches (9 x 4 cm).

Can I use different yarn weights for this pattern?

You can use different yarn weights, but this will change the final size and may require a different hook; adjust the hook size accordingly and make a gauge swatch before starting.

Do I need prior crochet experience for this pattern?

This pattern is rated intermediate and assumes familiarity with basic amigurumi techniques such as working in the round, increases, decreases, and crocheting into front or back loops only.

How long does this project typically take to complete?

Most crocheters complete the full set (one big turtle and several babies) in about 5-7 hours, though time will vary depending on experience and how many babies you make.