🧢 Beautiful ✨ Detailed πŸ’ Adorable

Turtle Bowl Amigurumi Pattern

Turtle Bowl Amigurumi Pattern
4.3β˜… Rating
5-7 Hours Time Needed
2.5K Made This
βœ‚οΈ

Intermediate Level

Ideal for those with basic crochet experience, featuring slightly more advanced stitches and techniques to expand your skills.

⏱️

Weekend Treat

Takes 5-7 hours, making it an enjoyable project to finish over a couple of days.

🧸

Cute Companion

An adorable friend to cherish, handcrafted with love to bring comfort and joy for years to come.

About This Turtle Bowl Amigurumi Pattern

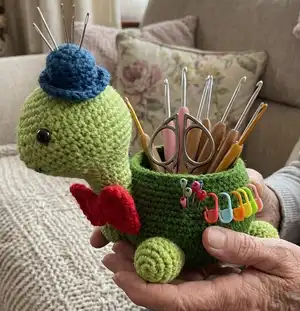
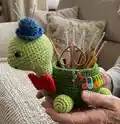
This pattern creates a sweet Turtle Bowl β€” a small amigurumi turtle whose shell forms a usable bowl. You will crochet a double-layered body for stability, plus a head, four legs, a tiny hat and a cute bow. The finished piece is both decorative and functional, great for storing hooks, small tools, or used as a plant pot cover.

Turtle Bowl Amigurumi Pattern crochet pattern - detailed view of completed project

The design uses 5ply cotton and a 3 mm hook; safety eyes and simple sewing finish the project. Clear round-by-round instructions and photos guide you through assembly and finishing.

Why You'll Love This Turtle Bowl Amigurumi Pattern

I absolutely love this pattern because it blends function and cuteness β€” the turtle is both decorative and useful. I enjoy making the double-layered bowl because it gives the piece structure and makes it sturdy for holding tools or a small plant. The small accessories like the hat and bow are quick, satisfying details that add personality. I find the construction relaxing yet engaging, and assembling the parts brings everything to life in a very rewarding way.

Turtle Bowl Amigurumi Pattern step 1 - construction progress Turtle Bowl Amigurumi Pattern step 2 - assembly progress Turtle Bowl Amigurumi Pattern step 3 - details and accessories Turtle Bowl Amigurumi Pattern step 4 - final assembly and finishing

Switch Things Up

I love how easy it is to customize this Turtle Bowl with color changes β€” try bright greens for a playful look or soft pastels for a nursery piece.

You can change yarn weight and hook size to make different sizes of the bowl; a thicker yarn produces a chunkier, sturdier holder.

I often switch the hat color or shape to match seasons β€” a red hat for holidays or a straw-color for summer vibes.

Try embroidering patterns on the shell or add small crocheted flowers for extra detail and texture.

I sometimes replace safety eyes with embroidered eyes for a child-safe version that still looks adorable.

Want a flatter bowl? Skip a few increases on the outer layer to reduce height and get a wider opening.

I also like to add a small pocket inside the shell by sewing a fabric circle in place for extra reinforcement and storage separation.

For gifts, I add a loop to the back so the turtle can hang as decor, or sew a ribbon through the bow for a present-ready finish.

If you want more posability, consider adding a small length of wire inside the neck to adjust head tilt slightly before closing.

I recommend trying different accent colors for the bow and hat to create unique personalities β€” bright contrasts pop beautifully against a neutral bowl.

Finally, I sometimes line the inside with a thin plastic coaster or stiff felt for plant use so water won’t damage the yarn, making it a practical plant pot cover.

Common Mistakes & How to Fix Them

βœ— Skipping stitch markers when working continuous rounds leads to losing the start of the round; place a marker at the first stitch of every round to stay on track. βœ— Overstuffing the head or legs creates a lumpy or distorted shape; stuff gradually with small amounts to keep the shape smooth and even. βœ— Not counting stitches after increases and decreases causes mis-shaped pieces; count each round carefully, especially after shaping rounds. βœ— Joining the rounds incorrectly can create visible seams or uneven edges; work in continuous rounds and avoid joining unless the pattern explicitly instructs you to.

Turtle Bowl Amigurumi Pattern

Make a charming Turtle Bowl that doubles as a cute storage bowl or plant pot cover. This pattern guides you step-by-step through crocheting the double-layered bowl, head, legs, hat and bow so you can create a functional and adorable handmade piece. Perfect for gifting or adding a whimsical touch to your craft space. The instructions are clear and include finishing and assembly tips to help you every stitch of the way.

Intermediate 5-7 Hours

Materials Needed for Turtle Bowl Amigurumi Pattern

β€” Main Fabric

  • 01
    5ply milk cotton (1 skein = 50 g) - Main color: Navy blue - 1 skein (for inner/outer bowl)
  • 02
    5ply milk cotton (1 skein = 50 g) - Main color: Light blue - 1 skein (for head and legs)
  • 03
    Contrasting color yarn: Dark brown - small amount (for hat)
  • 04
    Contrasting color yarn: Pink - small amount (for bow)
  • 05
    Polyester fiberfill for stuffing

β€” Tools Required

  • 01
    Crochet hook size 3 mm
  • 02
    10 mm safety eyes (2 pieces)
  • 03
    Tapestry needle for sewing
  • 04
    Polyester fiberfill
  • 05
    Stitch marker
  • 06
    Scissors
  • 07
    Black embroidery thread for mouth

Progress Tracker

0% Complete

β€” Body :

Inner Layer :

Use navy blue

Round 1 :

ch 2, Starting from the second chain from hook, 6 sc (6)

Round 2 :

inc, rep 6x (12)

Round 3 :

sc, inc, rep 6x (18)

Round 4 :

sc, inc, [2 sc, inc = rep 5x], sc (24)

Round 5 :

3 sc, inc, rep 6x (30)

Round 6 :

2 sc, inc, [4 sc, inc = rep 5x], 2 sc (36)

Round 7 :

FLO, 5 sc, inc, rep 6x (42)

Round 8-16 :

sc around

Round 17 :

3 sc, inc, [6 sc, inc = rep 5x], 3 sc (48)

Round 18-19 :

sc around

Round 20 :

7 sc, inc, rep 6x (54)

Round 21-22 :

sc around

Info :

F/O. Turn the inner layer inside out

Outer Layer :

Use the same color yarn. Start from the loop of R6.

Round 1 :

3 sc, inc, rep 9x (45)

Round 2 :

2 sc, inc, rep 15x (60)

Round 3-4 :

sc around

Round 5 :

9 sc, inc, rep 6x (66)

Round 6-11 :

sc around

Round 12 :

9 sc, dec, rep 6x (60)

Round 13-14 :

sc around

Round 15 :

8 sc, dec, rep 6x (54)

Round 16-18 :

sc around

Info :

Stuff, but don't too much

Round 19 :

Join both layers by crocheting them together, sl st around.

Info :

F/O

β€” Head :

Info :

Use light blue

Round 1 :

ch 2, Starting from the second chain from hook, 6 sc (6)

Round 2 :

inc, rep 6x (12)

Round 3 :

sc, inc, rep 6x (18)

Round 4 :

sc, inc, [2 sc, inc = rep 5x], sc (24)

Round 5 :

3 sc, inc, rep 6x (30)

Round 6 :

sc around

Round 7 :

2 sc, inc, [4 sc, inc = rep 5x], 2 sc (36)

Round 8 :

5 sc, inc, rep 6x (42)

Round 9 :

19 sc, (inc=4x), 19 sc (46)

Round 10 :

22 sc, (inc=2x), 22 sc (48)

Round 11 :

sc around

Round 12 :

22 sc, (dec =2x), 22 sc (46)

Round 13 :

19 sc, (dec=4x), 19 sc (42)

Info :

Attach safety eyes between R9-10, and give 12 stitches (count from R10) between them

Round 14 :

5 sc, dec, rep 6x (36)

Round 15 :

2 sc, dec, [ 4 sc, dec = rep 5x], 2 sc (30)

Round 16 :

3 sc, dec, rep 6x (24)

Round 17 :

sc around

Info :

Stuff

Round 18 :

2 sc, dec, rep 6x (18)

Round 19-22 :

sc around

Round 23 :

4 sc, dec, rep 3x (15)

Round 24 :

sc around

Round 25 :

3 sc, dec, rep 3x (12)

Round 26 :

sc around

Info :

Stuff

Round 27 :

Flatten the round; crochet both sides together by using sl st to close the hole, 4 sl st

Info :

F/O leaving a long tail for sewing

β€” Legs (make 4) :

Info :

Use light blue

Round 1 :

ch 2, starting from the second chain from hook, 6 sc (6)

Round 2 :

inc, rep 6x (12)

Round 3 :

sc, inc, rep 6x (18)

Round 4 :

sc around

Round 5 :

4 sc, dec, rep 3x (15)

Round 6 :

sc around

Round 7 :

3 sc, dec, rep 3x (12)

Info :

Stuff

Info :

F/O leaving a long tail for sewing

β€” Accessories :

Hat :

Use contrasting yarn, I used dark brown.

Round 1 :

ch 2, starting from the second chain from hook, 5 sc (5)

Round 2 :

inc, rep 5x (10)

Round 3 :

sc, inc, rep 5x (15)

Round 4 :

BLO, sc around

Round 5-6 :

sc around

Round 7 :

15 fpsc (15)

Round 8 :

2 sc, inc, rep 5x (20)

Round 9 :

3 sc, inc, rep 5x (25)

Info :

Stuff and F/O

Bow :

Use pink

Round 1 :

ch 11, starting from the second chain from hook, sc in each sts (10), ch 1, turn

Round 2 :

dec, 6 sc, dec (8), ch 1, turn

Round 3 :

dec, 4 sc, dec (6), ch 1, turn

Round 4 :

dec, 2 sc, dec (4), ch 1, turn

Round 5 :

dec, dec (2), ch 1, turn

Round 6 :

sc in each st (2), ch 1, turn

Round 7 :

inc, inc (4), ch 1, turn

Round 8 :

inc, 2 sc, inc (6), ch 1, turn

Round 9 :

inc, 4 sc, inc (8), ch 1, turn

Round 10 :

inc, 6 sc, inc (10)

Info :

F/O. Wrap the yarn around the center of the piece.

β€” Finishing :

Info :

Sew the head to the body.

Info :

Sew the legs under the body.

Info :

Sew the hat on the head.

Info :

Sew the bow on the neck.

Info :

Sew the mouth by using black embodriyd thread.

Info :

This turtle bowl is also can be used as a plant pot cover.

Assembly Instructions

  • Sew the head to the body using the long tail left from the head and a tapestry needle; position the neck into the opening and stitch securely with even stitches.
  • Position and sew the four legs under the body evenly spaced, using the tails left on each leg and whipstitch to secure them firmly to the base.
  • Place the hat on the top of the head and sew it in place through the hat brim and a few head stitches so it sits securely without wobbling.
  • Wrap the bow center tightly and sew the bow to the neck area, securing the ends so the bow sits flat and centered on the neck.
  • Use black embroidery thread to stitch a small smile on the face, checking placement against the eyes before securing and weaving in ends.

Important Notes

  • πŸ’‘This pattern uses US terminology; follow abbreviations accordingly to avoid stitch confusion.
  • πŸ’‘Work this amigurumi in continuous rounds and mark the beginning of each round with a stitch marker for accurate shaping.
  • πŸ’‘Gauge is not critical for this project but maintain consistent tension so parts fit together neatly.
  • πŸ’‘Use MR (magic ring) as an alternative to ch 2 when beginning rounds if you prefer a tighter center.
  • πŸ’‘Measurement of the finished piece is approximately 16 cm tall; adjust yarn/hook size to change final dimensions.

Make this Turtle Bowl to add handmade charm to your home or give as a delightful gift. It combines playful amigurumi with a practical double-layered bowl that holds tools or a small plant. Enjoy the satisfying process of shaping, assembling and finishing every sweet detail. 🧢🌿

You ask,

we answer.

FAQs

What size will the finished piece be?

The finished amigurumi measures approximately 16 cm tall when using the recommended 5ply cotton and 3 mm hook.

Can I use different yarn weights for this pattern?

Yes, you can change yarn weight, but it will affect final size and required hook; choose an appropriate hook and expect different stitch counts to produce a different fit.

Do I need prior crochet experience for this pattern?

This pattern is rated intermediate and assumes you are comfortable with continuous rounds, increases, decreases and basic shaping.

How long does this project typically take to complete?

Most crocheters finish this Turtle Bowl in 5-7 hours, depending on experience and whether you make additional accessories.