๐Ÿงถ Beautiful โœจ Detailed ๐Ÿ’ Adorable

Trick or Treat Sam Amigurumi Pattern

Trick or Treat Sam Amigurumi Pattern
4.2โ˜… Rating
5-7 Hours Time Needed
1.4K Made This
โœ‚๏ธ

Intermediate Level

Ideal for those with basic crochet experience, featuring slightly more advanced stitches and techniques to expand your skills.

โฑ๏ธ

Weekend Treat

Takes 5-7 hours, making it an enjoyable project to finish over a couple of days.

๐Ÿงธ

Cute Companion

An adorable friend to cherish, handcrafted with love to bring comfort and joy for years to come.

About This Trick or Treat Sam Amigurumi Pattern

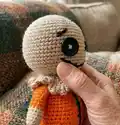
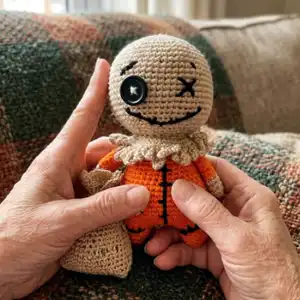
This pattern creates Trick or Treat Sam, a tiny amigurumi scarecrow-style character with a ruffled collar, button eye and stitched details. Youll work in rounds and use basic amigurumi shaping techniques to assemble the head, body, legs and arms. The design includes a small patch and embroidered facial details to give Sam character.

Trick or Treat Sam Amigurumi Pattern crochet pattern - detailed view of completed project

Clear round-by-round instructions guide you through every step, with photos to help where shaping is important. Intermediate stitches like BLO and working in chains to join pieces add fun shaping elements.

Why You'll Love This Trick or Treat Sam Amigurumi Pattern

I absolutely love this pattern because it brings a small character to life with simple stitches and charming details. I enjoy how the button eye and embroidered mouth give Sam so much personality with minimal materials. The ruffled collar is a fun textured element that elevates the design and is satisfying to crochet. Making Sam is a great way for me to combine small amigurumi techniques into a complete, themed toy.

Trick or Treat Sam Amigurumi Pattern step 1 - construction progress Trick or Treat Sam Amigurumi Pattern step 2 - assembly progress Trick or Treat Sam Amigurumi Pattern step 3 - details and accessories Trick or Treat Sam Amigurumi Pattern step 4 - final assembly and finishing

Switch Things Up

I love how easy it is to customize Sam with color changes; try pastel yarns for a softer, sweeter version of the character.

You can change yarn weight and hook size to create different sizesโ€”use DK or worsted weight with a larger hook for a chunkier Sam or sport weight for a mini version.

I often swap the button eye for a safety eye or embroider both eyes for a fully handmade look that is safer for little ones.

Embroider extra scars, stitches or tiny patches using contrasting yarn to give Sam even more personality and a handmade aesthetic.

Try adding tiny crocheted accessories like a mini hat, bag or a little pumpkin to give Sam a story and make a set of seasonal toys.

For a posable version, consider inserting a small wire armature in the limbs before stuffing to make simple posing possible.

You can make Sam a keychain by using thinner yarn and a smaller hook, then attach a keyring through the top loop of the head or collar.

I like to experiment with texture on the collarโ€”use a boucle or textured yarn for the ruffle to make it stand out visually and tactilely.

To make a group of characters, vary the patch shapes and embroidered faces so each one has a unique personality even when using the same base pattern.

For gifting, package Sam with a small burlap bag or hang a tiny tag and include a noteโ€”handmade details make it feel extra special.

Common Mistakes & How to Fix Them

โœ— Skipping the BLO instruction on round 28 can prevent the collar loops from forming correctly; follow BLO exactly and cut the yarn when instructed to keep the remaining loops for the ruffle. โœ— Not stuffing the head before continuing can make it hard to shape evenly; stuff gradually and firmly before closing the top of the head to keep the round shape consistent. โœ— Forgetting to leave a long tail when fastening off the body makes sewing the head on difficult; always leave the long tail as instructed for neat joining and finishing. โœ— Cutting the thread after the first leg without following the join instructions will break the body joining chain; after the first leg cut only when directed and continue with the second leg to join to the body as described.

Trick or Treat Sam Amigurumi Pattern

Make a spooky-cute Trick or Treat Sam amigurumi to celebrate Halloween or gift to a friend. This pattern walks you through crocheting the head, body, legs, arms, patch and collar with clear round-by-round instructions. Youll enjoy creating the little details like the button eye and embroidered stitches to give Sam personality.

Intermediate 5-7 Hours

Materials Needed for Trick or Treat Sam Amigurumi Pattern

โ€” Main Fabric

  • 01
    Alize Cotton Gold 37
  • 02
    Alize Cotton Gold 262
  • 03
    Alize Cotton Gold 60

โ€” Tools Required

  • 01
    6 mm safety eyes
  • 02
    2.00 mm or a hook that fits your yarn
  • 03
    Polyester Fiberfill
  • 04
    Scissors
  • 05
    Yarn needle for sewing
  • 06
    Stitch markers
  • 07
    Pins for assembly (optional)

Progress Tracker

0% Complete

โ€” Head :

Round 1 :

6 sc in magic ring (6)

Round 2 :

(inc) x6 (12)

Round 3 :

(sc, inc) (18)

Round 4 :

(inc, 2 sc) x6 (24)

Round 5 :

(3 sc, inc) x6 (30)

Round 6 :

2 sc, inc, (4 sc, inc) x5, 2 sc (36)

Round 7 :

(5 sc, inc) (42)

Round 8 :

3 sc, inc, (6 sc, inc) x5, 3 sc (48)

Round 9 :

(7 sc, inc) x6 (54)

Round 10 :

4 sc, inc, (8 sc, inc) x5, 4 sc (60)

Round 11-23 :

sc around (60) (13 rnds)

Round 24 :

(3 sc, dec) x12 (48)

Round 25 :

(2 sc, dec) x12 (36)

Round 26 :

2 sc, dec, (4 sc, dec) x5, 2 sc (30)

Round 27 :

(3 sc, dec) x6 (24)

Round 28 :

BLO sc around (24) *cut the yarn.

Info :

Work with the remaining loops of the 28th row. Photos will help.

Round 29 :

(inc) x24 (48)

Round 30-31 :

sc around (48) (2 rnds)

Round 32 :

ch5, slst, ch7, slst, ch9, slst, ch7, slst, ch5, slst, ........

Info :

*continue in the same way throughout the row and finish.

โ€” Leg :

Round 1 :

7 sc in magic ring (7)

Round 2 :

(inc) x7 (14)

Round 3-5 :

sc around (14) *make 2 pieces.

Info :

*After making the first leg, cut the thread. When making the second leg, do not cut the thread and continue to the body.

โ€” Body :

Round 6 :

ch4, join the first leg with the sc. Crochet on the first leg: 2 sc, (inc, 5 sc) x2, working on the chain: inc, 2 sc, inc, crochet on the second leg: (5 sc, inc) x2, 2 sc, working on the chain: 4 sc (42)

Round 7 :

(13 sc, inc) x3 (45)

Round 8-12 :

sc around (45) (5 rnds)

Round 13 :

(13 sc, dec) x3 (42)

Round 14-16 :

sc around (42) (3 rnds)

Round 17 :

(5 sc, dec) x6 (36)

Round 18-20 :

sc around (36) (3 rnds)

Round 21 :

(4 sc, dec) x6 (30)

Round 22-24 :

sc around (30)

Round 25 :

(3 sc, dec) x6, slst (24)

Info :

*Fasten off and leaving a long tail for sewing. Stuff the body. Sew the Head with the Body.

โ€” Patch :

Round 1 :

6 sc in magic ring (6)

Round 2 :

(inc) x6 (12)

โ€” Arm :

Info :

Use the beige yarn

Round 1 :

6 sc in magic ring (6)

Round 2 :

(sc, inc) x3 (9)

Round 3-4 :

sc around (9) (2 rnds)

Info :

*switch the orange.

Round 5-11 :

sc around (9) (7 rnds) *I don't fill arms.

โ€” Assembly :

Info :

*Fasten off and leaving a long tail for sewing. Stuff the body. Sew the Head with the Body.

Info :

Sew the patch to the body and embroider decorations and stitches as shown in the photos.

Info :

Sew or position the arms on either side of the body. Attach the button eye and embroider the opposite eye and mouth with black yarn.

Assembly Instructions

  • Fasten off and leave a long tail for sewing; stuff the body and sew the head to the body using the long tail for a secure seam.
  • When making the legs follow Rnd 6 to join the first and second leg with ch4 and the chain as instructed so the body is formed seamlessly.
  • Sew the patch onto the body where shown in the photos and secure with small neat stitches; embroider around the patch with black yarn for detail.
  • Attach arms to the sides of the body by sewing through the side stitches so they sit symmetrically; the arms are made in beige then switched to orange as instructed.
  • Embroider facial details with black yarn and sew on the button eye securely; use the pattern photos as a guide for placement and spacing.

Important Notes

  • ๐Ÿ’กUse stitch markers to keep track of your rounds, especially during increases and when working BLO for the collar.
  • ๐Ÿ’กStuff gradually and firmly for best shapeโ€”avoid overstuffing which can distort the toy.
  • ๐Ÿ’กPin parts in place before sewing to ensure even placement and symmetry when attaching head, arms, and patch.

Your Trick or Treat Sam is complete and ready to spook and delight! ๐ŸŽƒ This tiny amigurumi makes a perfect handmade gift or seasonal decoration you'll be proud of. ๐Ÿงถ Happy crocheting and enjoy sharing Sam with friends and family! โœจ

You ask,

we answer.

FAQs

What size will the finished piece be?

The finished amigurumi measures approximately 12-15 cm tall depending on your yarn and tension when using the recommended hook sizes.

Can I use different yarn weights for this pattern?

Yes, you can use different yarn weights but it will affect the final size; adjust hook size accordingly to maintain stitch definition and shape.

Do I need prior crochet experience for this pattern?

This pattern is rated intermediate, so familiarity with basic amigurumi techniques, magic ring, increases, decreases and BLO is recommended.

How long does this project typically take to complete?

Most crafters complete this pattern in 5-7 hours, though time may vary based on experience and the amount of detailing you add.