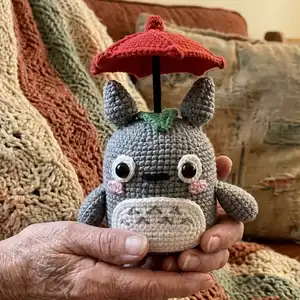
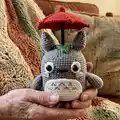
Make your own adorable Totoro little lamp with this detailed amigurumi pattern. You will crochet the body, ears, arms, belly, leaf and a clever umbrella lamp using USB LED string lights for a cozy glow. The pattern includes step-by-step stitch counts, assembly guidance and helpful photos so you can follow along with confidence. Perfect for gifting or to brighten up your crafting space.
Progress Tracker
0% Complete
— Umbrella :
Round 1-3 :
8sc. (Magic ring) (8)
Round 4 :
[sc, inc]*4 times. (12)
Round 5 :
[sc, inc]*6 times. (18)
Round 6 :
[2sc, inc]*6 times. (24)
Round 7 :
[3sc, inc]*6 times. (30)
Round 8 :
[4sc, inc]*6 times. (36)
Round 9 :
[5sc, inc]*6 times. (42)
Round 10 :
[6sc, inc]*6 times. (48)
Round 11 :
[7sc, inc]*6 times. (54)
Round 12 :
[8sc, inc]*6 times. (60)
Round 13 :
[9sc, inc]*6 times. (66)
Round 15 :
[10sc, inc]*6 times. (72)
Round 16 :
[11sc, 1ch, 3dc popcorn, 1ch,]*6 times, slst with first stitch to close. (72)
Info :
Fasten off, hide yarn end. To decorate more (Optional) Pic 1-8. Glue the inner side of the umbrella with latex/liquid/white glue to strengthen and keep shape; allow 4-5 hours to dry.
— Body :
Round 1 :
6sc. (Magic ring) (6)
Round 3 :
[sc, inc]*6 times. (18)
Round 4 :
[2sc, inc]*6 times. (24)
Round 5 :
[3sc, inc]*6 times. (30)
Round 6 :
[4sc, inc]*6 times. (36)
Round 7 :
[5sc, inc]*6 times. (42)
Round 8 :
[6sc, inc]*6 times. (48)
Round 9 :
[7sc, inc]*6 times. (54)
Round 10 :
[8sc, inc]*6 times. (60)
Info :
Pause work, and attach the inner side with a floor to make the base smooth suitable for placing and not easy to lose shape. Use felt or cardboard cut into a circle diameter about 60-65 mm, cover about the 9th row, glue UHU inside and stick it to the floor inside as shown.
Round 15 :
Crochet to cover the cable so that the USB end comes out of the workpiece (pic 6-7.) 60sc. On the side of the bulb, use a wire to wrap it in a spiral and put it inside the workpiece. It will be more convenient when crocheting (pic 8-9). (60)
Round 16-21 :
60sc. (6 rnds) (60)
Round 22 :
*Mark1, For sewing Arms. Use scraps yarn to mark this point (pic 10-11.) 12sc, Mark1, 6sc, Mark1, 24sc, Mark1, 6sc, Mark1, 12sc. (60)
Round 23-25 :
60sc. (3 rnds) (60)
Round 26 :
*Mark2, For making the nose. (pic 12.) 28sc, Mark2, 4sc, Mark2, 28sc. (60)
Round 27-29 :
60sc. (3 rnds) (60)
Round 30 :
4sc, dec, [8sc, dec]*5 times, 4sc. (54)
Round 32 :
[dec, 7sc]*6 times. (48)
Info :
Take the end of the wires to the outside, put the weight bag on the bottom, center the wires. Fill the Fiberfill "tightly" until almost full: see next page for stuffing instructions.
— Continue to crochet the body :
Round 34 :
3sc, dec, [6sc, dec]*5 times, 3sc. (42)
Round 35 :
[dec, 5sc]*6 times. (36)
Round 36 :
2sc, dec, [4sc, dec]*5 times, 2sc. (30)
Round 37 :
[dec, 3sc]*6 times. (24)
Round 38 :
[dec, 2sc]*6 times. (18)
Info :
Add fiberfill to make it tight until the workpiece is fully inflated so that when you press it it won't collapse easily. Fasten off, hide yarn end.
— Arms :
Round 1 :
6sc. (Magic ring) (6)
Round 3 :
[sc, inc]*6 times. (18)
Round 4-7 :
18sc. (4 rnds) (18)
Round 8 :
[4sc, dec]*3 times. (15)
Round 10 :
[3sc, dec]*3 times. (12)
Info :
Fasten off, leave a yarn for sewing. Add fiberfill up to the 7th-8th row, not too full. Squeeze the top ends together and sew them closed. Pic 1-4.
— Ears :
Round 1 :
6sc. (Magic ring) (6)
Round 2 :
[sc, inc]*3 times. (9)
Round 4 :
[2sc, inc]*3 times. (12)
Round 6 :
[3sc, inc]*3 times. (15)
Round 7 :
[4sc, inc]*3 times. (18)
Round 11 :
5sc. (Crochet half round from row 10.) slst to close and fasten off, leave a yarn for sewing. Fill it up with fiberfill.
— Eyes :
Round 1 :
MR, 2sc, 2hdc, 5dc, 2hdc, 2sc, slst with first stitch to close the round. (13) Before pulling the closure, insert the plastic eye in the center as picture 1-2.
Info :
Fasten off, hide yarn end. Use glue to assemble will make the edges look more beautiful. If you want to use the sewing method leave some yarn for sewing.
— Belly :
Info :
Belly : make 1 piece : White. Begin 12 chains for foundation.
Round 1 :
1ch, 26sc. (Around 12 Chains. How to page 3.) (26)
Round 2 :
inc, 10sc, 3inc, 10sc, 2inc. (32)
Round 3 :
3sc in same stitch, 12sc, 3sc in same stitch, 3sc, inc, 2sc, inc, 4sc, inc, 2sc, inc, 3sc. (40)
Round 4 :
sc, 3sc in same stitch, 14sc, 3sc in same stitch, 6sc, inc, 4sc, 2inc, 4sc, inc, 5sc. (48)
Round 5 :
48sc, slst with first stitch to close the round. Fasten off, hide yarn end. Use gray yarn to embroider the pattern later.
— Pink cheeks :
Round 1 :
Begin 3 chains for foundation. 1ch, 3sc. (On 3 chains) (3)
Info :
Fasten off, hide yarn end. Pink cheeks will use glue; if you don't want pink cheeks you can embroider whiskers using black yarn after finishing other parts.
— Leaf :
Info :
Leaf : make 1 piece : Green. Crochet to have a hole in the middle, to be used to close the head part and has a compartment for the umbrella pole. Crochet 8ch into a circle, picture 1. (as foundation)
Round 1 :
Crochet to cover the foundation 6sc, picture 2-3. 6ch (Use 1 size larger hook to make the next row easier to crochet or crochet the chain larger than usual, picture 4.), Crochet with the 2nd loop from the hook 5sc, picture 5. Crochet to cover the foundation 6sc, slst with first stitch. picture 6. (22)
Round 2 :
2ch, dc in same stitch, 2inc, 2dc, inc, 2dc, hdc, 2sc, picture 7. 2ch, Crochet on the other side picture 8. 2sc, hdc, 2dc, inc, 2dc, inc, dc, inc, slst with first stitch to close the round. picture 9. Fasten off, hide yarn end.
— Embroider nose :
Info :
Mark2. Use black yarn to embroider the nose 4 stitches long, 4-5 rounds. (The more rounds, the bigger the nose) Continue embroidering vertically, threading the thread in a worm to the end, hide yarn end.
— Body decoration and assembly :
Info :
Use UHU glue to attach parts, it dries quickly. After attaching parts, use pin needles or hand to press down for 3-5 minutes to allow the glue to set. Caution: glue will be viscous. Or you can use the sewing method. Count from the nose down 3 rows; align left and right, apply glue for the belly and eyes placement as shown in pictures. Sew ears to head using marked points (Mark1) and allow base to oblique down as shown.
— Assemble the umbrella :
Info :
At the Top, use scissors or sharp pencils to gently part the fiberfill down to the bottom in a straight line. Then stick the wooden stick to the bottom. Mark the edge with a pen, pull the stick out. The remaining length at the top should be approximately 80-90 mm. If it's too long, cut it off. You can use a nail file to sharpen the tip.
Info :
Measure the wires so that the first light from the USB end is at the end of the stick above. Apply glue from the end of the wood slightly past the mark. Attach the wires to the wood and wait until it dries for about 5 minutes. Apply glue in a line, use black yarn length about 3 feet+, press one end of the yarn thread against the stick and wrap it; press and trim ends. Put the stick back into the head and gently pull the USB cable out the back until it stops.
Info :
At the long end, gently wrap the yarn thread and tie the stick down until it passes the mark. Apply glue periodically until finish, cut off the ends. The "Umbrella Pole" is done. Attach the leaf to the umbrella pole by gently running the wire through the hole from the bottom, apply glue around the base of the umbrella pole to bring the leaf down and wait until completely dry.
— Final umbrella wiring :
Info :
At the end of the upper umbrella pole, bend the wires to the side and wrap the wires in a circle diameter about 60 mm. Put some glue into the hole inside the umbrella body, wait about 2 minutes, then plug it into the umbrella pole. Use yarn to tie to make the umbrella pole and the umbrella body closer. After umbrella and pole are tightly attached, with the workpiece facing down glue a circle under the line of the wire. Wait about 2 minutes and gently squeeze so cord is firmly attached. Done.
— Tail (Optional) :
Round 1 :
12sc. (Magic ring) (12) Before pulling the closure, insert the USB power cable in the center of picture 2-4.
Round 2 :
[3sc, inc]*3 times. (15)
Round 6 :
[3sc, dec]*3 times. (12)
Round 8 :
[2sc, dec]*3 times. (9)
Round 9 :
9sc. (9) Fasten off, leave a long end for sewing. Slightly filled with fiberfill, sew to the body. picture 5-6.
Info :
Do the same with the other ear. Sew the arms to the "Mark1" on both sides as shown. Attach tail optionally to the lower back as pictured. Final checks: ensure umbrella pole straight and leaf covers top hole; UHU glue will help hold leaf to head and umbrella pole.
This little Totoro lamp brings a bit of handmade magic to any corner of your home. It's a delightful mix of amigurumi charm and a functional LED umbrella that really lights up the room. Make one as a gift or keep it as a cozy night light — either way, it's sure to spark smiles and warm memories. 🧶✨