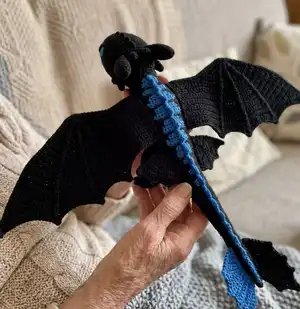
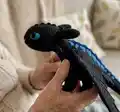
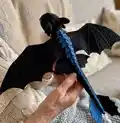
Bring Toothless—the beloved dragon—into the real world with this full-size plush pattern. You will cut, sew and stuff large fabric pieces to create a 90" wingspan, 50" body dragon with interchangeable tail fins and magnetic back fins. The pattern includes detailed templates, step-by-step instructions for wings, fins, head, legs and assembly, plus tips for working with quilt batting and topstitching details. Perfect for makers who love large-scale costume or plush projects.
Progress Tracker
0% Complete
— Printing & Pattern Setup :
Round 1 :
Open the pattern document with Adobe Acrobat Reader/Pro DC and print using the Poster option in Page Sizing & Handling to produce the tiled pages.
Round 2 :
Set Tile Scale to 100% for the original pattern size and use Overlap to help assemble tiles later on; add Cut marks and Labels optionally.
Round 3 :
Print the scale square and measure both sides; if both are 2 inches your print is successful and you can proceed to assemble the pattern pages.
— Getting to know the pattern document :
Round 4 :
Check the upper right corner of the pattern pages for a 2-inch scale square, directional arrows (orange) that indicate fabric hair direction, and three seam allowance lines for 0.25, 0.50 and 0.75 inches.
Round 5 :
Note the green lines on pieces like the wing and feet; these indicate a second edge or top/bottom differentiation where the pattern includes an extra overlapping section for the darker top fabric.
Info :
Body A: blue marks along the bottom of the tail indicate where tail fins and small tail fins are placed; two marks closest to the legs show placement of Fin A and two marks at the end of the tail show placement of Fin B.
— Preparing the pieces :
Round 6 :
Fold fabric in half with right sides together to cut one original and one mirrored piece automatically; follow the pattern arrow for hair direction on minky or plush fabrics.
Round 7 :
For pieces with green lines, cut both pieces neglecting the green line initially and trim the excess from one side before sewing the final seam later as directed.
Round 8 :
Refer to the cut-list table for the exact number of pieces to cut when fabric is folded (Back fins 2x, Fin A 2x, Fin B 4x, Body A 1x, Body B 1x, Wing 2x, etc.).
Info :
* Cut one set of back fins from black fabric and one set from blue fabric. ** Some pieces (Head back, Skull) are to be cut without seam allowance or on the fold for symmetry as noted in the table.
— A few tips before sewing :
Round 9 :
Work precisely by tracing pattern pieces on the fabric backside without seam allowance for accurate lines and use basting stitches before machine sewing complicated curves.
Round 10 :
Double-check details, fabric direction and fold placement to avoid common mistakes such as sewing pieces wrong-side-out or reversing mirrored parts.
Round 11 :
Prevent movement by basting pieces together using basting thread or hand-stitching before sewing with the machine, especially for stretchy fabrics and batting layers.
Round 12 :
Keep wrinkles away from your seamline by flattening and pushing folds away from the seam; trim seam allowances and clip curves as appropriate but avoid cutting too close to the stitch line.
Round 13 :
Always sew right sides together; colored lines in the figures show which seam to sew at each step and pieces should be sewn with wrong sides facing you in assembly.
— Part 1: The head :
Round 14 :
Eyes & Nose: You can embroider eyes and nose by hand or machine; if using an embroidery ring cut a larger square first to fit the hoop and then trim after stitching.
Round 15 :
Spikes & Ears: For the spikes take two pieces (one original, one mirrored), sew right sides together leaving the end open for attachment, and sew along the orange lines shown on the pattern once aligned.
Round 16 :
Ears assembly step 1: Sew the three back pieces of the ear together by attaching the left and right back pieces to the center piece so the shapes bend in opposite directions when sewn right sides together; manage wrinkles carefully.
Round 17 :
Ears assembly step 2: Take the front ear piece and sew front and back ear pieces right sides together along the orange seam line; flip right sides out and press or baste to fit flat.
Round 18 :
Head assembly step 1: Place the two head side pieces right sides together and sew along the shortest edge shown in the figure; align carefully so eyes and nose embroidery match.
Round 19 :
Head top: Sew the top head pieces right sides together with the head spikes in between; ensure spikes are trimmed, turned right sides out and aligned so they stand apart slightly before stitching the top seam.
Round 20 :
Attach top to sides: With the top of the head completed, sew it to the completed side pieces aligning seams and leaving openings for ear and spike insertion as shown in the figure.
Round 21 :
Attach back piece: Sew the head back to the edges of the top and side head pieces, leaving small holes open for inserting ears and top spikes; only sew the small lines that create holes for ears and spikes if they are pre-attached to each other.
Round 22 :
Sew ears and top spikes: Take the ears and top spikes and sew right sides together to the head; ensure the correct ear goes to the correct side by matching inner ear sides to the inner side of the head before sewing.
Round 23 :
Side spikes: Sew side spikes partly in between the head side and head back pieces, aligning them right sides together and leaving the two biggest side spikes unsewn in the first pass so they can be finished in a circular stitch for stuffing space.
Round 24 :
When you have attached both ears and spikes, the outer edge of the Head back piece should be fully attached and the head preparation is finished and ready to be stuffed and attached to the body later.
— Part 2: Wings and fins :
Round 25 :
How to work with polyester quilt batting: Use a double layer of medium-thick batting for wings for shape; cut fabric and batting together so they fit perfectly, and baste if necessary to keep layers aligned.
Round 26 :
Batting thickness tips: Medium thickness keeps tailfins flexible; thicker batting adds depth but can make top-stitching more difficult and prone to puckering — practice control and pulling to keep lines even.
Round 27 :
How to add detail: Trace the black guideline lines on the wing/fins with basting thread or pins by hand, then top-stitch these guidelines with your sewing machine using a contrasting thread to emphasize wing ribs and decorative lines.
Round 28 :
Sewing the wings step 1: Make sure an original and mirrored wing piece are laying right sides together on top of the quilt batting; sew around the edges leaving the body edge open for later attachment.
Round 29 :
Sewing the wings step 2: Flip the wing right sides out and start sewing the guidelines by hand, then over-stitch with the machine; top-stitched ribs are the orange lines indicated on the wing pattern.
Round 30 :
Sewing the wings step 3: Repeat for the other wing so both left and right wings are complete, shaped and ribbed with the same top-stitching details.
Round 31 :
Sewing the fins - Back fins step 4: Split the back fin pieces into two sets; each set consists of a blue and black fabric piece right sides together with a single-layer quilt batting piece; sew along the edge of each piece to get left and right back fins with the blue inside.
Round 32 :
Back fins step 5: Before flipping right sides out, place or glue small magnets at the top corners of the fin pieces on the blue fabric so magnets align when left and right pieces are brought together; secure magnets, trim and turn pieces.
Round 33 :
Small tail fins step 6: For small tail fins on the side of the tail, take two fabric pieces with one single-layer batting piece; sew along the outside edge, trim corners and flip right sides out.
Round 34 :
Fin A step 7: Make Fin A same as wings: two pieces right sides together on batting, sew leaving attachment edge open, flip, then add top-stitching guidelines and finish the seam for attachment to the body.
Round 35 :
Fin B steps 8-10: Repeat the same method for brown and black Fin B pieces; for the red interchangeable Fin B apply the white skull appliquE9 first, top-stitch in a zig-zag, then assemble with batting and mirrored piece.
Round 36 :
Bands & assembly of bands steps 11-14: Take Band A, B & C pieces; sew Band B and C right sides together as inserts between Band A pieces with left edge open, turn bands right side out and top-stitch; install snaps or buttons if desired, then fit Band A around Fin B edge and top-stitch to secure.
Round 37 :
Repeat steps 13-14 for the other two Fin B pieces and finish all bands; wings and fins are now ready to be attached to the body in the assembly stage.
— Part 3: Legs :
Round 38 :
Preparing the nails: Sew a guideline on the nail strip to form 16 nails in sets of four; cut the strip into four sets of nails for easier placement and trimming between nails as needed.
Round 39 :
Preparing the fins for legs: Take two fin-foot pieces, place right sides together on batting and sew around the outer edge; trim outer allowances and do the same for the other front-leg fin.
Round 40 :
Assembly of the legs parts needed: Fins Foot, Foot bottom pieces, Front Legs, Hips, Nails, Rear Legs. Sew Front Legs right sides together with the fin piece sandwiched so the fin is inside the leg when flipped.
Round 41 :
Attach bottom foot pieces: Sew the Foot bottom pieces to the bottom of the leg pieces, placing the nails in between following the pattern so nails attach to each other and form a tidy toe strip.
Round 42 :
Leave bottom parts open for turning and stuffing as indicated; finish seams and flip the leg pieces right sides out before stuffing and securing to the body.
— Part 4: Assembly of the body :
Round 43 :
Sewing the back fins in place: Align back fin pieces to the markings on Body A and B and baste them in place if necessary; ensure left/right orientation and magnet alignment for interchangeable fins.
Round 44 :
Attaching the legs: Position front and rear legs at the indicated placement marks on Body A and sew in place securely through multiple passes if necessary to withstand handling.
Round 45 :
Sewing the fins in place: Attach Fin A and Fin B pieces to the tail and body at the blue marks; ensure the small tail fins fit between Fin A and Fin B as the pattern shows.
Round 46 :
Sewing the wings in place: Mark the wing shoulder placement shown in the wing profile shape, sew the shoulder circle to the body so it can be stuffed from the body for a firm base before finishing the seam.
Round 47 :
Adding detail: After wings are attached, add any remaining top-stitching and reinforcement stitches, and check magnet alignment and band closures for the interchangeable tail-fin system.
— Part 5: Finishing off :
Round 48 :
Stuff the plush with polyester stuffing, taking care to stuff wings, shoulders and head firmly but not overfull; add poly pellets to feet if you want extra weight for standing stability.
Round 49 :
Attach the head to the body by sewing the head opening to the body neck opening, aligning marks and reinforcing with multiple passes of stitching to secure the head firmly.
Round 50 :
Final touches: Weave in ends, trim excess seam allowance, and check all snap and magnet closures for the interchangeable fins; mark left/right ears if desired to avoid confusion later.
Create your very own full-size Toothless plush with professional detail and personality. This pattern is written with careful steps for cutting, sewing and top-stitching wings, fins and body pieces. Enjoy the customization options like interchangeable fins, appliquE9 details and optional weighting in the feet. 🧵🖤