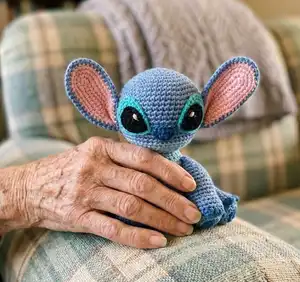
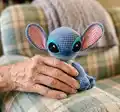
Make your own adorable Stitch-inspired amigurumi with this complete crochet pattern. You will create a lovable little alien with detailed instructions for head, ears, body, arms, legs, claws, tail, eyes and nose. The pattern includes clear round-by-round directions, materials list, and assembly notes so you can finish a charming handmade toy you will be proud to gift or keep.
Progress Tracker
0% Complete
— Head :
Round 1 :
R1: 6 FM in den MR (6)
Round 2 :
R2: 2 FM in jede Masche (12)
Round 3 :
R3: (1 FM, Zun.) x6 (18)
Round 4 :
R4: (2 FM, Zun.) x6 (24)
Round 5 :
R5: (3 FM, Zun.) x6 (30)
Round 6 :
R6: (4 FM, Zun.) x6 (36)
Round 7 :
R7: (5 FM, Zun.) x6 (42)
Round 8 :
R8: (6 FM, Zun.) x6 (48)
Round 9 :
R9: (7 FM, Zun.) x6 (54)
Round 10-19 :
R10-19: 1 FM in jede Masche (54). Farbwechsel zu Hellblau.
Round 20 :
R20: (7 FM, uns. Abn.) x6 (48)
Round 21 :
R21: (6 FM, uns. Abn.) x6 (42)
Round 22 :
R22: (5 FM, uns. Abn.) x6 (36)
Round 23 :
R23: (4 FM, uns. Abn.) x6 (30)
Info :
Den Kopf fest füllen, ggf. am Ende noch etwas mehr Füllung hinzufügen.
Round 24 :
R24: (3 FM, uns. Abn.) x6 (24)
Round 25 :
R25: (2 FM, uns. Abn.) x6 (18)
Info :
Garn abschneiden, dabei ein langes Ende stehen lassen um später den Kopf an den Körper zu nähen.
— Ears :
Info :
Ohren (4x) in der Runde, ohne Wenden. 2 in mittelblau, 2 in rosa. Zuerst die rosa inneren Ohren häkeln. Garn abschneiden und Fadenende vernähen. Bei den blauen äußeren Ohren ein langes Fadenende stehen lassen.
Round 1 :
15 LM, von der 2. LM von der Nadel: R1: 13 FM, 5 FM in letzte M, 13 FM (31)
Round 2 :
R2: 1 LM (wird nicht gezählt), 12 FM, (Zun.) x5, 13 FM (35). Die LM überspringen oder mit einem KM Runde beenden.
Round 3 :
R3: 1LM++, 12 FM, (1 FM, Zun.) x5, 13 FM (40)
Round 4 :
R4: 1 LM, 40 FM (40)
Info :
Am Ende die die beiden Ohrenteile zusammenhäkeln. Dabei sollte die richtige Seite der Ohren nach außen zeigen. Siehe Foto.
— Body :
Round 1 :
R1: 6 FM in MR (6)
Round 2 :
R2: 2 FM in jede M (12)
Round 3 :
R3: (1 FM, Zun.) x6 (18)
Round 4 :
R4: (2 FM, Zun.) x6 (24)
Round 5 :
R5: (3 FM, Zun.) x6 (30)
Round 6 :
R6: (4 FM, Zun.) x6 (36)
Round 7 :
R7: (5 FM, Zun.) x6 (42)
Round 8 :
R8: (6 FM, Zun.) x6 (48)
Round 9 :
R9: 1 FM in 46 Maschen. 47. Masche mit mittelblau aufnehmen und mit hellblau abschliessen. 1 FM in hellblau (48). Nach jedem Farbwechsel den Faden abschneiden und die Fadenenden zusammenknoten.
Round 10-15 :
R10-15: in hellblau: 15 FM. 16. Masche mit mittelblau abschliessen. 30 FM mit mittelblau häkeln, die 31. Masche mit hellblau abschliessen und die letzte Masche in hellblau häkeln. (48)
Round 16 :
R16: in hellblau: (3 FM, uns. Abn.), 6 FM, uns. Abn., 2 FM, Farbwechsel (1 FM). in mittelblau: 3 FM, uns. Abn, (6 FM, uns. Abn) x 3, 1 FM, Farbwechsel, 1 FM (42)
Round 17-18 :
R17-18: in hellblau: 14 FM, 15. Masche mit mittelblau abschliessen. in mittelblau: FM in jede M, letzte FM mit hellblau abschliessen (42)
Round 19 :
R19: in hellblau: (5 FM, uns. Abn) x2, (Masche aufnehmen, mit mittelblau abschliessen) (1 FM), in mittelblau: 4 FM, uns. Abn, (5 FM, uns. Abn) x2, 5 FM, fuer Abnahme Masche mit hellblau aufnehmen und abschliessen (36)
Round 20 :
R20: in hellblau: 12 FM, Farbwechsel zu mittelblau (1 FM). in mittelblau: 22 FM, Farbwechsel zu hellblau (1 FM) (36)
Round 21 :
R21: in hellblau: 13 FM, Farbwechsel, (1 FM), 21 FM, Farbwechsel (1 FM) (36)
Round 22 :
R22: in hellblau: (4 FM, uns. Abn) x2, 1 FM, Farbwechsel (1 FM). in mittelblau: 2 FM, uns. Abn., (4 FM, uns. Abn) x2, 4 FM, uns. Abn, uns. Abn mit hellblau abschliessen (30)
Round 23 :
R23: 1 FM in jede M (Farbwechsel machen) (30)
Info :
Körper füllen und am Ende nachfüllen.
Round 24 :
R24: in hellblau: (3 FM, uns. Abn) x2, 1 FM, Farbwechsel (1 FM). in mittelblau: 1 FM, uns. Abn, (3 FM, uns. Abn) x2, 3 FM, durch zwei Maschen mit mittelblau Masche aufnehmen, mit hellblau beenden (24)
Round 25 :
R25: FM in jede M (Farbwechsel machen) (24)
Round 26 :
R26: (2 FM, uns. Abn.) x2, 1 FM, Farbwechsel (1 FM), uns. Abn, (2 FM, uns. Abn) x3 (18). Garn abschneiden und vernähen.
Info :
Kopf und Körper mit dem Matratzenstich zusammennähen.
— Legs :
Info :
Beine (2x) in dunkelblau. Farbwechsel zu mittelblau wie angegeben. Fadenende zum Nähen stehen lassen.
Round 1 :
R1: 6 FM in MR (6)
Round 2 :
R2: 2 FM in jede M (12)
Round 3 :
R3: (1 FM, Zun.) x6 (18)
Round 4 :
R4: (2 FM, Zun.) x6 (24)
Round 5-7 :
R5-7: 1 FM in jede M (24)
Round 8 :
R8: (2 FM, uns. Abn.) x6 (18)
Round 9 :
R9: 1 FM in jede M (18)
Round 10 :
R10: (2 FM, Zun.) x6 (24)
Round 11-14 :
R11-14: 1 FM in jede M (24)
Round 15 :
R15: (2 FM, uns. Abn.) x6 (18)
Round 16-17 :
R16-17: 1 FM in jede M (18)
Info :
Bein füllen den Rand zusammenhalten und entlang häkeln um ihn zu schliessen. Garn abschneiden und Fadenende zum Nähen stehen lassen.
Info :
Jetzt werden wir zwischen Runde 4 und 5 also auf der 5. Masche entlang häkeln. Es ist wichtig, dass sich die Krallen dort befinden, wo sich das Ende des zugehäkelten Randes befindet. So zeigen sie nach oben, wenn wir die Beine annähen. Garn entsprechend anbringen. Sie zeigen Fotos.
— Claws :
Claw 1 :
Kralle 1: 1 LM, in nächste M: 1 Stb, 1 LM, in nächste M 1 FM
Claw 2 :
Kralle 2: in nächste M 1 KM und 2 LM, in nächste M: 1 Stb, 1 LM, FM in nächste M
Claw 3 :
Kralle 3: KM in nächste M, 2 LM, 1 Stb, 1 LM, KM
Info :
Garn abschneiden und vernähen.
— Arms :
Info :
Arme (x2) in dunkelblau, Farbwechsel zu mittelblau wie bei den Beinen.
Round 1 :
R1: 6 FM in MR (6)
Round 2 :
R2: 2 FM in jede M (12)
Round 3 :
R3: (1 FM, Zun.) x6 (18)
Round 4 :
R4: (2 FM, Zun.) x6 (24)
Round 5-7 :
R5-7: 1 FM in jede M (24)
Round 8 :
R8: (2 FM, uns. Abn.) x6 (18)
Round 9 :
R9: 1 FM in jede M (18)
Round 10 :
R10: (2 FM, Zun.) x6 (24)
Round 11-15 :
R11-15: 1 FM in jede M (24)
Round 16 :
R16: (2 FM, uns. Abn.) x6 (18)
Round 17-18 :
R17-18: 1 FM in jede M (18)
Round 19 :
R19: (1 FM, uns. Abn.) x6 (12)
Round 20 :
R20: 1 FM in jede M (12)
Info :
Entlang der Kante häkeln um sie zu schliessen. Diesmal enden die Krallen in einer Linie zum Ende der zugehäkelten letzten Reihe. Damit sie in die richtige Richtung zeigen, wenn wir die Arme annähen. Garn entsprechend anbringen. Die Krallen werden genauso gehäkelt wie bei den Beinen.
— Tail :
Round 2 :
R2: 2 FM in jede M (12)
Round 3 :
R3: 1 FM in jede M (12)
Round 4 :
R4: (1 FM, Zun.) x6 (18)
Round 5 :
R5: (1 FM, uns. Abn.) x6 (12)
Info :
Garn abschneiden und ein Ende zum Nähen lassen.
— Eyes :
Info :
Augen so ausschneiden wie auf den Fotos zu sehen ist. Mit schwarzem Garn den schwarzen Teil auf den hellblauen Teil aufnähen. Mit weißem Näh- oder Stickgarn einen kleinen Punkt auf das Schwarze sticken.
Info :
Die Augen an den Kopf pinnen. So positionieren wie auf den Fotos. Mit der unteren Kante eine Runde oberhalb des Farbwechsels. Mit der unteren Kante zwischen Runde 10 und 11 des Kopfes. Die Außenseiten sollten in einer Linie mit dem oberen Ende der Arme sein. Zwischen den Augen ca. 5 Maschen Abstand lassen. Die Ohren an den Kopf stecken um zu prüfen, ob alles passt.
— Nose :
Info :
Nase: Mit dunkelblau. Langes Fadenende am Anfang stehen lassen.
Round 1 :
5 LM, 1 Wendeluftmasche.
Round 2 :
KM in nächste LM. HStb in die nächste LM. 2 Stb in nächste LM. HStb in nächste LM. 1 LM, KM in letzte LM. Garn abschneiden und vernähen.
Info :
Die Nase zwischen die Augen nähen, dabei zeigt die gewölbte Seite nach unten. Augen mit hellblauem Nähgarn annähen.
— Assembly :
Info :
Ohren und Schwänzchen annähen: Die Ohren an den Kopf nähen. Die obere Seite sollte zwischen Runde 11 und 12 enden. Die untere Seite eine Runde über dem Farbwechsel. Dabei darauf achten, dass sie in einer Linie mit den Armen und Beinen sind.
Info :
Das Schwänzchen füllen und mit der unteren Seite zwischen Runde 5 und 6 des Körpers annähen.
Info :
Arme und Beine annähen: Den oberen Teil der Arme zwischen Runde 23 und 24, eine Masche ins hellblau hinein annähen. Den unteren Teil zwischen Runde 19 und 20, ca 1-3 Maschen vom hellblauen Bereich entfernt annähen. Die Unterseite der Beine beginnt ca. zwischen Runde 7 und 8 und die Oberseite zwischen Runde 15 und 16. Die Beine sind 3 Maschen vom hellblauen Bereich entfernt.
Info :
Kopf und Körper mit dem Matratzenstich zusammennähen. Positionieren und fest annähen.
Info :
Gratuliere! Du hast jetzt einen niedlichen Stitch gehäkelt. Zeige mir deine Kreation und markiere mich in deinem Foto @rxy_crochet!
You did it — your very own little Stitch-inspired amigurumi is ready to love and display! 🧶 This pattern combines simple shaping with charming details like felt eyes and tiny claws to give your toy personality. Make one as a heartfelt gift or keep it as a cuddly companion. ✨