Make a lovable Tofi the Mushroom with this step-by-step amigurumi pattern. You will crochet a charming mushroom character with a roomy cap, embroidered grass details, and tiny accessories. The pattern includes clear instructions for each part so you can assemble a professional-looking finished toy. Perfect for gifting or keeping as a cozy handmade companion.
Progress Tracker
0% Complete
— Mug :
Round 1 :
Start with a magic circle, 6sc in the loop. [6st]
Round 2 :
1 sc, 1 inc. Repeat. [9st]
Info :
Change to YELLOW yarn.
Round 3 :
[YELLOW] BACK LOOP this row, sc all around. [9st]
Round 4 :
Sc all around. [9st]
Round 5 :
Sc all around. [9st]
Round 6 :
Sc all around. [9st]
Round 7 :
Sc all around. [9st]
Round 8 :
1 sc, 1 dec. Repeat [6sc] Fasten off with a very long tail.
Info :
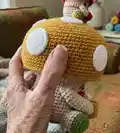
With the help of a pencil, push the brown part in, as the inside part of the cup. You can very, very lightly stuff the rest of the cup.
Info :
Using your long tail, weave loose ends through each stitch and pull it close.
Info :
Feed your tail inside first, then pull it out from where you want the bottom of your mug handle to start. Using adjacent stitches, attach your yarn tail. Chain 9 (or more, if you think you need more) and attach your last chain to the brim of the mug with a slip stitch and fasten off.
Info :
I also used this new yarn tail to weave it back in and come out again to shape my handle as an half-S shape.
Info :
Leave a long tail again, you will use this to sew the mug to the hands.
— Spots (x6) :
Info :
With your white yarn:
Round 1 :
Start with a magic circle, 8sc in the loop. [8st]
Round 2 :
Increase each stitch. [16st]
Round 3 :
1 sc, 1 inc. Repeat. [24st]
Info :
Fasten off with a long tail, you will use this tail to sew the spots to the mushroom cap later.
Info :
Make at least six. If you want spottier mushroom, make eight. I ended up making eight :)
— Cheeks (x2) :
Info :
With your RED yarn, chain 3. We'll make a simple bobble stitch of 3 columns to the first stitch.
Step 1 :
Yarn over, using the first chain you created, pull up a loop. You have 3 loops on the hook. Pull through the first two. You have 2 loops on the hook.
Step 2 :
On the same stitch, do it again: Yarn over, pull up a loop. You have 4 loops on the hook. Pull through the first two. You have 3 loops on the hook.
Step 3 :
On the same stitch, do it again: Yarn over, pull up a loop. You have 5 loops on the hook. Pull through the first two. You have 4 loops on the hook.
Step 4 :
Pull through all of them. Chain 1 to fasten off. Cut a long tail, we’ll use both of the tails to sew the cheeks. Push your bobble out to give it a round shape.
— Legs (x2) :
Info :
We start from the feet. With your GREEN yarn:
Round 1 :
Start with a magic circle, 6sc in the loop. [6st]
Round 2 :
Increase all stitches. [12st]
Round 3 :
1 sc, 1 inc. Repeat. [18st]
Round 4 :
BACK LOOP this row, sc all around. [18 st]
Info :
Change to BEIGE yarn.
Round 5 :
[BEIGE] Sc all around. [18st]
Round 6 :
Sc all around. [18st]
Round 7 :
Sc all around. [18st] Fasten off with a long tail.
Info :
Make two. Stuff firmly.
— Arms (x2) :
Info :
With your BEIGE yarn:
Round 1 :
Start with a magic circle, 6sc in the loop. [6st]
Round 2 :
1 sc, 1 inc. Repeat. [9st]
Round 3 :
Sc all around. [9st]
Round 4 :
Sc all around. [9st]
Round 5 :
Sc all around. [9st]
Round 6 :
Sc all around. [9st]
Round 7 :
Sc all around. [9st]
Round 8 :
Sc all around. [9st]
Round 9 :
Sc all around. [9st]
Round 10 :
Sc all around. [9st]
Info :
Stuff firmly at the hands, then lightly towards the arm. Fold half, sc across the top to close the arm.
— Mushroom Stem :
Info :
We start our mushroom from the bottom. With your GREEN yarn:
Round 1 :
Start with a magic circle, 8sc in the loop. [8st]
Round 2 :
Increase all stitches. [16st]
Round 3 :
1 sc, 1 inc. Repeat. [24st]
Round 4 :
2 sc, 1 inc. Repeat. [32st]
Round 5 :
3 sc, 1 inc. Repeat. [40st]
Round 6 :
4 sc, 1 inc. Repeat. [48st]
Round 7 :
5 sc, 1 inc. Repeat. [56st]
Round 8 :
BACK LOOP this row, sc all around. [56st]
Round 9 :
Sc all around. [56st] Change to BEIGE yarn.
Round 10-24 :
[BEIGE] 15 rows of sc all around. [56st] Change to BROWN yarn.
Round 25 :
[BROWN] 6 sc, 1 inc. Repeat. [64st]
Round 26 :
7sc, 1 inc. Repeat. [72st]
Round 27 :
8sc, 1 inc. Repeat. [80st]
Round 28 :
19sc, 1 inc. Repeat. [84st]
Info :
Put a marker on your last stitch and fasten off.
— Mushroom Cap :
Info :
With your YELLOW yarn:
Round 1 :
Start with a magic circle, 6sc in the loop. [6st]
Round 2 :
Increase all stitches. [12st]
Round 3 :
1 sc, 1 inc. Repeat. [18st]
Round 4 :
2 sc, 1 inc. Repeat. [24st]
Round 5 :
3 sc, 1 inc. Repeat. [30st]
Round 6 :
4 sc, 1 inc. Repeat. [36st]
Round 7 :
5 sc, 1 inc. Repeat. [42st]
Round 8 :
6 sc, 1 inc. Repeat. [48st]
Round 9 :
7 sc, 1 inc. Repeat. [54st]
Round 10 :
8 sc, 1 inc. Repeat. [60st]
Round 11 :
9 sc, 1 inc. Repeat. [66st]
Round 12 :
10 sc, 1 inc. Repeat. [72st]
Round 13 :
11 sc, 1 inc. Repeat. [78st]
Round 14 :
12 sc, 1 inc. Repeat. [84st]
Round 15-26 :
12 rows of sc all around. [84st]
Info :
Firmly fill the mushroom cap halfway. Fill firmly as you go.
Round 27 :
Sandwich this row and the last BROWN row of mushroom stem together, sc all around. [84st]
Round 28-30 :
Continue only with YELLOW, 3 rows of sc all around. [84st]
Info :
Fasten off, shape the underside of the mushroom cap, creating a deep channel underneath.
— Face :
Info :
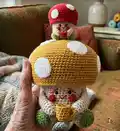
Use this photo as a reference how to place the face. Your marker needs to be at the back of your project.
Info :
I recommend starting by placing the eyebrows. Counting beige rows from the top, leave the first beige row clear.
Info :
Place the top of the first eyebrow between row 1-2 and the bottom of the eyebrow between row 3-4. In total, the eyebrow is 2sc wide.
Info :
Between two eyebrows (the top part), there are 3sc.
Info :
Place your Amigurumi eyes between row 3-4, where the top and the bottom of the eyebrow aligns.
Info :
Place your cheeks by feeding the end tails in and making a knot inside. The cheek is between row 5-7.
Info :
For the mouth, make a simple U shape between row 5-6.
Info :
After completing the face, stuff the beige part of the mushroom stem very firmly, leave brown part empty for now.
— Final Placement :
Info :
SPOTS: Sew the white spots all around the mushroom cap.
Info :
I started by placing one on the left side of the face and then gone up and right, evenly distributing the spots.
Info :
I made 8 spots for a spottier look, but for smaller Tofis, 6 spots would be enough.
Info :
MUG: Position your mug so that it stays properly up and using the long tail, sew it to inside of both hands. I prefer sewing the mug first, as it is easier to see where I am putting it. But if you really can’t see where it will go, wait after you sew the arms in.
Info :
ARMS: Position the top of the arms like this / \ between top BEIGE rows 4-7, just past 2 sc from the cheeks. Make sure the mug is holding up. You can adjust the arms depending on how you want Tofi to hold the mug.
Info :
LEGS: Starting from the green back loop, sew your legs at the bottom 9 rows. Make sure that Tofi can sit properly without falling over to his face :) The outer stitches of the legs are roughly on the same line of where the arms end.
— Grass Embroidery :
Info :
Use these photos as your reference. You have all the creative freedom here, but here is what I did: I used the green back loop stitches to make simple V lines, first.
Info :
I placed a couple of white Vs as flowers and few double-brown lines as cattail plants.
Info :
Since my Tofi is yellow, I also added a tiny bee, simple going over the same stitch with yellow and a bit of spare black yarn. I added a white V for bee wings.
Info :
Place your plants all around the mushroom backside starting from one leg to the other.
Thank you for crocheting Tofi the Mushroom — I hope this little companion brings you joy and cozy vibes every day. 🌼
This pattern is full of charming details to personalize, from tiny embroidered flowers to a little mug. 🧶
Happy crocheting and enjoy making your own unique Tofi to love and share! ✨