🧢 Beautiful ✨ Detailed πŸ’ Adorable

Toby - The Siamese Cat Amigurumi Pattern

Toby - The Siamese Cat Amigurumi Pattern
4.9β˜… Rating
5-7 Hours Time Needed
4.1K Made This
βœ‚οΈ

Intermediate Level

Ideal for those with basic crochet experience, featuring slightly more advanced stitches and techniques to expand your skills.

⏱️

Weekend Treat

Takes 5-7 hours, making it an enjoyable project to finish over a couple of days.

πŸ₯

Charming Critter

Delightful animal designs with sweet details that capture the essence of your favorite woodland and farmyard friends.

About This Toby - The Siamese Cat Amigurumi Pattern

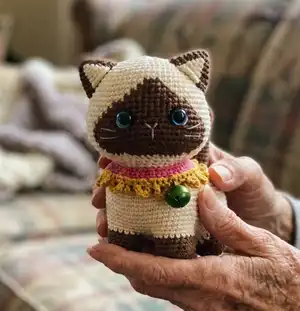
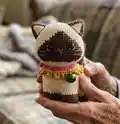
This pattern guides you through crocheting Toby, a small Siamese cat amigurumi with clear round-by-round instructions. It uses YarnArt Jeans yarn and a 2.0 mm hook to create tight stitches for a neat finish. The design includes separate pieces for head, body, legs, ears, tail and a decorative collar for finishing touches. Perfect for makers who enjoy shaping and small-detail work.

Toby - The Siamese Cat Amigurumi Pattern crochet pattern - detailed view of completed project

Complete stitch counts and placement notes are included for accurate assembly and beautiful results. Photographs accompany each main section to help you match the shaping and placement.

Why You'll Love This Toby - The Siamese Cat Amigurumi Pattern

I absolutely love this pattern because it captures the classic Siamese look with simple crochet techniques and charming details. I enjoy how the color changes create a striking face mask that brings character to the cat. The construction is modular, so I can make adjustments and experiment with size and features easily. Sewing the pieces together and adding the collar always makes me smile when the little cat stands up for the first time.

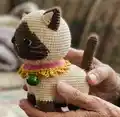
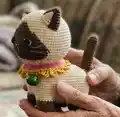
Toby - The Siamese Cat Amigurumi Pattern step 1 - construction progress Toby - The Siamese Cat Amigurumi Pattern step 2 - assembly progress Toby - The Siamese Cat Amigurumi Pattern step 3 - details and accessories Toby - The Siamese Cat Amigurumi Pattern step 4 - final assembly and finishing

Switch Things Up

I love experimenting with color changes on this pattern: try pastel creams and greys for a softer look or deep chocolates for a realistic Siamese feel.

I often change the yarn weight and hook to create different sizes: bulky yarn with a larger hook makes a chunky huggable cat, while fingering yarn makes a tiny keychain version.

I like to add embroidered eyebrows or different mouth shapes to change Toby's expression and personality.

Try adding tiny crocheted accessories like a bow, scarf, or a mini sweater to personalize each cat for gifts.

You can swap the safety eyes for embroidered eyes to make the toy safer for small children or for a vintage look.

If you want poseable limbs, insert thin wire inside the legs before stuffing and secure the ends so they don't poke through the yarn.

Vary the collar design by changing the number of chain loops or using beads and different sized bells for a unique finish.

I sometimes use a slightly darker cream for the body base to give the face mask contrast without switching to stark white.

Adjust leg placement slightly to create different stancesβ€”closer together for a compact look or spaced further apart for stability.

To make a family set, change small details like eye color, bell color, or collar pattern so each cat has its own character.

Common Mistakes & How to Fix Them

βœ— Not placing the stitch marker after the first stitch of body round 1 will make round counting confusing; put a marker at that exact point to keep track. βœ— Skipping the instruction to insert safety eyes between rounds 18-19 can lead to wrong placement; insert eyes before stuffing with 7 stitches spacing as specified. βœ— Overstuffing the head or body will distort the shape and make sewing difficult; stuff gradually and evenly to maintain sculpted curves. βœ— Forgetting to change yarn color exactly where indicated will spoil the facial mask placement; follow the round-by-round color segments carefully for the intended look. βœ— Not using invisible decrease for the shaping can leave visible gaps or bumps; use invisible decrease as suggested for a smoother finish.

Toby - The Siamese Cat Amigurumi Pattern

Make an adorable Toby the Siamese cat with this complete crochet pattern. You will create a small, detailed amigurumi with separate head, body, legs, ears, tail and a sweet decorative collar. The pattern includes step-by-step rounds, materials list, and helpful assembly notes so you can bring your little cat to life.

Intermediate 5-7 Hours

Materials Needed for Toby - The Siamese Cat Amigurumi Pattern

β€” Main Fabric

  • 01
    YarnArt Jeans yarn 160m/50g - Brown (70) - small amount for face, feet and tail
  • 02
    YarnArt Jeans yarn 160m/50g - Light brown (40) - small amount for accents
  • 03
    YarnArt Jeans yarn 160m/50g - Cream (05) - main body color, approximately 2-3 balls depending on size
  • 04
    YarnArt Jeans yarn 160m/50g - White (01) - small amount for eyelid and details
  • 05
    YarnArt Jeans yarn 160m/50g - Honey (84) - small amount for collar edging
  • 06
    YarnArt Jeans yarn 160m/50g - Red (51) - small amount for collar base
  • 07
    YarnArt Jeans yarn 160m/50g - Black (53) - very small amount for whisker and eyelid details
  • 08
    Fiberfill stuffing - enough to fill head, body, legs and tail securely
  • 09
    One pair safety blue ocean eyes 9mm
  • 10
    One bell 13mm
  • 11
    One wooden button 10mm

β€” Tools Required

  • 01
    Crochet hook size 2.0mm
  • 02
    One pair safety blue ocean eyes 9mm
  • 03
    One bell 13mm
  • 04
    One wooden button 10mm
  • 05
    Fiberfill for stuffing
  • 06
    Yarn needle for sewing
  • 07
    Scissors
  • 08
    Stitch markers
  • 09
    Pins for assembly (optional)

Progress Tracker

0% Complete

β€” Head :

Info :

HEAD - (brown and cream yarn) - use the cream yarn to make MAGIC RING - work in a continuous spiral (photo 1, 2, 3). Black word: cream yarn. Red word: brown yarn.

Round 1 :

8sc into magic ring (8)

Round 2 :

8inc (16)

Round 3 :

(sc, inc)*8 (24)

Round 4 :

(2sc, inc)*8 (32)

Round 5 :

(3sc, inc)*8 (40)

Round 6 :

(4sc, inc)*8 (48)

Round 7 :

(5sc, inc)*8 (56)

Round 8 :

56sc (56)

Round 9 :

(6sc, inc)*8 (64)

Round 10 :

64sc (64)

Round 11 :

36sc, 3sc, 25sc (64)

Round 12 :

35sc, 5sc, 24sc (64)

Round 13 :

34sc, 7sc, 23sc (64)

Round 14 :

33sc, 9sc, 22sc (64)

Round 15 :

31sc, 13sc, 20sc (64)

Round 16 :

30sc, 15sc, 19sc (64)

Round 17 :

15sc, (sc, inc)*7, sc, inc, 14sc, sc, inc, (sc, inc)*7, 3sc (80)

Round 18 :

35sc, 6sc, mark the point, 9sc, mark the point, 6sc, 24sc (80)

Round 19 :

34sc, 23sc, 23sc (80)

Round 20-22 :

33sc, 25sc, 22sc (80)

Round 23 :

(8sc, dec)*3, 3sc, 5sc, dec, 8sc, dec, 8sc, dec, (8sc, dec)*2 (72)

Round 24 :

(7sc, dec)*3, 4sc, 3sc, dec, 7sc, dec, 7sc, dec, (7sc, dec)*2 (64)

Round 25 :

(6sc, dec)*3, 5sc, sc, dec, 6sc, dec, 6sc, dec, (6sc, dec)*2 (56)

Round 26 :

(5sc, dec)*4, sc, 4sc, dec, 4sc, sc, dec, (5sc, dec)*2 (48)

Round 27 :

(4sc, dec)*8 (40)

Round 28 :

BLO (3sc, dec)*8 (32)

Infos :

Insert the safety eyes between round 18-19 with 7 sts apart. Stuff the head. Use white yarn to sew mouth and whiskers between round 20-22. Use white and black yarn to sew eyelid. Use orange blush on the nose. Now continue to crochet body.

β€” Body :

Info :

BODY - use the cream yarn, work in a continuous spiral (photo 4, 5, 6, 7)

Round 1 :

Make a chain of 10ch, start in the 2nd chain from hook, place the stitch marker after crocheting the 1st stitch, this is the 1st stitch of round 1 of body: inc, 8sc, 32sc on the head, work on the other side of the chain: 8sc, inc. (photo 4, 5) (52)

Round 2 :

2inc, 48sc, 2inc (56)

Round 3 :

(sc, inc)*2, 15sc, inc, 16sc, inc, 15sc, (sc, inc)*2 (62)

Round 4 :

(sc, inc, sc)*2, 7sc, inc, 34sc, inc, 7sc, (sc, inc, sc)*2 (68)

Round 5 :

(3sc, inc)*2, 52sc, (3sc, inc)*2 (72)

Round 6 :

(11sc, inc)*6 (78)

Round 7 :

(12sc, inc)*6 (84)

Round 8-13 :

84sc (84)

Round 14 :

(12sc, dec)*6 (78)

Round 15-17 :

78sc (78)

Info :

Don't cut the yarn, now we start to crochet the legs.

β€” Legs (4) :

Info :

LEGS (4) - (cream, brown and light brown yarn) - use the cream yarn, work in a continuous spiral (photo 8, 9, 10, 11, 12, 13, 14, 15, 16). 2sc, chain 10, skip 14sts, 7sc, chain 10, skip 14sts, 4sc, chain 10, skip 14sts, slst. Fasten off, weave in the yarn end. (photo 8, 9, 10, 11) There are 4 holes and we crochet 4 legs in there. Start with the 1st leg. (photo 12, 13)

Round 1 :

14sc, 10sc on the chain (24)

Round 2-4 :

Change to light brown yarn 24sc (24)

Round 5 :

Change to brown yarn 24sc (24)

Round 6 :

(sc, dec)*8 (16)

Round 7 :

8dec (8)

Info :

Fasten off, leaving a long tail about 15cm for sew the FLO of each remaining stitches and pull it tight to close. Weave in end. (photo 14, 15) Crochet the remaining legs similar to the 1st leg. (photo 16)

β€” Stomach :

Info :

STOMACH - use the cream yarn, work in round (photo 17, 18, 19, 20, 21, 22, 23, 24, 25)

Round 1 :

Attach yarn to the 1st stitch next the front leg. (photo 17) 7sc, 1ch, turn (7)

Round 2 :

7sc, 1ch, turn (7)

Round 3 :

7sc, 7ch, rotation (photo 19) (7)

Round 4 :

Start in the 2nd loop from hook: 13sc, 7ch, rotation (13)

Round 5 :

Start in the 2nd loop from hook: 19sc, 1ch, turn (19)

Round 6 :

19sc, 1ch, turn (19)

Round 7 :

13sc, 1ch, turn (13)

Round 8-10 :

7sc, 1ch, turn (7)

Info :

Fasten off, leaving a long tail about 50cm for sewing. Stuff while sewing.

β€” Ears (2) :

Info :

EARS (2) - (brown and cream yarn) - use the brown yarn to make MAGIC RING, work in a continuous spiral (photo 26). Black word: brown yarn. Red word: cream yarn.

Round 1 :

4sc into magic ring (4)

Round 2 :

4inc (8)

Round 3 :

(sc, inc)*4 (12)

Round 4 :

2sc, inc, 2sc, inc, (2sc, inc)*2 (16)

Round 5 :

3sc, inc, 2sc, sc, inc, (3sc, inc)*2 (20)

Round 6 :

4sc, inc, 2sc, 2sc, inc, (4sc, inc)*2 (24)

Round 7 :

5sc, inc, 2sc, 3sc, inc, (5sc, inc)*2 (28)

Round 8 :

9sc, 5sc, 14sc (28)

Info :

Stuff the ears. Fasten off, leave a long tail for sewing.

β€” Tail :

Info :

TAIL - use the brown yarn to make MAGIC RING, work in a continuous spiral (photo 27)

Round 1 :

5sc into magic ring (5)

Round 2 :

5inc (10)

Round 3 :

(sc, inc)*5 (15)

Round 4-16 :

15sc (15)

Info :

Fasten off, leave a long tail for sewing. Stuff the tail.

β€” Collar :

Info :

COLLAR - (red and honey yarn) - use the red yarn, work in round (photo 28, 29, 30)

Round 1 :

Make a chain of 42ch, start from the 7th chain from hook: (hdc, hdc inc)*18, turn (54)

Round 2 :

Change to honey yarn ch, 54sc, turn (54)

Round 3 :

(ch6, sk2, slst)*18 (126)

Info :

Fasten off, weave in the yarn end. Sew the button and the bell to the collar. Wear collar for the cat.

β€” Sewing :

Info :

Sew ears to the head between round 4-11. Sew tail to the body between round 1-5.

Assembly Instructions

  • Insert the safety eyes between rounds 18-19 of the head, spacing them 7 stitches apart and secure the washers before stuffing the head.
  • Sew the ears to the head between rounds 4-11, positioning them symmetrically and securing with small whipstitches so they sit firmly.
  • Place and sew the four legs into the prepared leg holes on the body, using the long tails left on each leg to attach and secure them from inside.
  • Sew the tail to the body between rounds 1-5 (of the tail attachment area) using the long tail for a hidden, strong attachment, and stuff while sewing.

Important Notes

  • πŸ’‘Use stitch markers to mark the first stitch of each round, especially for the body where the marker is placed after the first stitch of round 1.
  • πŸ’‘Make Invisible Decrease crochet stitches for smoother shaping as recommended in the notes for best results.
  • πŸ’‘Stuff gradually and evenly while shaping each piece; overstuffing can distort the amigurumi and make sewing difficult.
  • πŸ’‘Insert safety eyes before final stuffing to achieve the correct placement and avoid damaging the stuffing later.

This Toby Siamese cat amigurumi is a delightful small plush with charming color details and a playful collar. The pattern is modular and perfect for making a thoughtful handmade gift or a special addition to your collection. Follow the step-by-step rounds and photos to achieve a polished finished toy. 🧢😊

You ask,

we answer.

FAQs

What size will the finished piece be?

The finished doll size is approximately 4.3 inch when using the recommended YarnArt Jeans yarn and a 2.0 mm hook.

Can I use different yarn weights for this pattern?

Yes, you can use different yarn weights but it will change the finished size; choose an appropriate hook to maintain tight stitches for amigurumi.

Do I need prior crochet experience for this pattern?

This pattern is rated intermediate and assumes familiarity with single crochet, increases, decreases, working in spirals, and basic sewing of parts.

How long does this project typically take to complete?

Most crocheters complete this project in 5-7 hours, though time may vary depending on experience and speed.