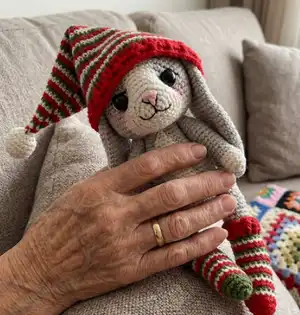
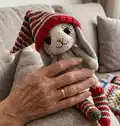
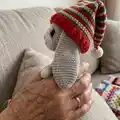
Make a charming handcrafted Christmas Bunny with step-by-step instructions, photo guides, and full stitch-by-stitch rounds. This pattern includes the body, head, limbs, ears, tail, hat and stockings so you can create a complete festive companion. Youll learn jacquard colorwork, simple embroidery for the face, and finishing tips for a polished toy. Perfect as a holiday gift or a cozy handmade decoration.
Progress Tracker
0% Complete
— Arms (make 2) :
Info :
With White yarn. Place row marker at the first stitch. Stuff with fiberfill in the process.
Round 2 :
(1sc, inc) *3 (9)
Round 3 :
(2sc, inc) *3 (12)
Round 5 :
Change color to Gray. BLO (2sc, dec) *3 (9)
Round 6-11 :
9sc (6 rounds) (9)
Round 12 :
3sc, 3inc, 3sc (12)
Round 13-19 :
12sc (7 rounds) (12)
Info :
Fasten off, cut the yarn, weave in the yarn ends.
— Tail :
Info :
With White yarn. Place row marker here. Stuff with fiberfill. Leave a long tail for sewing.
Round 3 :
(1sc, inc) *6 (18)
Round 5 :
(1sc, dec) *6 (12)
— Legs (make 2) :
Info :
With White yarn. Place row marker here. Stuff with fiberfill in the process.
Round 4 :
Change color to Gray. 12sc (12)
Round 5-9 :
12sc (5 rounds) (12)
Info :
Stuff with fiberfill in the process. Crochet the heel in rows with Gray yarn:
Heel Row 1 :
5sc, turn (5)
Heel Row 2 :
ch1, 5sc, turn (5)
Heel Row 3 :
ch1, 5sc, turn (5)
Heel Row 4 :
ch1, 5sc, turn (5)
Round 10 :
Return to crochet the legs. Work in a spiral: dec, sc, 3dec, 5sc, 2dec (12)
Round 12 :
(2sc, dec) *3 (9)
Round 13-14 :
9sc (2 rounds) (9)
Round 15 :
(2sc, inc) *3 (12)
Round 17 :
(3sc, inc) *3 (15)
Round 18-20 :
15sc (3 rounds) (15)
Round 21 :
(4sc, inc) *3 (18)
Round 22-27 :
18sc (6 rounds) (18)
Round 28 :
(1sc, dec) *6 (12)
Info :
Stuff the legs with fiberfill. Fasten off, cut the yarn, weave in the ends.
— Body :
Info :
With Gray yarn. Place row marker at the first stitch.
Round 3 :
(1sc, inc) *6 (18)
Round 4 :
(2sc, inc) *6 (24)
Round 5 :
(3sc, inc) *6 (30)
Round 6 :
(4sc, inc) *6 (36)
Round 7 :
(5sc, inc) *6 (42)
Round 8 :
(6sc, inc) *6 (48)
Round 9 :
(7sc, inc) *6 (54)
Round 11 :
Attention! Crochet in jacquard technique from Rnd 11 to 27. Add White yarn (these stitches are highlighted in red). 10sc, 8sc, 36sc (54)
Round 12 :
9sc, 10sc, 35sc (54)
Round 13 :
8sc, 12sc, 34sc (54)
Round 14 :
8sc, 12sc, 34sc (54)
Round 15 :
8sc, 12sc, 9sc, (2sc, dec) *6, 1sc (48)
Round 16 :
9sc, 10sc, 29sc (48)
Round 17 :
9sc, 10sc, 29sc (48)
Round 18 :
9sc, 10sc, 29sc (48)
Round 19 :
6sc, dec, 2sc, 8sc, 1sc, dec, 1sc, dec, (6sc, dec) *3 (42)
Round 20 :
9sc, 8sc, 25sc (42)
Round 21 :
9sc, 8sc, 25sc (42)
Round 22 :
9sc, 8sc, 25sc (42)
Round 23 :
5sc, dec, 3sc, 6sc, dec, 1sc, dec, (5sc, dec) *3 (36)
Round 24 :
9sc, 6sc, 21sc (36)
Round 25 :
9sc, 6sc, 21sc (36)
Round 26 :
4sc, dec, 4sc, 2dec, (dec, 4sc) *3, 4sc (30)
Round 27 :
9sc, 2sc, 19sc (30)
Info :
Stuff the body with fiberfill. Leave a long tail for sewing.
— Head :
Info :
With White yarn. Place row marker here. Insert the eyes between rounds 7-8 at a distance of 10-12 stitches.
Round 3 :
3inc, 3sc, 3inc, 3sc (18)
Round 4 :
(2sc, inc) *6 (24)
Round 5 :
(3sc, inc) *6 (30)
Round 6 :
(4sc, inc) *6 (36)
Round 7-9 :
36sc (3 rounds) (36)
Round 10 :
Change color to Gray. Attention! Crochet in jacquard technique from Rnd 10 to 13. Add white yarn (these stitches are highlighted in red) (5sc, inc) *2, 1sc, inc, 8sc, inc, 1sc, (5sc, inc) *2 (42)
Round 11 :
(6sc, inc) *2, 3sc, inc, 6sc, inc, 3sc, (6sc, inc) *2 (48)
Round 12 :
(7sc, inc) *2, 5sc, inc, 4sc, inc, 5sc, (7sc, inc) *2 (54)
Round 13 :
(8sc, inc) *2, 7sc, inc, 2sc, inc, 7sc, (8sc, inc) *2 (60)
Round 14-21 :
With Gray yarn 60sc (8 rounds) (60)
Round 22 :
(8sc, dec) *6 (54)
Round 23 :
(7sc, dec) *6 (48)
Round 24 :
(6sc, dec) *6 (42)
Round 25 :
(5sc, dec) *6 (36)
Round 26 :
(4sc, dec) *6 (30)
Round 27 :
(3sc, dec) *6 (24)
Info :
Stuff the head with fiberfill.
Round 28 :
(2sc, dec) *6 (18)
Round 29 :
(1sc, dec) *6 (12)
Info :
Fasten off, cut the yarn, weave in the ends.
— Ears (make 2) :
Info :
With Gray yarn. Place row marker here. Do not stuff. Leave a long tail for sewing.
Round 4 :
(1sc, inc) *6 (18)
Round 6 :
(2sc, inc) *6 (24)
Round 8 :
(3sc, inc) *6 (30)
Round 9-18 :
30sc (10 rounds) (30)
Round 19 :
(3sc, dec) *6 (24)
Round 20-26 :
24sc (7 rounds) (24)
Round 27 :
(2sc, dec) *6 (18)
Round 28-31 :
18sc (4 rounds) (18)
Round 32 :
(1sc, dec) *6 (12)
Round 33-34 :
12sc (2 rounds) (12)
— Assembly & Finishing :
Info :
Sew the head to the body. Tighten cheeks following the pictures in the guide. Fasten the legs and the arms to the body with a button mount.
Info :
Sew the ears to the head.
Info :
Embroider the nose with pink thread. Embroider the eyelids, the outline of the nose and mouth with black thread. Sew the tail to the body.
Info :
Embroider the inside of the ears and cheeks with a black thread and pink pastel. Embroider the claws on the legs with a black thread.
— Stockings (pair) :
Item Name (Right stocking) :
With Red yarn. 1. 6sc in MR. Place row marker here. 2. 6inc (12). 3. (1sc, inc) *6 (18). 4. 18sc (18). 5. Change color to Minty. 18sc (18). 6. Change color to Green. 18sc (18). 7. Change color to Red. 18sc (18). 8. Change color to Minty. 18sc (18). 9. Change color to Green. 18sc (18). 10. Change color to Red. 18sc (18). 11. Change color to Minty. 18sc (18).
Info :
Change color to Red. Crochet the heel in rows with Red yarn: (do not turn) 8sc, turn (8). ch1, 8sc, turn (8). ch1, 8sc, turn (8). ch1, 8sc, turn (8).
Round 12 :
Change color to Green. Return to crochet the stocking. Work in a spiral: dec, 4sc, 4dec, 6sc, 3dec (18).
Rounds 13-19 :
Change colors in sequence: 13. Change to Red 18sc (18). 14. Change to Minty 18sc (18). 15. Change to Green 18sc (18). 16. Change to Red 18sc (18). 17. Change to Minty 18sc (18). 18. Change to Green 18sc (18). 19. Change to Red. 18dc, sl st (18).
Round 20 :
ch2, (FPdc, BPdc) *9, sl st. Fasten off, cut the yarn, weave in the yarn ends.
Item Name (Left stocking) :
With Green yarn. 1. 6sc in MR. Place row marker here. 2. 6inc (12). 3. (1sc, inc) *6 (18). 4. 18sc (18). 5. Change color to Red. 18sc (18). 6. Change color to Minty. 18sc (18). 7. Change color to Green. 18sc (18). 8. Change color to Red. 18sc (18). 9. Change color to Minty. 18sc (18). 10. Change color to Green. 18sc (18). 11. Change color to Red. 18sc (18).
Info :
Change color to Green. Crochet the heel in rows with Green yarn: (do not turn) 8sc, turn (8). ch1, 8sc, turn (8). ch1, 8sc, turn (8). ch1, 8sc, turn (8). 12. Change color to Minty. Return to crochet the stocking. Work in a spiral: dec, 4sc, 4dec, 6sc, 3dec (18). Continue color changes as on the right stocking. 18dc, sl st (18). 20. ch2, (FPdc, BPdc) *9, sl st. Fasten off, cut the yarn, weave in the yarn ends.
— Cap :
Info :
With White yarn (Alize Softy). Place row marker here. Pom-pom made with fluffy yarn.
Round 3 :
(1sc, inc) *6 (18)
Round 4-5 :
18sc (2 rounds) (18)
Round 6 :
(1sc, dec) *6 (12)
Round 8 :
Change color to Green. 6sc (6)
Round 9 :
Change color to Red. 6sc (6)
Round 10 :
Change color to Minty. (1sc, inc) *3 (9)
Round 11 :
Change color to Green. 9sc (9)
Round 12 :
Change color to Red. (2sc, inc) *3 (12)
Round 13 :
Change color to Minty. 12sc (12)
Round 14 :
Change color to Green. (3sc, inc) *3 (15)
Round 15 :
Change color to Red. 15sc (15)
Round 16 :
Change color to Minty. (4sc, inc) *3 (18)
Round 17 :
Change color to Green. 18sc (18)
Round 18 :
Change color to Red. (5sc, inc) *3 (21)
Round 19 :
Change color to Minty. 21sc (21)
Round 20 :
Change color to Green. (6sc, inc) *3 (24)
Round 21 :
Change color to Red. 24sc (24)
Round 22 :
Change color to Minty. (7sc, inc) *3 (27)
Round 23 :
Change color to Green. 27sc (27)
Round 24 :
Change color to Red. (8sc, inc) *3 (30)
Round 25 :
Change color to Minty. 30sc (30)
Round 26 :
Change color to Green. (9sc, inc) *3 (33)
Round 27 :
Change color to Red. 3sc (33)
Round 28 :
Change color to Minty. (10sc, inc) *3 (36)
Round 29 :
Change color to Green. 36sc (36)
Round 30 :
Change color to Red. (11sc, inc) *3 (39)
Round 31 :
Change color to Minty. 39sc (39)
Round 32 :
Change color to Green. (12sc, inc) *3 (42)
Round 33 :
Change color to Red. 42sc (42)
Round 34 :
Change color to Minty. (13sc, inc) *3 (45)
Round 35 :
Change color to Green. 45sc (45)
Round 36 :
Change color to Red. (14sc, inc) *3 (48)
Round 37 :
Change color to Minty. 48sc (48)
Round 38 :
Change color to Green. (15sc, inc) *3 (51)
Round 39 :
Change color to Red. 51sc (51)
Round 40 :
Change color to Minty. (16sc, inc) *3 (54)
Round 41 :
Change color to Green. 54sc (54)
Round 42 :
Change color to Red. 54sc (54)
Round 43 :
Change color to Minty. (17sc, inc) *3 (57)
Round 44 :
Change color to Green. 57sc (57)
Round 45 :
Change color to Red. 57sc (57)
Round 46 :
Change color to Minty. (18sc, inc) *3 (60)
Round 47 :
Change color to Green. 60sc (60)
Round 48 :
Change color to Red. 60sc (60)
Round 49 :
Change color to Minty. 60sc (60)
Round 50 :
Change color to Green. (19sc, inc) *3 (63)
Round 51 :
Change color to Red. 63sc (63)
Round 52 :
Change color to Minty. 63sc (63)
Round 53 :
Change color to Red. 63sc (63)
Round 54 :
ch2, 62dc, sl st, turn (63)
Round 55 :
ch2, (FPdc, BPdc, FPdc) *21. Fasten off, cut the yarn, weave in the yarn ends.
Info :
Congrats! Your Christmas Bunny is ready! Follow assembly images to attach parts and embroider features for the final look.
Create a sweet holiday bunny that will bring smiles and warmth to family and friends this season. Make a set with the hat and tiny stockings for extra festive charm. Share or gift this handmade companion with love and a seasonal ribbon. 🧶🎁