About This Toadstool Keychain Amigurumi Pattern
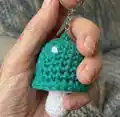
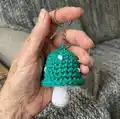
This pattern creates a tiny crocheted toadstool keychain with a colourful cap and a white stalk. It is designed to be quick to make using small amounts of yarn and a 3mm hook. The instructions include both UK and US terms so you can follow the version you prefer. Perfect for using scrap yarn and making multiple colour variations.
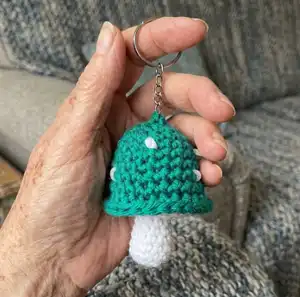
Includes step-by-step row instructions for both the base (stalk) and cap, plus finishing, keychain attachment, and spot details. Suitable for beginners with basic stitch knowledge.
Why You'll Love This Toadstool Keychain Amigurumi Pattern
I absolutely love this pattern because it turns tiny scraps of yarn into something delightful and useful. I enjoy how quick each keychain is to make, perfect for instant gifts or market stall items. The shaping is simple but gives a neat, professional-looking little mushroom every time. I also love how easy it is to personalise with different cap colours and spot placements.
Switch Things Up
I love experimenting with different cap colours — try pastel shades for a soft, dreamy set or bright neon shades for a playful look.
You can change the size by swapping yarn weight and hook size; use a bulky yarn with a larger hook for a chunkier mushroom or fingering yarn with a smaller hook for a tiny keychain.
I often add tiny embroidered faces or blush on the cap to give the toadstools more personality — simple French knots work well for eyes.
Try crocheting a small scarf or bow and sewing it to the stalk for a seasonal or characterful accessory.
I sometimes replace the white sewn spots with tiny felt circles glued in place for a cleaner look if I am making many for a market.
If you want posability, consider inserting a short piece of floral wire into the stalk before finishing and stuffing to allow slight movement.
To create a hanging mobile, make several in coordinating colours and attach them to a ring at varying lengths.
Use variegated yarn for the cap to get an interesting colour mix without changing colours mid-pattern.
I also recommend using metallic keychain hardware if you want a premium finish; secure it well with reinforced stitching.
Don’t be afraid to mix UK and US terminology based on your preference — the pattern includes both versions to make customization easier.
Common Mistakes & How to Fix Them
✗ Skipping the stitch marker when working continuous rounds leads to lost round starts; place a marker at the last stitch of each round and move it as you go.
✗ Overstuffing the stalk or cap causes stuffing to show through the stitches; stuff gradually and only until the part can be easily squeezed when pinched firmly.
✗ Not joining the cap and base correctly will make the join bulky or lopsided; pick up the base and place it behind the cap with wrong sides together and work through both layers carefully as instructed.
✗ Cutting ends too early before securing can cause your keychain to come apart; weave ends through the coloured section and secure with small stitches before trimming to make the join secure.