🧢 Beautiful ✨ Detailed πŸ’ Adorable

Toadstool Keychain Amigurumi Pattern

Toadstool Keychain Amigurumi Pattern
4.8β˜… Rating
1-2 Hours Time Needed
3.0K Made This
βœ‚οΈ

Beginner Friendly Level

Perfect for those just starting their crochet journey, with clear instructions and simple techniques

⏱️

Quick Make

Complete in under 2 hoursβ€”lightning fast fun for instant gratification and quick gifts.

🎁

Tiny Treasure

Small, sweet, and gift-worthy creations that fit perfectly in the palm of your hand with detailed charm.

About This Toadstool Keychain Amigurumi Pattern

This pattern makes a small stuffed toadstool keychain using tiny amounts of yarn and a 3mm hook. Youll crochet a white stalk (base) and a coloured cap, join them together and sew on tiny white spots for a classic toadstool look. The finished size is small and portable β€” ideal for keyrings, bag charms or small gifts.

Toadstool Keychain Amigurumi Pattern crochet pattern - detailed view of completed project

Clear round-by-round instructions are provided in both UK and US terms to suit your preference. The pattern is quick to make and perfect for using yarn scraps to create colourful variations.

Why You'll Love This Toadstool Keychain Amigurumi Pattern

I absolutely love this pattern because it turns the tiniest amount of yarn into a delightful, portable keepsake that anyone will smile at. I enjoy how fast it works up β€” you can make several in an afternoon and mix colours for variety. I also love that the steps are simple and repeatable, making it ideal for giving to friends as handmade gifts. Sewing on the tiny white spots is my favourite finishing touch because it gives the toadstool so much character.

Toadstool Keychain Amigurumi Pattern step 1 - construction progress Toadstool Keychain Amigurumi Pattern step 2 - assembly progress Toadstool Keychain Amigurumi Pattern step 3 - details and accessories Toadstool Keychain Amigurumi Pattern step 4 - final assembly and finishing

Switch Things Up

I love experimenting with colours for this pattern; try pastel shades for a soft vintage look or bright jewel tones for a playful feel.

You can make a tiny set by changing the yarn weight and hook size β€” bulky yarn with a larger hook makes chunky, cuddly versions.

I sometimes stitch a tiny felt leaf or little embroidered face to the cap to give each toadstool more personality.

Try using variegated yarn for the cap to create unique, speckled colour effects without sewing spots.

To create a mini garland, make several toadstools and join them on a length of yarn or chain for a whimsical decoration.

If you want more durability on a bag, consider adding a small keyring disc inside the cap before finishing to reinforce the attachment point.

I often add a contrasting trim row around the cap edge β€” one round of surface slip stitch or contrasting sc/hdc gives a neat finish.

For a holiday theme, use metallic or sparkly yarn for the cap and tiny bell attachments for festive jingles.

If you prefer embroidery, replace the sewn spots with embroidered French knots or tiny satin-stitched dots for a different texture.

Don't be afraid to combine techniques: crochet tiny accessories (a mini toadstool hat or scarf) to create themed keychain sets that make great gifts.

Common Mistakes & How to Fix Them

βœ— Skipping the stitch marker when working continuous rounds leads to losing track of the start of round; place a stitch marker at the last stitch of each round as instructed so you always know where to begin the next round. βœ— Overstuffing the stalk or cap causes the stuffing to show through the stitches and distort the shape; stuff gradually and only enough so the piece can be squeezed slightly when pinched. βœ— Not leaving a long enough tail when fastening off at the cap makes assembly harder; leave the 20cm end as instructed to weave through and secure the keychain attachment. βœ— Failing to align the base and cap correctly before joining results in an uneven seam; pick up the base and place behind the cap wrong sides together and check orientation before crocheting the two pieces together. βœ— Using the wrong term set (UK vs US) may confuse stitch counts; choose either the UK or US rounds and follow the matching abbreviations consistently.

Toadstool Keychain Amigurumi Pattern

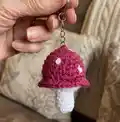
Create a charming tiny toadstool keychain with this easy-to-follow crochet pattern. Perfect for gifting or personalizing your bag, the pattern uses small amounts of yarn and a 3mm hook to make quick, adorable minis. Youll learn simple shaping techniques and how to attach a keychain securely for a durable finished piece. Suitable for crafters who enjoy quick, satisfying projects with delightful results.

Beginner Friendly 1-2 Hours

Materials Needed for Toadstool Keychain Amigurumi Pattern

β€” Main Fabric

  • 01
    Hayfield Bonus White - 2g
  • 02
    Hayfield Bonus Main (coloured) - 3g

β€” Tools Required

  • 01
    Keychain
  • 02
    Hi-Loft Quality Toy Stuffing
  • 03
    3mm Crochet Hook
  • 04
    Wool Needle (for sewing)
  • 05
    Stitch marker

Progress Tracker

0% Complete

β€” Materials :

Info :

Hayfield Bonus White - 2g. Hayfield Bonus Main - 3g. Keychain. Hi-Loft Quality Toy Stuffing. 3mm Crochet Hook. Wool Needle (for sewing).

β€” Abbreviations (UK Terms) :

Infos :

ch - chain. dc - double crochet. htr - half treble crochet. inc - 2 stitches into next stitch. dec - decrease over next two stitches in front loops only. FLO - dc into front loops only. sl st - slip stitch. f/o - fasten off by slip stitch in next stitch.

β€” Note :

Info :

Unless stated work in continuous rounds marking last stitch of each row with a stitch marker before proceeding with the next.

Info :

When stuffing parts make sure that you don't overstuff them as you don't want the stuffing to show through when complete.

Info :

Each part should be filled just enough that it can be easily squeezed when pinched firmly.

β€” Base (UK Terms) :

Row 1 :

Using White: ch2, htr 8sts into 2nd st from hook (alternatively htr 8sts into magic ring) (8) sl st to join

Row 2 :

BLO Row: dc to end (8)

Row 3 :

dc (8)

Row 4 :

(dc into next 2sts, dec) x2 (6)

Row 5 :

dc (6)

Row 6 :

FLO Row: inc x6 (12)

Row 7 :

inc x12 (24)

Info :

F/O leaving a short end.

Info :

Stuff the stalk section and put to one side.

β€” Cap (UK Terms) :

Row 1 :

Using Main: ch 2, dc 6sts into 2nd st from hook (alternatively dc 6sts into magic ring) (6)

Row 2 :

inc x6 (12)

Row 3 :

(dc into next 3sts, inc) x3 (15)

Row 4 :

dc (15)

Row 5 :

(dc into next 4sts, inc) x3 (18)

Row 6 :

dc (18)

Row 7 :

(dc into next 5sts, inc) x3 (21)

Row 8 :

(dc into next 6sts, inc) x3 (24)

Row 9 :

pick up base and place behind the cap wrong sides together, sl st to join, ch1, working through both layers htr the 2 pieces together until 5sts remain, stuff the cap just enough to hold it's shape, htr to end (24) sl st to join

Info :

F/O leaving a 20cm end.

Info :

Weave end through the coloured section of cap, coming out in the starting circle of cap.

Info :

Secure end with a couple of small sts being careful not to pull the toadstool out of shape.

Info :

Using small back sts attach the keychain securely.

Info :

Using white and groups of 3 small back sts, 1 row deep, sew spots to toadstool cap at random.

Info :

Weave ends through cap and cut flush.

β€” Abbreviations (US Terms) :

Infos :

ch - chain. sc - single crochet. hdc - half double crochet. inc - 2 stitches into next stitch. dec - decrease over next two stitches in front loops only. FLO - sc into front loops only. sl st - slip stitch. f/o - fasten off by slip stitch in next stitch.

β€” Base (US Terms) :

Row 1 :

Using White: ch2, hdc 8sts into 2nd st from hook (alternatively hdc 8sts into magic ring) (8) sl st to join

Row 2 :

BLO Row: sc to end (8)

Row 3 :

sc (8)

Row 4 :

(sc into next 2sts, dec) x2 (6)

Row 5 :

sc (6)

Row 6 :

FLO Row: inc x6 (12)

Row 7 :

inc x12 (24)

Info :

F/O leaving a short end.

Info :

Stuff the stalk section and put to one side.

β€” Cap (US Terms) :

Row 1 :

Using Main: ch 2, sc 6sts into 2nd st from hook (alternatively sc 6sts into magic ring) (6)

Row 2 :

inc x6 (12)

Row 3 :

(sc into next 3sts, inc) x3 (15)

Row 4 :

sc (15)

Row 5 :

(sc into next 4sts, inc) x3 (18)

Row 6 :

sc (18)

Row 7 :

(sc into next 5sts, inc) x3 (21)

Row 8 :

(sc into next 6sts, inc) x3 (24)

Row 9 :

pick up base and place behind the cap wrong sides together, sl st to join, ch1, working through both layers hdc the 2 pieces together until 5sts remain, stuff the cap just enough to hold it's shape, hdc to end (24) sl st to join

Info :

F/O leaving a 20cm end.

Info :

Weave end through the coloured section of cap, coming out in the starting circle of cap.

Info :

Secure end with a couple of small sts being careful not to pull the toadstool out of shape.

Info :

Using small back sts attach the keychain securely.

Info :

Using white and groups of 3 small back sts, 1 row deep, sew spots to toadstool cap at random.

Info :

Weave ends through cap and cut flush.

β€” Finishing Notes :

Info :

Teri Hamilton 2020. This pattern is my original pattern. By purchasing this pattern, you agree to the terms of use: Please do not claim this pattern as your own. You may not sell or distribute the pattern, or any part thereof, without prior permission. It is for personal use only. It is permitted to make items from this pattern to sell for charitable purposes, provided they meet safety guidelines and Crochet at Teri's is accredited.

Assembly Instructions

  • Pick up the base and align it behind the cap wrong sides together, then sl st to join before working through both layers.
  • When joining cap and base, ch1 and work through both layers until 5 sts remain, then stuff the cap just enough to hold its shape and finish the round.
  • Weave the long tail through the coloured section of the cap coming out at the starting circle; secure with a couple of small stitches to avoid distorting shape.
  • Attach the keychain using small back stitches through the top of the cap securing it firmly so it will not pull free.
  • Using white yarn, make groups of 3 small back stitches, one row deep, and sew random spots onto the cap; weave in ends and cut flush.

Important Notes

  • πŸ’‘Unless stated work in continuous rounds marking last stitch of each row with a stitch marker before proceeding with the next.
  • πŸ’‘When stuffing parts make sure that you don't overstuff them as you don't want the stuffing to show through when complete.
  • πŸ’‘Each part should be filled just enough that it can be easily squeezed when pinched firmly.

This delightful Toadstool Keychain pattern is perfect for quick makes and thoughtful gifts. πŸ„ 
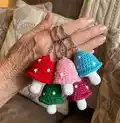
Make colourful variations using tiny amounts of yarn to create a whole family of mushrooms. 🎁 Fast, fun, and adorable β€” a lovely project to brighten your day and decorate your keys or bag.

You ask,

we answer.

FAQs

What size will the finished piece be?

The finished keychain measures approximately 4-6 cm tall depending on yarn tension and the hook you use.

Can I use different yarn weights for this pattern?

Yes, you can use different yarn weights, but the finished size will change; use an appropriate hook for your chosen yarn.

Do I need prior crochet experience for this pattern?

This pattern is rated beginner friendly; familiarity with basic stitches (chain, single/half double/htr, increase, decrease) is recommended.

How long does this project typically take to complete?

Most crocheters complete one toadstool keychain in under 2 hours, though time may vary by experience and speed.