🧢 Beautiful ✨ Detailed πŸ’ Adorable

Tishka the cat Amigurumi Pattern

Tishka the cat Amigurumi Pattern
4.8β˜… Rating
5-7 Hours Time Needed
1.8K Made This
βœ‚οΈ

Intermediate Level

Ideal for those with basic crochet experience, featuring slightly more advanced stitches and techniques to expand your skills.

⏱️

Weekend Treat

Takes 5-7 hours, making it an enjoyable project to finish over a couple of days.

🧸

Cute Companion

An adorable friend to cherish, handcrafted with love to bring comfort and joy for years to come.

About This Tishka the cat Amigurumi Pattern

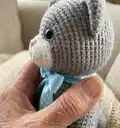
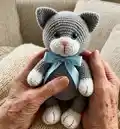
This pattern creates a soft, furry amigurumi cat named Tishka with sculpted muzzle and expressive eyes. It uses Nako Paris yarn for a fluffy finish and includes detailed shaping for head, body, paws, ears and tail. The instructions show how to assemble, sculpt the muzzle, glue eyes and add final combing for a plush look.

Tishka the cat Amigurumi Pattern crochet pattern - detailed view of completed project

Youll get full round-by-round stitch directions and helpful construction notes for joints and stuffing. The pattern includes tips for glazing eyes, embroidering details and combing the fur for a professional finish.

Why You'll Love This Tishka the cat Amigurumi Pattern

I absolutely love this pattern because it transforms simple stitches into a sweet, characterful friend with so much personality. The muzzle sculpting technique gives the face a realistic, cuddly look that always delights people who see it. I enjoy the balance between shaping and finishing β€” adding glass eyes and combing the yarn makes such a dramatic difference. It is also satisfying to position the plastic joint and see the toy become poseable and ready to display.

Tishka the cat Amigurumi Pattern step 1 - construction progress Tishka the cat Amigurumi Pattern step 2 - assembly progress Tishka the cat Amigurumi Pattern step 3 - details and accessories Tishka the cat Amigurumi Pattern step 4 - final assembly and finishing

Switch Things Up

I love experimenting with color when I make this pattern β€” try soft pastels or warm autumn tones instead of the grey to make a whole family of Tishkas.

You can change the size easily by switching yarn weight and hook size: use thicker yarn and a larger hook for a chunky cuddly toy, or finer yarn for a tiny collectible version.

I often swap the glass eyes for safety eyes or embroidered eyes depending on who the finished toy is for β€” safety eyes are great for gifts for children, while glass eyes add sparkle for display pieces.

To make the limbs posable, I sometimes add a thin wire inside the legs or use slightly smaller plastic joints for more stiffness; just be sure to secure ends safely inside stuffing.

I like adding little accessories like a crocheted scarf, bow or tiny hat β€” these make lovely seasonal variations and allow you to gift-match for birthdays or holidays.

For a different texture, try substituting a soft mohair or brushed yarn for the body while keeping the muzzle and paws in regular yarn for contrast.

I sometimes embroider different facial expressions β€” move the eyebrow placement or change the nose line to give your Tishka a happy, surprised, or sleepy look.

If you want a tabby look, I add subtle surface embroidery stripes on the body after combing and trimming the fur; it adds personality without heavy crocheting.

Try combining yarns: one strand of Nako Paris with a thin cotton thread can alter drape and density while keeping the fluffy appearance.

I recommend experimenting with combing techniques β€” Velcro first to loosen fibers and a slicker brush to finalize the fluff β€” each method gives a slightly different finish and personality to your cat.

Common Mistakes & How to Fix Them

βœ— Skipping stitch markers when shaping the back can make it hard to keep symmetry; place a marker in the middle of the back side and recheck after each few rounds. βœ— Not stuffing evenly causes lumps or a flattened belly; stuff gradually and shape as you go, especially around the muzzle and joints. βœ— Forgetting to insert or lock the plastic joint at the recommended row makes jointing difficult later; insert the plastic joint when instructed (head/body notes) and lock it in place at the 7th body row. βœ— Crocheting into the slip stitch join on the muzzle connection can distort the shape; when connecting two muzzle halves, join with sl st but do not crochet sc into the sl st as instructed. βœ— Applying too much glue for eyes or nose can glue down surrounding fur; use a hot glue gun sparingly and hold pieces in place until secure. βœ— Overtrimming the fur after combing can ruin the fluffy look; trim a little at a time and hide edge threads inside the muzzle as suggested.

Tishka the cat Amigurumi Pattern

Make an adorable Tishka the Cat amigurumi using soft Nako Paris yarn and simple shaping techniques. This pattern guides you step-by-step through the head, body, paws, ears, tail and muzzle sculpting so you can create a fluffy, poseable toy. Youll finish with charming facial details and a fluffed muzzle for a professional look. Perfect as a handmade gift or a cozy collectible for your craft shelf.

Intermediate 5-7 Hours

Materials Needed for Tishka the cat Amigurumi Pattern

β€” Main Fabric

  • 01
    Nako Paris yarn color #10914 (grey) - 1 skein
  • 02
    Nako Paris yarn color #208 (white) - small amount for muzzle, paws and tail stripes
  • 03
    Toy eyes 12-14 mm (I used glass eyes) - 2 pieces
  • 04
    Pink toy nose - 1 piece
  • 05
    Polyester toy stuffing - small amounts for head, body, limbs, tail

β€” Tools Required

  • 01
    Crochet hook size 2.0 mm
  • 02
    Toy eyes 12-14 mm (glass eyes recommended)
  • 03
    Pink toy nose
  • 04
    Super clear glue
  • 05
    Hot glue gun
  • 06
    Toy stuffing (polyester fiberfill)
  • 07
    Plastic toy joint (20-30 mm)
  • 08
    Black thread for embroidering eyebrows and nose line
  • 09
    Velcro or slicker brush for combing and finishing
  • 10
    Yarn needle for sewing and embroidery

Progress Tracker

0% Complete

β€” Head :

Round 1 :

start 6 sc in a mr (6)

Round 2 :

6 inc (12)

Round 3 :

(1 sc, inc)6 (18)

Round 4 :

(2 sc, inc)6 (24)

Round 5 :

(3 sc, inc)6 (30)

Round 6 :

(4 sc, inc)6 (36)

Round 7 :

(5 sc, inc)6 (42)

Rounds 8-9 :

42 sc

Round 10 :

(6 sc , inc)6 (48)

Rounds 11-12 :

48 sc

Round 13 :

(7 sc, inc)6 (54)

Rounds 14-15 :

54 sc

Round 16 :

16 sc, 8 inc, 6 sc, 8 inc, 16 sc (70)

Rounds 17-21 :

70 sc

Round 22 :

16 sc, (1 sc, dec)6, 2 sc, (1 sc, dec)6, 16 sc (58)

Rounds 23-24 :

58 sc

Round 25 :

2 sc, (7 sc, dec)6, 2 sc (52)

Round 26 :

2 sc, (6 sc, dec)6, 2 sc (46)

Round 27 :

2 sc, (5 sc, dec)6, 2 sc (40)

Round 28 :

(6 sc, dec)5 (35)

Round 29 :

(5 sc, dec)5 (30) stuff tight

Round 30 :

(4 sc, dec)5 (25) insert plastic joint

Round 31 :

(3 sc, dec)5 (20)

Round 32 :

(2 sc, dec)5 (15)

Round 33 :

(1 sc, dec)5 (10)

Round 34 :

5 dec

Info :

Align marker by the middle of back side!

β€” Muzzle :

Round 1 :

start 6 sc in a mr (6)

Round 2 :

6 inc (12)

Round 3 :

(1 sc, inc)6 (18)

Info :

Make 2

Info :

Connect 2 parts with sl st and crochet 36 sc ( do not crochet sc into sl st)

β€” Lip :

Round 1 :

Start 5 sc in a mr

Info :

Do not join a circle, turn the item, ch

Round 2 :

1 sc, 3 inc, 1 sc

β€” Muzzle decoration :

Info :

Sew muzzle close to eyes

Info :

Eyes: I used glass eyes and hot glue gun. When youve finished sculpting, glue eyes into eyes sockets you formed. Embroider eyebrows

Info :

Nose: I glued nose. If you use safety one, cut leg and glue nose. Glue nose above the muzzle, in the middle, where 2 parts meet. Embroider black nose line (w.pic. below)

Info :

Lip: Sew lip in bottom, where 2 parts meet

β€” Ears :

Round 1 :

start 6 sc in a mr (6)

Round 2 :

6 sc

Round 3 :

6 inc (12)

Round 4 :

12 sc

Round 5 :

(1 sc, inc)6 (18)

Rounds 6-7 :

18 sc

Round 8 :

(2 sc, inc)6 (24)

Round 9 :

24 sc

β€” Body :

Round 1 :

start 6 sc in a mr (6)

Round 2 :

6 inc (12)

Round 3 :

(1 sc, inc)6 (18)

Round 4 :

(2 sc, inc)6 (24)

Round 5 :

(3 sc, inc)6 (30)

Round 6 :

(4 sc, inc)6 (36)

Rounds 7-13 :

36 sc

Round 14 :

(5 sc, inc)6 (42)

Round 15 :

42 sc

Round 16 :

(6 sc, inc)6 (48)

Round 17 :

48 sc

Round 18 :

16 sc, (1 sc, inc)8, 16 sc (56) - inc are placed in front - it is belly

Rounds 19-25 :

56 sc

Round 26 :

(5 sc, dec)8 (48)

Rounds 27-30 :

48 sc

Round 31 :

(6 sc, dec)6 (42)

Round 32 :

(5 sc, dec)6 (36)

Round 33 :

(4 sc, dec)6 (30)

Round 34 :

(3 sc, dec)6 (24)

Round 35 :

(2 sc, dec)6 (18) ΠΠ°Π±ΠΈΡ‚ΡŒ

Round 36 :

(1 sc, dec)6 (12)

Round 37 :

6 dec

Info :

Crochet body from top to bottom. Lock plastic joint in the 7th row

Info :

Marker is placed in the middle of back side!

β€” Tail :

Info :

Crochet tail alternating grey and white colors: 4 rows - grey color, 2 rows - white

Round 1 :

Start 7 sc in a mr (7)

Round 2 :

7 inc (14)

Rounds 3-4 :

14 sc

Round 5 :

(6 sc, inc)2 (16)

Round 6 :

16 sc

Rounds 7-32 :

16 sc, stuff tail a little

Round 33 :

Put together and crochet 8 sc grabbing loops of both sides

β€” Front paws :

Round 1 :

start 6 sc in a mr (6)

Round 2 :

6 inc (12)

Round 3 :

(1 sc, inc)6 (18)

Round 4 :

(2 sc, inc)6 (24)

Rounds 5-6 :

24 sc

Round 7 :

(dec, 1 sc)4, 12 sc (20)

Round 8 :

20 sc

Round 9 :

1 sc, 4 dec, 11 sc (16)

Round 10 :

16 sc, change color to grey

Rounds 11-25 :

16 sc

Round 26 :

(2 sc, dec)4 (12)

Round 27 :

6 dec

Info :

Embroider black stripes on paws to imitate fingers. Sew arms (thread jointing)

β€” Back paws :

Round 1 :

Start 7 sc in a mr (7)

Round 2 :

7 inc (14)

Round 3 :

(1 sc, inc)7 (21)

Rounds 4-12 :

21 sc

Round 13 :

(5 sc, dec)3 (18)

Rounds 14-15 :

18 sc

Round 16 :

(4 sc, dec)3 (15), stuff a little

Round 17 :

(1 sc, dec)5 (10)

Round 18 :

5 dec

Info :

Make 2

β€” Foot / Leg :

Info :

Crochet on top of foot 14 sc, ~ on the 16th row of white foot, start working in back (right), if you look from back to front, crochet clock-wise.

Info :

Crochet 5 sc horizontally, 2 sc vertically, Crochet 5 sc horizontally, 2 sc vertically again. You get 14 sc now

Rounds 1-5 :

14 sc

Round 6 :

7 sc, 5 inc, 2 sc (19)- inc are in front, this is a knee

Round 7 :

19 sc

Round 8 :

7 sc, (1 sc, inc)5, 2 sc (24)- inc are in front, this is a knee

Rounds 9-18 :

24 sc. Stuff

Round 19 :

(6 sc, dec)3 (21)

Round 20 :

(1 sc, dec)7 (14) stuff, do not stuff tight top part

Round 21 :

7 dec

β€” Assembly & Finishing :

Info :

Sew legs (thread jointing). Do not sew them too high.

Info :

Combing: Use Velcro or slicker brush. Align yarn when youve finished combing. I trimmed muzzle a little and hid some threads inside (from edges).

Assembly Instructions

  • Sew muzzle close to the eyes sockets formed during head sculpting and secure with stitches so the muzzle sits centered under the eyes.
  • Glue the eyes with a hot glue gun into the sculpted eye sockets after youve finished shaping the muzzle and eyes area.
  • Glue the pink nose above the muzzle in the middle where the two muzzle parts meet; if using a safety nose, cut off the leg and glue it in place instead.
  • Insert the plastic toy joint where instructed: insert plastic joint into head at round 30 and lock plastic joint in the 7th row of the body for arm/leg attachment.
  • Sew arms and legs using thread jointing technique; sew legs but do not sew them too high on the body to maintain correct balance.
  • After assembly comb the yarn with Velcro or a slicker brush to fluff the fur and trim lightly as needed, aligning yarn and hiding threads inside muzzle edges.

Important Notes

  • πŸ’‘Place a stitch marker aligned to the middle of the back side to keep orientation consistent throughout shaping.
  • πŸ’‘Insert and lock the plastic joint in the specified rows (head round 30 and body row 7) to ensure correct alignment of limbs.
  • πŸ’‘Stuff firmly but avoid overstuffing top parts such as the knee or head top; stuff tail and paws lightly to keep shape.
  • πŸ’‘When connecting the two muzzle halves, join with slip stitch and then crochet 36 sc without crocheting into the sl st as instructed.
  • πŸ’‘Use a hot glue gun sparingly when fixing glass eyes and the nose to prevent glue from flattening surrounding fur.

This sweet Tishka the Cat pattern will become a treasured handmade friend that brightens any shelf or gift basket. Follow the clear shaping and muzzle-sculpting steps to create expressive eyes and a fluffy finish youll be proud of. Enjoy the finishing touches like combing the fur and embroidered eyebrows for an extra dose of charm. 🧢🐱✨

You ask,

we answer.

FAQs

What size will the finished piece be?

The finished amigurumi measures approximately 18-24 cm tall depending on yarn tension and stuffing when using the recommended Nako Paris yarn and a 2.0 mm hook.

Can I use different yarn weights for this pattern?

Yes, you can use different yarn weights but this will change the final size and fluffiness; choose an appropriate hook and keep in mind the look of the fur if substituting the eyelash-style yarn.

Do I need prior crochet experience for this pattern?

This pattern is rated intermediate due to shaping, muzzle sculpting, and joint insertion; basic knowledge of single crochet, increases and decreases is recommended.

How long does this project typically take to complete?

Most crocheters complete this project in 5-7 hours, though time may vary based on experience level and how much time you spend on sculpting and combing the fur.

What eye size is recommended and how are they attached?

Use 12-14 mm toy eyes (glass works beautifully). The pattern suggests gluing them into the sculpted eye sockets with a hot glue gun after sculpting is complete.