🧢 Beautiful ✨ Detailed πŸ’ Adorable

Bunny baby rattle Amigurumi Pattern

Bunny baby rattle Amigurumi Pattern
4.7β˜… Rating
2-4 Hours Time Needed
3.3K Made This
βœ‚οΈ

Intermediate Level

Ideal for those with basic crochet experience, featuring slightly more advanced stitches and techniques to expand your skills.

⏱️

Bite-Sized Project

Finishes in 2-4 hoursβ€”perfect for an afternoon of creative relaxation.

🎁

Tiny Treasure

Small, sweet, and gift-worthy creations that fit perfectly in the palm of your hand with detailed charm.

About This Bunny baby rattle Amigurumi Pattern

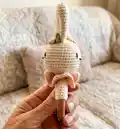
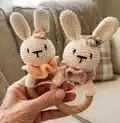
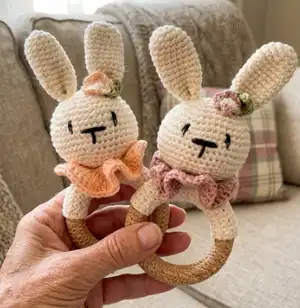
This pattern creates a charming bunny baby rattle with a wooden teether ring β€” a lovely handmade toy that soothes and entertains. The design includes a crocheted head with an internal rattle ball, two ears, a wrapped wooden ring body cover, a decorative collar, and a small flower decoration. The facial features are embroidered for safety and durability, ideal for baby use when assembled tightly.

Bunny baby rattle Amigurumi Pattern crochet pattern - detailed view of completed project

Clear step-by-step instructions and photos guide you through each piece and the final assembly. A video tutorial link and QR codes are included for extra help with technique.

Why You'll Love This Bunny baby rattle Amigurumi Pattern

I absolutely love this pattern because it combines simple stitches with a delightful final result that babies adore. I enjoy how small adjustments in color and decoration make each rattle uniquely personal. The wooden ring adds a natural texture that babies love to chew and grasp, making it both pretty and practical. I also love that the face is embroidered β€” it keeps the toy safe for little ones while still being expressive and cute.

Bunny baby rattle Amigurumi Pattern step 1 - construction progress Bunny baby rattle Amigurumi Pattern step 2 - assembly progress Bunny baby rattle Amigurumi Pattern step 3 - details and accessories Bunny baby rattle Amigurumi Pattern step 4 - final assembly and finishing

Switch Things Up

I love customizing this rattle with different color palettes β€” pastel tones make it sweet and soft while bright colors make it playful and modern.

You can change the collar and flower colors to match nursery themes or to make a matching set of rattles as gifts.

If you want a mini keychain version, use thinner yarn and a smaller ring or omit the wooden ring entirely and make a loop instead.

To make a chunkier, cuddlier rattle, try sport-to-worsted weight yarn and a bigger hook; you may need to adjust the number of rows to fit a larger ring.

I sometimes add a tiny bell inside with the rattle ball for extra sound, but only if the bell is securely enclosed and not a choking hazard.

You can embroider different facial expressions β€” a sleepy face, a smiling face, or add tiny freckles β€” to give each bunny its own personality.

Try crocheting the collar with a textured stitch or adding picot edges for a lacy look that feels special and detailed.

I recommend switching to a cotton blend yarn for a firmer, more durable toy that stands up to teething and frequent washing.

Make matching accessories like a tiny scarf or a removable bow so you can change the look for different seasons or gifting occasions.

I also like to experiment with natural-dyed or undyed yarns and wooden rings for a more rustic, organic aesthetic that appeals to modern parents.

Common Mistakes & How to Fix Them

βœ— Skipping the gauge check may cause the finished rattle to be too large or small; check the gauge and adjust hook size to match the pattern's measurements. βœ— Not stuffing evenly can make the head lumpy and misshapen; stuff gradually, shaping as you go for a smooth, round head. βœ— Sewing parts loosely will cause pieces to detach when played with; sew all parts tightly and secure with multiple passes for safety. βœ— Using unsafe or small parts like loose beads instead of the recommended rattle ball can be hazardous; use the specified 24 mm rattle ball and enclose it securely inside the head. βœ— Cutting yarn tails too short makes sewing difficult and weakens joins; leave long tails for sewing and weave them in securely. βœ— Ignoring placement instructions for ears and collar can cause asymmetry; use pins to mark placements and count stitches/rows to ensure even positioning.

Bunny baby rattle Amigurumi Pattern

Make a sweet bunny baby rattle with a wooden teether ring β€” perfect for gifting or soothing little ones. This pattern walks you through crocheting the head, ears, body cover, collar, and a tiny flower, plus safe assembly tips. You will enjoy the compact size and charming finished toy that encourages fine motor skills. Suitable for crafters who want a quick, handmade baby gift.

Intermediate 2-4 Hours

Materials Needed for Bunny baby rattle Amigurumi Pattern

β€” Main Fabric

  • 01
    Yarn Art Jeans (color 05) approx. 90 yards (main color)
  • 02
    Yarn Art Jeans (any color for decoration) approx. 5 yards (accent color for collar/flower)
  • 03
    Suggested yarn: Sport / Baby weight (Fine - 2)

β€” Tools Required

  • 01
    Crochet hook size 2.00 mm
  • 02
    6 cm / 2.5" wooden ring
  • 03
    24 mm / 1" rattle ball
  • 04
    Fiberfill stuffing
  • 05
    Sewing needle for yarn
  • 06
    Pins for assembly
  • 07
    Scissors
  • 08
    Stitch markers (optional)

Progress Tracker

0% Complete

β€” Head :

Info :

Crochet by spiral.

Round 1 :

6 sc in Magic ring [fig 1] (6)

Round 2 :

6 inc (12)

Round 3 :

(1 sc, inc) * 6 (18)

Round 4 :

(2 sc, inc) * 6 (24)

Round 5 :

(3 sc, inc) * 6 (30)

Round 6 :

(4 sc, inc) *6 [fig 2] (36)

Round 7 :

(5 sc, inc) * 6 (42)

Round 8 :

(6 sc, inc) * 6 (48)

Round 9-15 :

48 sc [fig 3]

Round 16 :

(6 sc, dec) * 6 (42)

Round 17 :

(5 sc, dec) * 6 (36)

Round 18 :

(4 sc, dec) * 6 (30)

Round 19 :

(3 sc, dec) * 6 (24)

Info :

Stuff the head firmly and insert the rattle ball [fig 4]

Round 20 :

(2 sc, dec) * 6 (18)

Round 21 :

(1 sc, dec) * 6 (12)

Round 22 :

(sc) * 6 (6)

Info :

Cut the yarn with long tail [fig 5]

β€” Ears :

Info :

Make 2. Crochet by spiral.

Round 1 :

6 sc in Magic ring (6)

Round 2 :

6 inc (12)

Round 3 :

(2 sc, inc) * 4 (16)

Rounds 4-11 :

16 sc

Round 12 :

(6 sc, dec) * 2 (14)

Round 13 :

14 sc

Round 14 :

(4 sc, dec) * 2 (12)

Round 15 :

12 sc

Round 16 :

(4 sc, dec) * 2 (10)

Info :

Cut the yarn with long tail approx. 15 cm /6" [fig 6]. Make the second ear.

β€” Body :

Info :

Working in rows. Start with foundation chain.

Info :

NOTE that you may need to increase or decrease the number of rows to match your wooden ring. It should `hug` wooden ring completely.

Instruction :

Chain 25

Rows 1-9 :

24 sc, ch 1 and turn [fig 7]

Info :

Cut the yarn leaving a long tail for sewing. Wrap the ring and sew along [fig 8]

β€” Collar :

Info :

Working in rows. Using brown yarn.

Instruction :

Chain 20

Row 1 :

ch 2, 1 dc in the 20th ch, *2 dc in the next st* till the end, turn [fig 9]

Row 2 :

ch 2, *2 dc in the next st* till the end.

Info :

Cut the yarn leaving a long tail for sewing [fig 10]

β€” Assembling :

Step 1 :

Attach the head to the middle of the body. And sew it, firmly as you can, so it doesn't move when shaking [fig 11]

Step 2 :

Fold the ears in half lengthwise so that a dimple forms at the base. Sew the ears between round 4 and 5. Use the sewing pins to place and fixate the ears. [fig 12]

Step 3 :

Place the collar between the body and head and sew the ends together into a ring. To prevent it from dangling, sew it to the head in several places [fig 13,14]

Step 4 :

Take black yarn and embroider the nose and eyes. Please, refer to the pictures! [fig 15]

Info :

Between the 11th and 12th rows embroider the horizontal line of the nose (the width of the nose is about 4 sc). From the middle down, embroider the nose with a vertical line in 2 rows.

Info :

Embroider the eyes at a distance of 2 sc in the direction of the horizontal line of the nose. Make sure the muzzle is symmetrical :)

β€” Flower :

Info :

Add some personality to your toy. Complete it with a bow or decorate it with a flower.

Instruction :

Chain 10 [fig 17]

Row 1 :

ch 1, 4 sc in one ch, sl-st, 4 hdc in one ch, sl-st, 4 dc in one ch, sl-st, change color of the yarn: (1 hdc, 2 dc, 2 trc, 2 dc, 1 hdc) in one ch, sl-st, (1 hdc, 2 dc, 2 tr, 2 dc, 1 hdc) in one ch.

Info :

Cut the yarn. Roll up and give the shape of a flower [fig 18-19]. Sew tightly.

Info :

Please sew all pieces tightly because a baby will play with it! Do not leave toys unattended in the crib!

Assembly Instructions

  • Attach the head to the middle of the wrapped body ring and sew it firmly so it does not move when shaken (see fig 11).
  • Fold each ear lengthwise to form a dimple at the base and sew the ears between rounds 4 and 5; use pins to position and fix before sewing (see fig 12).
  • Wrap the wooden ring with the crocheted body cover and sew the edges together to form a continuous ring; secure the seam and stitch the cover evenly to the ring (see fig 8).
  • Place the collar between the body and head, sew the ends together into a ring and tack it to the head in several places so it does not dangle (see figs 13 and 14).
  • Embroider the nose and eyes using black yarn: embroider the horizontal nose line between rows 11 and 12 (about 4 sc wide), then a vertical line downwards for two rows; place eyes two stitches from the nose line.

Important Notes

  • πŸ’‘Use a 2.00 mm hook (or adjust to achieve the gauge) to get the correct size and tight fabric suitable for a baby toy.
  • πŸ’‘Always sew pieces tightly and securely because a baby will play with the rattle; double-check all joins before gifting or use.
  • πŸ’‘Stuff the head firmly but not overfilled so the rattle ball fits securely and the head keeps a rounded shape.
  • πŸ’‘Embroider features rather than using small hard parts to keep the toy safe for infants.
  • πŸ’‘If you need help, use the provided QR/video links for step-by-step guidance of each stage.

This sweet Bunny Baby Rattle pattern is a delightful little project that makes a perfect handmade gift for newborns and toddlers. It combines soft yarn with a natural wooden ring and a secure internal rattle for sensory play and teething relief. Enjoy crocheting this pocket-friendly, charming rattle and share your finished pieces with loved ones! 🧢🐰

You ask,

we answer.

FAQs

What size will the finished piece be?

When using similar materials, the rattle diameter will be approximately 2 1/2" (6 cm) and the total height with the ring will be about 5 1/2" (14 cm).

Can I use a different yarn weight?

Yes, but the final size and drape will change; if you use thicker yarn, switch to a larger hook and expect a bigger, chunkier rattle. Adjust the number of rows to fit the wooden ring.

Is this pattern suitable for beginners?

The pattern is rated intermediate because it includes working in rounds and rows, shaping, and assembly; basic knowledge of single crochet, increases, and decreases is recommended.

How do I make the toy safe for babies?

Embroider facial features instead of using safety eyes, sew all parts tightly, enclose the rattle ball securely in the head, and avoid loose threads or decorations that could detach.