Create a festive collection of holiday decor with step-by-step instructions for a tall looped Christmas tree, large crocheted stocking, and a charming gift bag. These patterns are written for mostly beginner-friendly techniques and use scrap yarn or multiple strands for a quick, textured finish. You'll find clear photos, handy tips, and ideas so you can customize colors, size, and embellishments to suit your home or gift-giving plans.
Progress Tracker
0% Complete
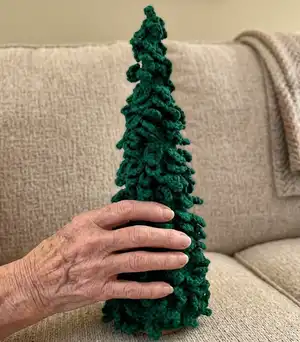
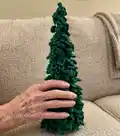
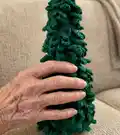
— "Oh, Christmas tree, Oh, Christmas tree": Tree #1 :
Info :
Beginner Crochet. Only chain stitches and slip stitches used. Use two strands of green yarn held together and a K/6.5mm hook. Use a 23" cardboard cone tree form as a base.
Info :
You will need hot glue gun and optionally liquid glue to hold rows in place. An embroidery needle is helpful for finishing. Do not cut the yarn until you finish the loop section unless you decide to stop at the base stage.
Step 1 :
Hold two strands of green yarn together and, with K/6.5mm hook, chain continuously until your starting chain will wrap at least halfway up the cone or reach your desired starting height (do not cut yarn) (continuous chain).
Step 2 :
Attach the beginning of your starting chain to the very bottom of the cone form; tie the two starting tails together to secure the bottom row snugly to the form.
Step 3 :
After the first row is secure, run a thin stream of liquid glue above that starting line and wind additional rows around the cone for several rows to hold the chain in place, working slowly to keep the chain right side up and untwisted.
Step 4 :
Every few rows add a line of hot glue over the previous rows to set them; alternate liquid glue rows and hot glue rows to speed up the process and create a secure base (work in small sections and hold while glue sets).
Info :
When you have covered the cone base as desired you may stop and hide tails for a simple wrapped tree look — this is a finished option.
Step 5 :
If moving on to the loops: DO NOT CUT your working yarn. After finishing the base wrapping, start making loops by chaining 10 (or the loop length you prefer) and slip stitch at the base of the chain 10 to attach the loop to the cone; repeat around to create loop chains.
Step 6 :
Continue chaining 10 and slip stitching at the base around the cone repeating until you have covered the cone with loop chains. You may vary the spacing and chain length as desired to create wider or narrower loops.
Step 7 :
When all loops are made, wind and position them on the cone: start at the top and pull the loop chain snug and reposition evenly as you work your way down the cone so the loops form layered branches.
Step 8 :
You can secure the loop chain with a bit of hot glue if needed but oftentimes pulling the loop chain snug will press it into the base layers and hold fine without extra adhesive.
Info :
After finishing loops, steam the whole tree lightly to relax and soften 4-ply yarn fibers and improve the final look if desired — steaming is optional and depends on yarn type.
Finish :
Trim or tuck in leftover tails. Add decorations, lights, or a small star to the top if desired. Hide any glue spots and fluff loops for final shaping.
— Christmas Stocking :
Info :
Beginner Friendly stocking worked from the toe up. Two strands of yarn held together in samples; K/6.5 mm hook used in examples. Stitches used include SC, HDC, DC and post stitches for the border. Work mostly in spiral, optionally join and chain each round if preferred.
Step :
Grab 2 strands of yarn and your K/6.5mm hook. Chain 2.
Round 1 :
In your 1st chain (the second from your hook) make 8 HDC (8)
Info :
Count back 8 if you need and find your first stitch to start the next round. You will work over the tails from the beginning to tighten the middle of your work; crochet over the tails all the way around then pull them tight.
Instruction :
In the first stitch only make 1 SC and then 1 HDC (this first SC is to reduce a big jog in height). Now make 2 HDC in all the rest of the stitches around for a total of 16 stitches.
Round 3 :
Make 1 HDC in next stitch, make 2 HDC in the next stitch; repeat around (24)
Round 4 :
Make 1 HDC in next 2 stitches, make 2 HDC in the next stitch; repeat around (32)
Round 5 :
Make 1 HDC in next 3 stitches, make 2 HDC in the next stitch; repeat around (40)
Round 6 :
Make 1 HDC in next 4 stitches, make 2 HDC in the next stitch; repeat around (48). After doing the last HDC make about 3-4 SC to eliminate the jog and then join your main color on this last stitch. Make the first part of the stitch in the toe color then pull through the last part with your new color. Tie ends in back of work and continue to crochet over the tails.
Round 7 :
Single crochet in Back Loop Only (BLO) around (48)
Rounds 8-~20 :
HDC around. See photos. (This is about 13 rows or about 624 stitches if you are working in the spiral.) Flow-style: keep going until you reach the point you want before doing the heel.
Instruction :
After all of those stitches are finished make 3-4 single crochet in the next 3-4 HDC stitches and DROP but DO NOT CUT your main color. You will come back to pick it up after you do the heel.
Info :
You are now going to work in rows for the heel section; do not chain at the end of the round when turning for heel rows unless instructed.
Row (heel) 1 :
Attach your heel/toe color when you make your last stitch from the toe; pull the new color through to finish the last stitch and slip stitch in the next stitch. Work 21 SC across the round and slip stitch in the next stitch.
Row (heel) 2 :
Do NOT chain; turn your work and skip the slip stitch then single crochet together (SCTOG) over the next two stitches and then work across until you reach the last two SC and then SCTOG those two last stitches. Continue repeating bracketed pattern until you are left with only 8 SC (19 SC across) as guided by photos.
Instruction :
If you are unsure how to single crochet two stitches together (SCTOG): insert hook into the space, pull up a loop, insert into next space, pull up a loop (3 loops on hook) and pull through all 3 loops to complete SCTOG.
Heel increase rows :
Chain 1 and turn. Make 2 SC in the first stitch, SC in the next 6 stitches and then make 2 SC in the last stitch (10). Chain 1 and turn. Make 2 SC in the first stitch, SC in the next 8 stitches and then make 2 SC in the last stitch (12). Continue increase rows until you are at the recommended count and shape — the last two rows of the heel before you break off yarn are increase rows.
Finish heel :
Attach your heel color/colors to the bottom of the heel right next to where you dropped your main color earlier. SC evenly around the entire heel piece — after finishing I had made 32 SC around the heel section. Fasten off heel color if desired and crochet over tails as you go.
Attach main color :
Go back and pick up the MAIN color yarn that you dropped earlier and rejoin to continue working in the round.
Round after heel :
Work around entire piece in your chosen stitch (SC or HDC) — when you get to the upper corner on the heel piece you will make SC3TOG (or HDC3TOG) on the upper 3 stitches on BOTH sides of the heel to slightly gather and shape the top of the heel.
Instruction :
After doing the shaping and working around you should be counting to approximately 49 stitches; adjust to 48 stitches around by making decrease(s) evenly if needed so your next border/post stitch round will lay correctly.
Leg section :
Continue to crochet in the round (SC or HDC) until the leg reaches desired length. The example leg above was about 12 inches measured from the heel section. Work in continuous spiral or join and chain at end of rounds, whichever you prefer for rhythm.
Optional top border :
If adding a top border/section in another color: join and chain up 2 (not a stitch) and in the next round alternate 4 front post double crochet and then 4 back post double crochet around (this is why you want approx 48 stitches). Repeat for as many rounds as you like for the striped post stitch border. On one sample two alternating front/back post rounds were used; on another sample just one row was done due to running out of yarn.
Finish :
Make a chain for hanger on the back if desired (example chain length about 15). Weave in ends and add any decorative trims, initials or beaded garland as desired. And that is it — your stocking is complete.
— Gift Bag #1 (Gift Sack) :
Info :
Beginner Crochet: uses HDC and DC and chain stitches; tie uses chains and pompoms. Example used three strands held together and an N/10mm hook; final bag measured about 16" x 16".
Instruction :
You can start gift bag exactly the same way as the stocking toe: Chain 2 and in the 1st chain (the second from your hook) make 8 HDC. Work in the spiral following the same increase rounds as stocking examples.
Round 3 :
Make 1 HDC in next stitch, make 2 HDC in the next stitch; repeat around (24)
Round 4 :
Make 1 HDC in next 2 stitches, make 2 HDC in the next stitch; repeat around (32)
Round 5 :
Make 1 HDC in next 3 stitches, make 2 HDC in the next stitch; repeat around (40)
Round 6 :
Make 1 HDC in next 4 stitches, make 2 HDC in the next stitch; repeat around (48)
Round 7 :
Make 1 HDC in next 5 stitches, make 2 HDC in the next stitch; repeat around (56)
Round 8 :
Make 1 HDC in next 6 stitches, make 2 HDC in the next stitch; repeat around (64)
Info :
Continue increasing in the same manner to make the base size you need for your bag; after base is complete work even rounds in HDC or SC to form the sides until desired height is reached.
Finish top :
Make a double crochet border around the top (join and chain up 2 then DC border) and create holes or chains for the drawstring tie; use chains or crocheted cords and attach pom poms for decoration.
Finish :
Weave in ends. Add any decorations and a drawstring. Your gift bag is complete and ready to fill.
Infos :
Many photos accompany these steps in the pattern — when working increases and shaping, refer to photos for placement and spacing guidance. If you prefer a smaller bag use single strand yarn and smaller hook or fewer strands held together.
This holiday crochet collection celebrates thrifty creativity with stash-busting ideas that become joyful decorations and gifts. Whether you make the tall looped tree, the cozy stocking, or the chunky gift bag, each piece is designed to be approachable and customizable. Have fun mixing colors, textures, and trims — and enjoy giving something handmade this season! 🎁🎄