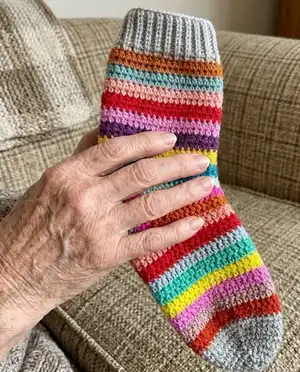
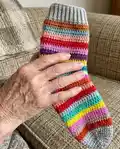
Make a cozy pair of striped slip-rib socks using fingering-weight yarn and simple ribbing plus slip-stitch colorwork. This pattern offers multiple sizes and a clear cuff-down construction so you can customize length and color as you go. Perfect for using up scraps or creating coordinated pairs with contrasting heels and toes. Detailed instructions cover cuff, leg, heel flap, gusset, toes, and finishing for reliable results.
Progress Tracker
0% Complete
— Materials :
Info :
Yarn:Fingering weight yarn in the following approximate amounts: MC: 92 (116, 136, 158, 174) yards /84 (106, 124, 144, 159) meters. CC1: 73 (94, 112, 132, 156) yards /67 (86, 102, 121, 143) meters. CC2: 42 (58, 72, 89, 98) yards /38 (53, 66, 81, 90) meters.
Info :
Needles: US Size 1 / 2.25mm. Notions: Stitch markers, measuring tape, snips, tapestry needle.
— Gauge :
Info :
38 sts over 4" / 10 cm and 28 rnds, knit in rib pattern and blocked.
— Abbreviations :
Info :
CO - Cast on. BOR - Beginning of round. MC - Main color. CC - Contrasting color. K - Knit. P - Purl. St - Stitch. M - Marker. Pm - Place marker. Sl m - Slip marker. K2tog - Knit two together. P2tog - Purl two together. Ssk - Slip, slip, knit. Rnd - Round. Cont - Continue. M1 - Make 1 new stitch.
— Pattern Notes :
Info :
HOW TO WORK A "MAKE 1 (M1)" There are many ways to make a new stitch! When I need to add a stitch or two to my socks, I typically use the "Make 1 Left" (M1L). You can use any method you prefer, however! To work a M1L, you simple insert the tip of your left needle, from front to back, into the bar between the stitch you just knit, and the one you're about to knit. With your right needle, knit into the back leg of that bar like normal. Now you've got a new stitch!
Info :
ON SIZING This pattern calls for a 3 x 2 rib, which means your cast-on numbers may be a little different than you are used to. Have no fear about fit! Ribbed socks are quite stretchy and forgiving, and the stitch counts are fairly close to what is standard for each size! Do make sure to read all instructions carefully, however. You will be adjusting your stitch counts in the heel area!
— Slip Stitch Stripe Pattern :
Info :
Note: You do not need to cut your CC1 and MC strands as you work your stripes! I simply carry mine along on the inside of my sock. See page 6 for the bonus modification on colorful stripes!
Rnd 1 :
With MC, [Sl 1, k1, sl 1, p2] to end.
Rnds 2 & 3 :
[Sl 1, k1, sl 1, p2] to end.
Rnds 4 - 8 :
[K3, p2] to end.
Rnd 9 :
[K1, sl 1, k1, p2] to end.
Rnds 10 & 11 :
[K1, sl 1, k1, p2] to end.
Rnds 12 - 18 :
[K3, p2] to end.
Info :
Repeat rnds 1 - 18.
— Instructions :
Item Name (Cuff) :
With CC2, CO 50 (60, 65, 70, 80) sts and join for working in the rnd, being careful not to twist your sts. Establish 3 x 2 rib pattern: [k3, p2] to end.
Info :
Cont working 3 x 2 rib pattern until cuff measures 2" / 5 cm, or your desired length. Break CC2.
Item Name (Leg) :
Join in MC and work 9 rnds of 3 x 2 rib, then begin Slip Stitch Stripe Pattern. Cont working the Slip Stitch Stripe Pattern until leg (including cuff!) measures 6" / 15 cm, or your desired length. Do NOT end after just working a slip stitch rnd. It's best to end after working a k3, p2 rnd.
— Heel Flap :
Item Name (Kid) :
Work in pattern across the first 25 sts. Break MC and CC1. Join in CC2. K1, m1, [sl 1, k1] to end. 51 sts.
Item Name (S) :
Work in pattern across the first 30 sts. Break MC and CC1. Join in CC2. K2, [sl 1, k1] to end.
Item Name (M) :
Work in pattern across the first 33 sts. Break MC and CC1. Join in CC2. K2, [sl 1, k1] to end.
Item Name (L) :
Work in pattern across the first 35 sts. Break MC and CC1. Join in CC2. K1, m1, [sl 1, k1] to end. 71 sts.
Item Name (XL) :
Work in pattern across the first 40 sts. Break MC and CC1. Join in CC2. K2, [sl 1, k1] to end.
Info :
You will now be working your heel flap back and forth across the last 26 (30, 32, 36, 40) sts you just worked. Turn your work, and begin your heel flap as follows:
Row 1 :
Sl 1, p to end. Turn work.
Row 2 :
[Sl 1, k1] to end. Turn work.
Info :
Repeat rows 1 and 2 until heel flap measures 1.5 (2, 2, 2.25, 2.5)" /4 (5, 5, 5.5, 6) cm. End after you have worked row 2.
— Heel Turn :
Row 1 :
Sl 1, p 13 (15, 16, 18, 20), p2tog, p1, turn.
Row 2 :
Sl 1, k 3, ssk, k1, turn.
Row 3 :
Sl 1, p 4, p2tog, p1, turn.
Row 4 :
Sl 1, k 5, ssk, k1, turn.
Info :
You have now established the following pattern for your heel turn: sl 1, k or p to one stitch before the gap created by turning on the previous row, ssk or p2tog, k1 or p1, turn. Continue in this pattern until all your heel stitches have been worked. Break CC2.
Info :
Note for sizes Kid and Small: You started on row 1 by working an odd number of sts (13 and 15). This means you will end your heel turn a bit different than normal. On the second to last row of the heel turn, you'll find that you can only work a p2tog before turning. On the last row, you will only work a SSK at the end. You cannot follow the p2tog, or the ssk with a p1, or k1, as you did on all the previous rows of the heel turn. This will not affect the fit or shape of your heel!
— Gusset :
Info :
Join in either MC or CC1 (whichever color you left off with prior to starting your heel flap). With the right side of your work facing, pick up and k 12 (14, 16, 18, 20) sts along the left side of your heel flap.
Info :
Next, work 25 (30, 32, 35, 40) sts across the front of your sock in established Slip Stitch Stripe Pattern. Pm, and pick up 12 (14, 16, 18, 20) sts on the right side of your heel flap. K across the heel sts, then k down the first set of new sts you picked up on the left side. You've reached the end of the rnd, and all your sts have now been picked up.
— Gusset Decreases :
Rnd 1 :
Work in established Slip Stitch Stripe Pattern across 25 (30, 32, 35, 40) sts, sl marker, k1, ssk, k around to 3 sts before the end of rnd, k2tog, k1.
Rnd 2 :
Work even with no decreases.
Info :
Repeat these two rnds until you have 52 (60, 64, 72, 80) sts on your needles. Note that we have now adjusted our st counts back to normal! We will rearrange our sts on the needles before working our toes.
— Note for Size M :
Info :
You may have noticed that you are only working your Slip Stitch Stripe Pattern across the first 32 sts of your sock. This means the pattern is interrupted at the end. For example, you should end by purling 2, then knitting 3. On a slip stitch round, you would end with either a "sl 1, k1, sl 1," or a "k1, sl 1, k1." Instead, you will end by purling 2, then knitting 2, and on slip stitch rnds with either a "sl 1, k1," or a "k1, sl1." You will not notice this slight aberration in the fit of your sock!
— Foot :
Info :
Cont working the Slip Stitch Stripe Pattern across the first 25 (30, 32, 35, 40) sts, and working st st across the remaining 27 (30, 32, 37, 40) sts until your foot reaches your desired length before beginning the toe decreases. Do NOT stop for the toes on a slip stitch rnd. I stopped for the toes after working 2 rnds beyond a slip stitch rnd.
Info :
I begin shaping for the toes once my work reaches just to the tip of my pinky toe. If you are knitting gift socks, or you can't easily try them on as you knit, the Craft Yarn Council has issued the following length guidelines for the foot of a sock, measured from the back of the heel to the end of the toe.
Info :
(All sizes are US) Women's shoe sizes 4-6.5: 8 - 9" (20 - 23 cm). Women's shoe sizes 7-9.5: 9.25 -10" (23 - 26 cm). Women's shoe sizes 10-12.5: 10.25 -11" (26 - 28 cm). Men's shoe sizes 6-8.5: 9.25 -10" (23 - 26 cm). Men's shoe sizes 9-11.5: 10.25 -11" (26-28 cm). Men's shoe sizes 12-14: 11.25 -12" (29-31 cm). Kid: 6-7.5" / 15-19 cm.
Info :
You will want to start your toe decreases at approximately 1.5" (4cm) before the end of your desired foot length.
— Toes :
Info :
Note: You may need to rearrange your sts on your needles so they are evenly divided for your toe decreases! Break MC and CC1. Join in CC2 and work 1 rnd even in st st. Next, begin the following decrease pattern for your toes:
Rnd 1 :
K1, ssk, k 20 (24, 26, 30, 34) sts, k2tog, k1, pm, k1, ssk, k 20 (24, 26, 30, 34) sts, k2tog, k1.
Rnd 3 :
K1, ssk, k to 3 sts before next marker, k2tog, k1, sl m, k1, ssk, k around to 3 sts before end of rnd, k2tog, k1.
Info :
Repeat rnds 2 and 3 until 24 (28, 32, 36, 40) sts remain.
Info :
Graft your toes closed using kitchener stitch.
— Finishing :
Info :
Weave in all ends and block your socks!
— Bonus Modification :
Info :
Follow the same construction as you did for the original Slip Rib Socks! But work this Slip Stitch Stripe Pattern instead!
Info :
With your first color, work the "k3, p2" rib for 7 rnds. Then begin:
Rnd 1 :
[Sl 1, k1, sl 1, p2] to end.
Info :
Switch to your second color.
Rnds 2 & 3 :
[Sl 1, k1, sl 1, p2] to end.
Rnds 4 - 8 :
[K3, p2] to end.
Rnd 9 :
[K1, sl 1, k1, p2] to end.
Info :
Switch to your third color.
Rnds 10 & 11 :
[K1, sl 1, k1, p2] to end.
Rnds 12 - 16 :
[K3, p2] to end.
Info :
Repeat rnds 1 - 16, switching your colors as you go! I wove my ends in as I knit, just to make life a little easier once I finished my socks!
These Stripey Slip Rib Socks were written to be playful, colorful, and practical all at once. They make a wonderful stash-busting project and a thoughtful handmade gift. Knit a pair in your favorite colors and enjoy the cozy, stretchy rib and neat heel shaping. 🧦🧶