🧢 Beautiful ✨ Detailed πŸ’ Adorable

The Nutcracker Amigurumi Pattern

The Nutcracker Amigurumi Pattern
4.3β˜… Rating
12-15 Hours Time Needed
2.4K Made This
βœ‚οΈ

Intermediate Level

Ideal for those with basic crochet experience, featuring slightly more advanced stitches and techniques to expand your skills.

⏱️

Multi-Day Project

A rewarding 12+ hour journeyβ€”perfect for dedicated crafters who love detailed work.

🧸

Cute Companion

An adorable friend to cherish, handcrafted with love to bring comfort and joy for years to come.

About This The Nutcracker Amigurumi Pattern

This pattern creates a full pastel Nutcracker amigurumi with a cupcake hat, wig, beard and many small accessories. It uses 100% cotton yarn and a 2.0mm hook for tight, neat stitches and crisp details. The pattern includes every round, color changes, and small parts so you can recreate the exact look shown in the photos.

The Nutcracker Amigurumi Pattern crochet pattern - detailed view of completed project

You will make body, legs, arms, a cupcake hat, candy base, boots, and decorative pieces like a candy buckle and candy cane. Detailed assembly instructions and finishing notes help you sew and glue pieces in the right positions for a polished result.

Why You'll Love This The Nutcracker Amigurumi Pattern

I absolutely love this pattern because it combines classic amigurumi shaping with playful candy-themed details that make the Nutcracker feel unique and fun to make. I enjoy the way the cupcake hat and braided candy cane add personality and charm to the design. The mix of color changes and simple textured stitches keeps the work engaging without being overwhelming. Seeing all the small pieces come togetherβ€”beard, buttons, bootsβ€”gives me a real sense of accomplishment and joy.

The Nutcracker Amigurumi Pattern step 1 - construction progress The Nutcracker Amigurumi Pattern step 2 - assembly progress The Nutcracker Amigurumi Pattern step 3 - details and accessories The Nutcracker Amigurumi Pattern step 4 - final assembly and finishing

Switch Things Up

I love customizing this pattern by changing colors to match different seasons or themes β€” try deep reds and greens for a classic Christmas Nutcracker or pastel shades for a sweet, modern look.

I often experiment with yarn weight and hook size to create different scales: use bulky yarn and a larger hook for a chunky, decorative version or fine yarn and a smaller hook for a tiny collectible.

I like to swap the cupcake hat for other headwear β€” a crown, a beret, or a tiny Santa hat all work nicely and change the character completely.

I frequently add embroidery details or felt accessories for facial features instead of beads to make the toy toddler-safe and soft to the touch.

I sometimes replace the braid candy cane with a striped cord or a crocheted cane in one piece and reduce the number of small glued parts to make assembly easier for gifting.

I like to create a family of nutcrackers by changing hair styles, beard shapes and button arrangements so each one has a distinct personality.

I recommend trying metallic or variegated yarn for accent stripes and buttons for a special sparkle that catches light in a display.

I occasionally add poseable wire to the legs or arms for display options, or I make the base heavier with a stitched-in washer to help the Nutcracker stand better.

I also make matching mini accessories like small gifts, tiny candy boxes, or a mini drum to build a themed set for shelves or centerpieces.

I encourage you to experiment with stitch textures β€” try alternating post stitches in the torso or boots to add contrast and depth to the finished toy.

Common Mistakes & How to Fix Them

βœ— Skipping color-change points can make stripes look uneven; mark the exact stitch where you change color and carry or fasten off yarn neatly to keep edges tidy. βœ— Not stuffing as you go leads to lumps or flat areas; stuff gradually and firmly before closing each section to maintain a smooth shape. βœ— Forgetting to work the indicated back loops only will lose the cupcake base detail; pay attention to "on back loops" notes and use stitch markers to remember where to work BLO. βœ— Sewing parts without pinning can result in crooked placement; pin or baste pieces in place, check symmetry, then sew securely with small whipstitches and hide ends. βœ— Pulling stitches too tight during decreases can deform shaping; keep consistent tension and decrease gently while checking counts each round.

The Nutcracker Amigurumi Pattern

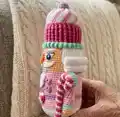
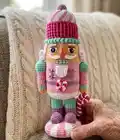
Make a charming pastel Nutcracker amigurumi with this complete pattern. You will crochet the body, arms, legs, cupcake hat, base and tiny accessories with step-by-step rounds and clear assembly notes. Perfect for gifting or seasonal decor, the finished doll is full of playful details like a beard, candy buckle and candy cane. Follow the instructions, gather your cotton yarn, stuffing and a 2.0mm hook to bring this sweet soldier to life.

Intermediate 12-15 Hours

Materials Needed for The Nutcracker Amigurumi Pattern

β€” Main Fabric

  • 01
    100% Cotton yarn (colors from picture or the ones you prefer) - assorted: nude (skin), pink, white, lilac, green, purple, small amounts of other accent colors (use amounts according to your project size)
  • 02
    Poly fill stuffing to stuff the doll and small parts
  • 03
    Felt fabric for eye details (small circles for pupils, eyelids)
  • 04
    Two mini white beads for eye highlights (optional)
  • 05
    Small amounts of black thread for teeth embroidery

β€” Tools Required

  • 01
    Crochet hook size 2.0mm (ergonomic hook of 2mm)
  • 02
    Scissors
  • 03
    Black thread for teeth embroidery
  • 04
    Embroidery needle
  • 05
    Glue to attach small parts (optional)
  • 06
    Yarn needle for sewing pieces together and weaving ends
  • 07
    Stitch markers to mark round starts or color-change points
  • 08
    Polyester stuffing (poly fil)
  • 09
    Small felt pieces for eyes
  • 10
    Small beads (optional)

Progress Tracker

0% Complete

β€” Body :

Round 1 :

6sc into magic ring (left 6)

Round 2 :

2 sc in each stitch (left 12)

Round 3 :

1 sc, 2 sc in next st (left 18)

Round 4 :

2 sc, 2 sc in next st (left 24)

Round 5 :

3 sc, 2 sc in next st (left 30)

Round 6 :

4 sc, 2 sc in next st (left 36)

Round 7 :

5 sc, 2 sc in next st (left 42)

Round 8 :

6 sc, 2 sc in next st (left 48)

Round 9 :

7 sc, 2 sc in next st (left 54)

Round 10 :

8 sc, 2 sc in next st (left 60)

Round 11 :

on back loops: 60 sc (left 60)

Round 12-21 :

60 sc (left 60)

Round 22 :

26 sc, change to white and 8 sc, change to nude and finish (left 60) change to Pink

Round 23 :

26 sc, change to white and 8 sc, change again to pink and finish (left 60)

Round 24-34 :

60 sc in pink (left 60) change to lilac

Round 35-36 :

60 sc in lilac (left 60) change to pink

Round 37-41 :

60 sc in Pink (left 60) change to White

Round 42-43 :

60 sc in White (left 60)

Round 44 :

on back loops 8 sc, 1 dec (left 54)

Round 45 :

7 sc, 1 dec (left 48)

Round 46 :

6 sc, 1 dec (left 42)

Round 47 :

5 sc, 1 dec (left 36)

Round 48 :

4 sc, 1 dec (left 30)

Round 49 :

3 sc, 1 dec (left 24)

Round 50 :

2 sc, 1 dec (left 18)

Round 51 :

1 sc, 1 dec (left 12) leave a long piece of yarn and close.

β€” Legs :

Info :

LEGS (MAKE 2) start with green

Round 1 :

6sc into magic ring (left 6)

Round 2 :

2sc in each stitch around (left 12)

Round 3 :

1 sc, 2 sc in next st (left 18)

Round 4 :

18 sc on back loops (left 18)

Round 5-9 :

18 sc (left 18) change to lilac

Round 10-16 :

18 sc (left 18) leave a long piece of yarn to sew

β€” Arms :

Round 1 :

6sc into magic ring (left 6)

Round 2 :

2 sc in each stitch (left 12)

Round 3 :

1 sc, 2 sc in next st (left 18)

Round 4 :

2 sc, 2 sc in next st (left 24)

Round 5-6 :

24 sc (left 24)

Round 7 :

2 sc, 1 dec (left 18)

Round 8 :

1 sc, 1 dec (left 12) change to Pink

Round 9-17 :

12 sc (left 12) change to green

Round 18-19 :

12 sc (left 12) change to nude

Round 18-20 :

12 sc (left 12)

Round 21 :

dec all row (left 6) hide the yarn with needle and cut it

β€” Green Base for Cupcake :

Info :

On back loops from top of the head, work 1 pop corn stitch (hdc), 1 hdc. See video.

β€” Buttons (MAKE 2) :

Item Name (P1) :

6 sc on magic ring, chain 13, "go up" with 1 chain and 6sc on chain 13. Finish with slip stitch and attach to body with glue.

β€” Cupcake Hat :

Item Name (P1) :

Cupcake base: Insert your hook in the last round of the head (just before the back loop round) and sc all round (like pictures). Dc all round. Work all rounds with the "front and back post" double crochet stitch (see video of how to). Leave a long piece of yarn to sew with glace.

Item Name (P2) :

Cupcake glace: Chain 15 (start with White). Chain 1 to go up, 1 dec, 13 sc and 1 inc on last stitch. Chain 1 to go up, on back loops: 1 inc, 13 sc and 1 dec (change to Pink). Chain 1 to go up, on front loops: 1 dec, 13 sc and 1 inc on last stitch. Chain 1 to go up, on back loops: 1 inc, 13 sc and 1 dec (change to white). Continue untill you have 10 white/10 pink , leave a long piece of yarn. Sew the last part with the first one (like a ring), leave a long piece of yarn to close the top. Sew the glace with the cupcake base (see picture). To close the top, use a needle to pass the yarn you left through all the colors (see picture). Tighten and close.

β€” Cherry for Cupcake :

Round 1 :

6sc into magic ring (left 6)

Round 2 :

2sc in each stitch around (left 12)

Round 3 :

1 sc, 2 sc in next st (left 18)

Round 4-5 :

18 sc (left 18)

Round 6 :

1 sc, 1 dec (left 12)

Round 7 :

Now stuff it and attach it with glue to the glace

β€” Feet (MAKE 2) :

Round 1 :

6sc into magic ring (left 6)

Round 2 :

Instead of continuing the round, "go up" with one chain and 2sc in each stitch (left 12)

Round 3-7 :

Chain 1 to "go up" and 12 sc (left 12) See pictures. You can sew the pieces to the boots or attach them with glue.

β€” Candy Buckle :

Round 1 :

Into magic ring, 8 sc (one pink, one White)

Round 2 :

2 sc in each stitch (Pink in Pink, White in White)

Round 3 :

In White 1sc, 1sc/ in Pink 2 sc in first stitch, 1 sc.

β€” Beard :

Round 1 :

Chain 7 and dc on each chain (left 7)

Round 2 :

7 dc (left 7)

Round 3 :

In chain nr.4, 7 dc and slip stitch in chain nr. 7

β€” Candy Cane :

Round 1 :

Using White, chain 25 and 3 sc in each stitch, curls will appear imediately

Round 2 :

Using Pink, chain 25 and 3 sc in each stitch, curls will appear imediately

Round 3 :

Braid both pieces to get the shape of the candy cane

β€” Hair-Wig :

Round 1 :

Chain 15 and hdc in each stitch, DO NOT CUT THE YARN

Round 2 :

Now chain 20 and hdc in each stitch repeat this 15 times

Round 3 :

For last "hair", chain 15 and hdc in each stitch. Attach the wig with glue

β€” The Face :

Item Name (P1) :

NOSE: Chain 5. On chain nr. 5, 2 chains and hdc on chains 4,3,2,1. Cut the thread and hide

Item Name (P2) :

EYES (MAKE 2): White part: Chain 3. On chain nr. 3, 4 chains and trc on chains 2 and 1. Cut the thread and hide, attach to the face with glue. Now cut two circles of felt fabric (as the pupils) and attach them too. I also used two mini White beads and attached them to the blue piece. Finally cut two more pieces of gray felt fabric to be the eyelids.

Item Name (P3) :

EYEBROWS: Chain 4 and cut the yarn, attach them with glue

Item Name (P4) :

MUSTACHE: Chain 8. Sc in the first 3 stitches and slip stitch on the rest

Item Name (P5) :

THEETH DETAILS: I embroidered the teeth so they look better (see picture)...

β€” Candy Base :

Round 1 :

7sc into magic ring (start with white)

Round 2 :

1 sc pink and 1sc white in same st, repeat all round (left 14)

Round 3 :

2 pink sc in pink st, 1 white sc in white st (left 21) Use white in white stitches, pink in pink st

Round 4 :

1 sc pink, 1 sc pink, 2 sc in white st (left 28)

Round 5 :

1 increase pink, 1 sc Pink, 1 sc White, 1 sc White

Round 6 :

1 Sc Pink, 1 sc Pink, 1 sc Pink, 1 sc White, increase White

Round 7 :

1 Sc Pink, 1 sc Pink, increase Pink, 1 sc White, 1 sc White, increase White

Round 8 :

1 Sc Pink, inc pink, 1 sc Pink, 1 sc Pink, 1 sc White in next 4 stitches

Round 9 :

1 Sc Pink in next 5 st, 1 sc White, inc White, 1 sc White, 1 sc White

Round 10 :

1 Sc Pink in next 3 st, inc Pink, 1 sc Pink, 1 sc White in next 3 st, inc White, 1 sc White

Round 11 :

1 Sc Pink in next 4 st, inc Pink, 1 sc Pink, 1 sc White in next 6 st

Round 12 :

On back loops: 1 sc Pink in next 7 st, 1 sc White in next 6 st

Round 13-14 :

1 sc Pink in next 7 st, 1 sc White in next 6 st

Round 15 :

On back loops: 1 Sc Pink in next 5 st, dec Pink, 1 sc White in next 6 st

Round 16 :

1 Sc Pink in next 3 st, dec Pink, 1 sc Pink, 1 sc White in next 3 st, dec White, 1 sc White

Round 17 :

1sc Pink in next 5 st, 1 sc White in next 2 st, dec White, 1sc White

Round 18 :

1sc Pink in next 2 st, dec Pink, 1 sc Pink, 1 sc White in next 4 st

Round 19 :

1sc Pink in next 2 st, dec Pink,1 sc White in next 2 st, dec White

Round 20 :

1sc Pink in next 3 st, 1 sc White, dec White

Round 21 :

dec Pink, 1 sc Pink, 1 sc White, 1 sc White

Round 22 :

1sc Pink in next 2 st, dec White

Round 23 :

dec Pink,1 sc White and close

Info :

Front and back details: (see pictures)

Assembly Instructions

  • Knit all parts following instructions, stuff and sew according to pictures; the body is made as one piece and color changes are worked during construction.
  • Sew the arms in place after stuffing them, then sew the legs and attach the feet to the candy base using blue yarn or by sewing if you prefer; glue may be used for additional security.
  • Attach the cupcake hat to the top of the head, glue the wig into place and then add facial details (eyes, beard, mustache, teeth embroidery) as described in the face section.
  • Glue or sew small accessories (buttons, beard, cherry, candy buckle and candy cane) to the body as shown in photographs, using small stitches or fabric glue for felt pieces.
  • Pin pieces in place to check symmetry before final sewing, and weave in yarn ends neatly after assembly for a clean finish.

Important Notes

  • πŸ’‘Work on a 2.0mm hook with 100% cotton yarn to achieve the gauge and tight stitches needed for small details and stuffing.
  • πŸ’‘Use stitch markers to mark the beginning of rounds and important color-change points for consistency and easier counting.
  • πŸ’‘Stuff pieces firmly but gradually; overstuffing can distort shape while under-stuffing causes floppy parts.
  • πŸ’‘Pin and check placement before sewing pieces permanently and use glue sparingly for small felt or bead details to secure them.
  • πŸ’‘Hide and weave tails with a yarn needle after finishing each section to keep the toy tidy and make sewing easier.

This pastel Nutcracker pattern brings a playful candy-themed character to life with clear step-by-step rounds and charming accessories. It includes the cupcake hat, braided candy cane, beard and tiny felt-and-bead eyes for personality. Make one as a unique gift or seasonal decoration and enjoy every sweet stitch! 🧢✨

You ask,

we answer.

FAQs

What size will the finished piece be?

The finished Nutcracker size will vary with yarn and tension, but using 100% cotton yarn and a 2.0mm hook produces a tall, detailed amigurumi about 30-35 cm (estimate) depending on how you assemble accessories.

Can I use different yarn weights for this pattern?

Yes, you can use different yarn weights but the final size and stitch counts will change; choose an appropriate hook size for the yarn weight and expect larger or smaller finished measurements.

Do I need prior crochet experience for this pattern?

This pattern is rated intermediate and uses standard amigurumi stitches plus front/back post double crochet and small accessories, so basic crochet experience and familiarity with working in rounds is recommended.

How long does this project typically take to complete?

Most crocheters complete this multi-piece Nutcracker in approximately 12-15 hours, although time will vary by skill level, yarn choice and how many details you add.