Make your own cuddly Samantha the Sloth with this step-by-step crochet pattern designed for beginners. You will work in spiral rounds using plush Parfait Chunky yarn to create a soft, poseable sloth with charming eye patches and little hair tuft. Clear stitch counts and helpful tips are included so you can follow along and create a beautiful handmade gift or decor piece.
Progress Tracker
0% Complete
— Tips & Techniques :
Info :
Work in a spiral, magic ring, chain, slip stitch, single crochet stitch, half double crochet stitch, double crochet stitch, increasing and decreasing. Use the Yarn Under technique for this pattern. Use a stitch marker to mark the beginning of a round and move it after completing each round.
Info :
YARN UNDER: 1. Insert the hook in the next stitch. 2. Yarn under the hook and pull through. 3. Complete a single crochet stitch as usual. Yarn over and draw through all loops.
Info :
INVISIBLE DECREASE: 1. Insert the hook under the front loop of the first single crochet stitch. Do not yarn over. 2. Insert the hook under the front loop of the second stitch and pick it up onto the hook. 3. Yarn over and draw through the first two loops. Yarn over and draw through all loops.
Info :
CLOSING AN OPENING (using a crochet hook): 1. Insert the crochet hook from the inside going out through the next front loop only and pull the yarn through. 2. Repeat in each front loop around the opening. 3. Pull tight and hide the yarn tail (with a yarn needle or a crochet hook).
— Head :
Info :
You will be working around the foundation chain for the face. Start with Cream yarn.
Round 1 :
ch 10, inc in the 2nd ch from the hook, sc 7, sc 4 in the last ch. Working on the other side of the ch: sc 7, inc. (22)
Round 2 :
inc x2, sc 7, inc x4, sc 7, inc x2 (30)
Round 3 :
(sc 4, inc) x6 (36)
Round 4 :
sc 2, inc (sc 5, inc) x5, sc 3 (42)
Round 5 :
sc 6, inc, sc 3 | *change for main color: sc 2 | *go back to cream color: sc, inc, (sc 6, inc) x4 (48)
Round 6 :
sc 3, inc, sc 5 | *main color: sc 2, inc, sc 3 | *cream color: sc 4, (inc, sc 7) x3, inc, sc 4 (54)
Info :
Cut the cream yarn and continue with main color (do not worry about the color change, it will be hidden by the eye patch!).
Round 7 :
(sc 8, inc) x6 (60)
Round 8 :
sc 4, inc, (sc 9, inc) x5, sc 5 (66)
Round 9-20 :
sc around (12 rounds total) (66)
Round 21 :
sc 4, dec, (sc 9, dec) x5, sc 5 (60)
Round 22 :
(sc 8, dec) x6 (54)
Round 23 :
sc 3, dec, (sc 7, dec) x5, sc 4 (48)
Round 24 :
(sc 6, dec) x6 (42)
Round 25 :
sc 2, dec, (sc 5, dec) x5, sc 3 (36)
Round 26 :
(sc 4, dec) x6 (30)
Info :
Start stuffing and continue as you go.
Round 27 :
sc, dec, (sc 3, dec) x5, sc 2 (24)
Round 28 :
(sc 2, dec) x6 (18)
Round 29 :
(dec, sc) x6 (12)
Info :
Finish stuffing. Do not close the opening just yet and continue to the Eye Patch section.
— Eye Patch (x2) :
Info :
You will be working around the foundation chain for the face. With the darker color.
Round 1 :
Ch 9, starting in the 3rd ch from the hook: dc-inc, dc-inc, dc, hdc 3, sc 4 in the last ch. Working on the other side of the ch: sc 4, hdc, hdc-inc. (19)
Round 2 :
dc-inc, hdc-inc, hdc 4, sc, sl st 3 (end of the round here) (12)
Info :
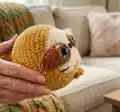
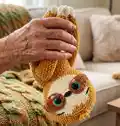
Images 1-2: Place one eye patch with the right side of the stitches facing and the other eye patch with the wrong side facing. Insert the eyes into the last chain (where you made 4 sc) and secure them.
Info :
Images 2-5: Embroider the cheeks under the eyes with pink yarn. Tie a knot to secure it. Images 6-9: Embroider a white line to the outer side of the eyes. Tie a knot to secure it.
Info :
*Every time that you will have to insert the needle, do it by the opening at the back of the head. Once the embroidery is done, bring the needle back through the opening and tie 2 knots.
Info :
Face shaping (with a strand of worsted weight yarn of a similar color) *only if you are using safety eyes, skip this step if you are embroidering the eyes or using felt eyes*: Insert the needle and bring it out between rounds 1-2 on one side. Insert the needle one st to the side and repeat on the other side of the face. Bring the needle at the back, pull on the strands and tie 2-3 knots to deepen the sts.
Info :
Embroider the nose with Parfait Chunky yarn in dark grey or black: Insert two sewing pins in the middle of round 1 to mark the sides of the nose. Insert the needle and push it out through one pin. Insert the needle through the other pin et push it out through the first point. Repeat about 3-5 times or until you are happy with the look of it. Bring the needle at the back.
Info :
Sew the eye patches to the face: The inner part as close as possible to the nose and the outer part between rounds 9-10 (do not forget to hide the color change). Sew in place securely. Embroider eyebrows slightly above the eye patch between rounds 5-6 and 6-7 as instructed. Add hair strands: insert your hook between rounds 8-9 and add 3 strands of about 6'' (15cm) each. Repeat and trim to stay upright.
— Body :
Round 3 :
(sc, inc) x8 (24)
Round 4 :
(sc 3, inc) x6 (30)
Round 5 :
sc, inc, (sc 4, inc) x5, sc 3 (36)
Round 6 :
(sc 5, inc) x6 (42)
Round 7 :
sc 2, inc, (sc 6, inc) x5, sc 4 (48)
Round 8-16 :
sc around (9 rounds total) (48)
Round 17 :
sc 2, dec, (sc 6, dec) x5, sc 4 (42)
Round 18 :
(sc 5, dec) x6 (36)
Info :
Stuff the body and make an invisible fasten off (see 'Tips' section). Sew the body to the head.
— Arms (x2) :
Info :
Read the tip at the bottom of the page. With main color.
Round 2 :
(inc, sc) x3 (9)
Round 3 :
(sc 2, inc) x3 (12)
Round 4-5 :
sc around (2 rounds) (12)
Round 6 :
(sc 3, inc) x3 (15)
Round 7-30 :
sc around (15)
Round 31 :
(sc 3, dec) x3 (12)
Info :
Do not cut the yarn for now and make the fingers (version A). You can make the arms as long as you want by adding or removing rounds of 15 stitches. Lightly stuff as you go.
— Add the fingers (with cream yarn) :
Info :
Make sure that the last st of the arm is on one side, not in the middle. Insert your hook between rounds 4-5 and join cream yarn. Ch 6, starting in the 2nd ch from the hook: sl st 5 (first finger). Sl st in the next st of the arm. Repeat to make 2 more fingers. Cut the yarn and leave a yarn tail about 6'' (15 cm).
Info :
To attach fingers: Using the yarn tail, insert the needle through the last st and push it out through the middle of the magic ring. Insert the needle at the tip of one outer finger, then at the tip of the outer finger and finally at the tip of the middle finger. Insert the needle through the middle of the magic ring and push it out in the arm. Bring the other yarn tail through the same st, tie 2 knots and hide the yarn tails.
Info :
Stuff the arm if needed and close the opening by making 6 sc through both sides (see 'Tips' section). Sew the first arm to the body in line with the eye closer to the back; the top of the arm should be 1 round lower than the neck. If you want the arms to stay straight when you lift the sloth, sew following the dotted line in reference photo.
— Legs (x2) :
Info :
Possible to make Version A or B. With main color.
Round 3 :
(sc 3, inc) x3 (15)
Round 4-5 :
sc around (2 rounds) (15)
Round 6 :
(sc 4, inc) x3 (18)
Round 7-26 :
sc around (18)
Round 27 :
(sc 4, dec) x3 (15)
Info :
Do not cut the yarn for now and make the fingers (for Version A). Stuff the leg and close the opening with 7 sc. Sew the first leg 1 round lower than the arm. Sew the other arm and leg to the back of the body, in line with the back of the head. Optional: sew pieces of Velcro to the tip of the limbs or sew the limbs together.
— Assembly & Finishing :
Info :
Sew the eye patches to the face: the inner part as close as possible to the nose and the outer part between rounds 9-10. Hide color changes under the eye patch. Secure the eyes with about 1 st of space from the eye border. Embroider cheeks and white eye highlights as shown. Add hair strands between rounds 8-9 and trim short.
Info :
Sew the head to the body by inserting the neck portion into the opening at the top of the body and whipstitch securely. Position arms on either side of the body between rounds indicated in photos and sew at slight angle. Attach legs to the bottom of the body spaced evenly for stability.
Info :
For eyebrows: push the needle out between rounds 5-6, slightly above the eye patch. Insert the needle between rounds 6-7 or 7-8 for the other eyebrow as shown in images. Close the opening at the back of the head using the 'Closing an Opening' tip.
Info :
Optional finishing: add extra hair by inserting two or three short strands; tie off and trim. Weave in all ends and hide tails inside the body. Final adjustments: shape face by adding a few stitches to deepen features as needed.
This adorable Samantha the Sloth amigurumi pattern is a joyful project that makes a perfect handmade gift or cozy decoration. The pattern uses plush Parfait Chunky yarn for a super-soft finish and includes full instructions for the head, body, limbs and facial details. Follow the step-by-step rounds, tips and photos to create your own snuggly companion. 🧶😊✨