🧶 Beautiful ✨ Detailed 💝 Adorable

The Little Sheep Amigurumi Pattern

The Little Sheep Amigurumi Pattern
4.2★ Rating
2-3 Hours Time Needed
2.4K Made This
✂️

Intermediate Level

Ideal for those with basic crochet experience, featuring slightly more advanced stitches and techniques to expand your skills.

⏱️

Bite-Sized Project

Finishes in 2-4 hours—perfect for an afternoon of creative relaxation.

🧸

Cute Companion

An adorable friend to cherish, handcrafted with love to bring comfort and joy for years to come.

About This The Little Sheep Amigurumi Pattern

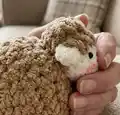
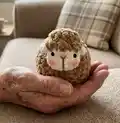
This pattern teaches you how to crochet a small, textured sheep using chunky velvet-style yarn and bobble stitches. It includes clear round-by-round instructions for the body and head, plus finishing steps for eyes, nose embroidery and blush. The finished toy is compact and full of character—great for gifts or shelf decor.

The Little Sheep Amigurumi Pattern crochet pattern - detailed view of completed project

Worked in two main parts (body and head) and joined together, this pattern uses basic increases, decreases and bobble stitch techniques. Helpful photos and video links are included to guide you through the trickier parts.

Why You'll Love This The Little Sheep Amigurumi Pattern

I absolutely love this pattern because it turns simple stitches into a delightful textured toy that feels special to hold. I enjoy the bobble stitch texture which gives the sheep its fluffy personality while keeping construction compact. I also love that it is quick to make—perfect for finishing in an afternoon and giving as a heartfelt gift. The pattern encourages experimenting with yarn color and tiny details, and I find the finishing touches like embroidered noses and blush bring each sheep to life.

The Little Sheep Amigurumi Pattern step 1 - construction progress The Little Sheep Amigurumi Pattern step 2 - assembly progress The Little Sheep Amigurumi Pattern step 3 - details and accessories The Little Sheep Amigurumi Pattern step 4 - final assembly and finishing

Switch Things Up

I love how easy it is to customize this little sheep—try pastel shades for a soft nursery collection or bold colors for a playful look.

Want a larger toy? Use a thicker yarn and a larger hook; for a tiny keychain version, use finer yarn and a smaller hook.

I often swap the bobble stitch for small pom-pom trims to create an exaggerated fluffy effect for holiday gifts.

Experiment with eye styles: safety eyes create a polished finish, while French knot eyes or embroidered eyes give a softer, toy-safe option.

Add wire to the legs if you want posable limbs, or stuff firmer at the bottom for better stability as a shelf sitter.

Try mixing yarn textures—velvet body with cotton face—so the face details stand out and the body remains super squishy.

I sometimes make matching little scarves or hats for seasonal variations; these accessories personalize each sheep instantly.

For baby-safe gifts, embroider all features and skip safety eyes; use felt or embroidered cheeks instead of powder blush.

Create a family set by changing yarn hues and eye placement to give each sheep a unique personality within a flock.

Don't be afraid to tweak placement of the nose and eyes; small shifts in position dramatically change the expression and charm of your finished sheep.

Common Mistakes & How to Fix Them

✗ Skipping stitch markers during rounds can make it hard to track the beginning of each round; use a stitch marker at the first stitch of every round to avoid losing your place. ✗ Not stuffing progressively can cause lumps or uneven shape in the body; stuff your piece gradually while shaping and add small amounts of fiberfill at a time for a smooth finish. ✗ Pulling your tension too tight when using chunky velvet yarn may result in very small, rigid stitches; practice maintaining a relaxed, consistent tension so the plush texture remains soft and flexible. ✗ Skipping the invisible decrease technique may leave visible holes at the decrease points; use invisible decreases for cleaner shaping and neater finish around tapered areas. ✗ Forgetting to count stitches after increases or decreases often leads to incorrect stitch counts and misshapen parts; recount at the end of each round, especially when doing pattern repeats or complex rounds.

The Little Sheep Amigurumi Pattern

Make a tiny, squishy sheep amigurumi with this friendly pattern. You will enjoy textured bobble stitches and simple shaping to create a cuddly little companion. Clear step-by-step rounds and photos guide you through every stitch so you can finish a charming toy quickly. Perfect for gifting or decorating a nursery.

Intermediate 2-3 Hours

Materials Needed for The Little Sheep Amigurumi Pattern

— Main Fabric

  • 01
    Chunky velvet-style yarn (suitable for 4-5mm hook) e.g. Himalaya Velvet or Himalaya Dolphin Baby - main color approx 50-100g
  • 02
    Cream yarn (contrast for face/head detail) - small amount (approx 10-20g)
  • 03
    White yarn for body details (if using two-tone) - small amount (approx 10-20g)
  • 04
    Toy stuffing (polyester fiberfill) - small amount to firmly stuff 1 toy

— Tools Required

  • 01
    Crochet hook size 4mm
  • 02
    4.5mm toy safety eyes
  • 03
    Needle for sewing
  • 04
    Stitch marker
  • 05
    Scissors
  • 06
    Yarn needle for weaving and assembly
  • 07
    Powder blush (for cheek coloring, optional)

Progress Tracker

0% Complete

— Body :

Info :

Start in white yarn. (Note: Use cream yarn in pink word, white yarn in black word)

Rnd 1 :

8sc in MR [8]

Rnd 2 :

8inc [16]

Rnd 3 :

(sc, inc) x 8 [24]

Rnd 4 :

(3sc, inc) x 6 [30]

Rnd 5 :

11sc9, bo4, 4sc9, bo4, 13 sc [30]

Rnd 6 - 9 :

(4 rounds): 30sc [30]

Rnd 10 :

11sc, bo4, 4sc, bo4, 13 sc [30]

Rnd 11 :

(3sc, dec) x 6 [24]

Rnd 12 :

(sc, dec) x 8 [16]

Info :

Stuff the body firmly with fiberfill.

Rnd 13 :

8dec [8]

Info :

Fasten off, leaving the yarn tail. Using the yarn needle, weave the yarn tail through the front loop of each remaining stitch and pull it tight to close.

Info :

~ How to weave in the yarn end on a stuffed piece: https://youtu.be/amYifc37uSs

— Head :

Info :

Start in cream yarn. Ch 4. Stitches are worked in both sides of the foundation chain.

Rnd 1 :

Skip the first ch on the hook, inc in next ch, sc in next ch, 4sc in next ch. Continue on the other side of the foundation chain, sc in next ch, inc in next ch [10]

Rnd 2 :

2inc, sc, 4inc, sc, 2inc [18]

Rnd 3 :

18sc [18]

Rnd 4 :

(ch 4 , skip 3 ch from the hook, slst in next ch), sc in next st of the base, dec9, (sc9, dec) x 2, (ch 4, skip 3 ch from the hook, slst in next ch), sc in next st of the base, dec, (sc9, dec) x 2 [12]

Info :

Change to white yarn.

Rnd 5 :

(sc, bo2) x 6 [12]

Info :

Stuff the head firmly with fiberfill.

Rnd 6 :

6dc-dec [6]

Info :

Fasten off, leaving the yarn tail. Using the yarn needle, weave the yarn tail through the front loop of each remaining stitch and pull it tight to close.

— Assembly :

Info :

Insert the 4.5mm safety eyes between rounds 3 and 4, 4 stitches apart.

Info :

Embroider the nose with brown threads.

Info :

Sew the head to the body.

Info :

Use powder blush for the cheeks.

Info :

Video tutorials: ~ How to crochet the sheep's head (from rnd 4 to 6): https://youtu.be/85tKbY9tJMk ~ How to embroider the sheep's face: https://youtu.be/_t3-pnZa54M ~ How to sew the head to the body: https://youtu.be/LIMfpMLDcvU

Assembly Instructions

  • Insert the 4.5mm safety eyes between rounds 3 and 4 of the head, spacing them 4 stitches apart before embroidering the nose and closing the head.
  • Embroider the nose with brown thread centered on the face, then add gentle powder blush to the cheeks for a soft, realistic finish.
  • Sew the head to the top of the body using the long yarn tail and a yarn needle, matching stitch edges and securing with small whipstitches so the head sits centered.
  • Weave the yarn tail through the front loop of each remaining stitch at the openings, pull tight to close, and weave the end securely into the inside of the toy.
  • Pin eyes, ears and facial features into place before final sewing to check symmetry and make adjustments for the best expression.

Important Notes

  • 💡Make the invisible decrease stitches to have a better results.
  • 💡Add toy stuffing according to instruction of each part and stuff gradually to avoid lumps.
  • 💡Stitches should be close together so that when the finished toy is stuffed, the stuffing doesn't come out through gaps in the stitches.
  • 💡The pattern includes color change techniques, bobble stitch technique and the X stitch technique for single crochet stitch; practice these to ensure the finished product resembles the pattern.
  • 💡Finished size: the finished toy is approximately 7cm (~ 2.75 inch) high.

This little sheep is designed to be quick, charming and irresistibly squishy—perfect for gifting or keeping on your shelf. Create a whole flock in different colors and textures to decorate a nursery or give as heartfelt handmade presents. Happy crocheting and enjoy making each sheep uniquely yours! 🧶🐑

You ask,

we answer.

FAQs

What size will the finished piece be?

The finished toy is approximately 7cm (~2.75 inches) high when using recommended chunky velvet yarn and a 4mm hook.

Can I use different yarn weights for this pattern?

Yes, you can use different yarn weights, but the final size and texture will change; if you choose another weight, adjust your hook size accordingly and expect a different finished size.

Do I need prior crochet experience for this pattern?

This pattern is rated intermediate due to bobble stitches, color changes and shaping; basic knowledge of single crochet, increases and decreases is recommended.

How long does this project typically take to complete?

Most crocheters complete this project in 2-3 hours, though time may vary depending on experience and how much time you spend on finishing touches.