🧢 Beautiful ✨ Detailed πŸ’ Adorable

The Camera Crochet Bag & Purse Pattern

The Camera Crochet Bag & Purse Pattern
4.5β˜… Rating
5-7 Hours Time Needed
3.7K Made This
βœ‚οΈ

Intermediate Level

Ideal for those with basic crochet experience, featuring slightly more advanced stitches and techniques to expand your skills.

⏱️

Weekend Treat

Takes 5-7 hours, making it an enjoyable project to finish over a couple of days.

✨

Stylish Touch

An elegant detail to elevate any look, combining traditional techniques with contemporary design sensibilities.

About This The Camera Crochet Bag & Purse Pattern

This pattern creates a charming camera-shaped crochet bag with a detachable-looking lens, a fold-over cover and a comfortable strap. It uses DK/light worsted yarn and a small hook to produce a neat dense fabric suitable for a bag. The design includes felt viewfinder pieces and a wood button for realistic camera styling. Clear row-by-row instructions guide you through the base chain, rounds and assembly steps.

The Camera Crochet Bag & Purse Pattern crochet pattern - detailed view of completed project

Includes full instructions for the bag body, cover, strap, two-part lens and felt viewfinder pieces. Suitable for intermediate crocheters familiar with single crochet, increases, slip stitch and sewing pieces together.

Why You'll Love This The Camera Crochet Bag & Purse Pattern

I absolutely love this pattern because it turns a simple boxy bag into a playful camera-shaped accessory with minimal fuss. I enjoy how the layered lens and felt details give it personality while staying quick to make. I like that the construction uses mainly single crochet so the fabric is sturdy and perfect for everyday use. I also appreciate the flexibility β€” you can change colors, add a lining or swap the closure to suit your style.

The Camera Crochet Bag & Purse Pattern step 1 - construction progress The Camera Crochet Bag & Purse Pattern step 2 - assembly progress The Camera Crochet Bag & Purse Pattern step 3 - details and accessories The Camera Crochet Bag & Purse Pattern step 4 - final assembly and finishing

Switch Things Up

I love how adaptable this camera bag pattern is β€” you can swap Color A and Color B for a completely different look in minutes.

I often make a version with a pop of bright color for the lens and a neutral body to make the details pop.

To make the bag bigger, I change yarn weight and hook size; using a chunkier yarn with a larger hook creates a cozy oversized bag.

If I want a more structured bag, I add a fabric lining with interfacing and stitch it in before attaching the zipper for a professional finish.

I like to experiment with different strap widths β€” try sc 3 for a slim strap or sc 5 for a chunkier, more comfortable shoulder strap.

For a removable strap option, I sometimes add metal D-rings and swivel hooks so the strap can be detached for washing or switching styles.

I also customize the viewfinder by cutting felt in different shapes or embroidery patterns to add personality and texture.

Adding a leather or faux-leather strap gives the bag a mixed-material look that is both modern and durable.

I recommend playing with closure options: a zipper for security, magnetic snaps for ease, or a decorative button and loop for vintage charm.

Finally, I sometimes make matching accessories β€” a coin pouch or phone sleeve in the same colors β€” to create a gift set or coordinated look.

Common Mistakes & How to Fix Them

βœ— Skipping the base chain stitch count will distort the bag shape; always count your starting chains and make sure you have the correct 35 chains before continuing. βœ— Not turning the base properly when working around both sides will create uneven edges; after working the first side, turn the piece and continue along the opposite side as instructed to keep the base symmetrical. βœ— Failing to change colors cleanly at the start of round 22 can leave loose floats; fasten off and rejoin neatly or carry yarn inside and trap ends to keep the edge tidy. βœ— Using a yarn that is too soft or an oversized hook makes the bag floppy and unstable; use the recommended 3.75-4.5 mm hook and DK/light worsted yarn for a firmer fabric. βœ— Forgetting to leave long yarn tails for sewing the lenses and cover causes difficulty during assembly; leave the ~30 cm and ~50 cm tails where specified to make sewing easy.

The Camera Crochet Bag & Purse Pattern

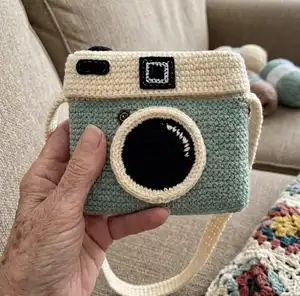
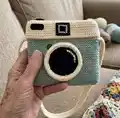
Create a stylish crochet camera bag and purse that fits your phone and small essentials. This pattern combines simple single crochet construction with fun details like a layered lens and felt viewfinder for a polished finish. You will make a main bag body, cover, strap and two-part lens, then assemble with a zipper or magnetic snap. Perfect for gifting or adding a unique handmade accessory to your wardrobe.

Intermediate 5-7 Hours

Materials Needed for The Camera Crochet Bag & Purse Pattern

β€” Main Fabric

  • 01
    100% acrylic DK / Light Worsted yarn (main weight)
  • 02
    Color A: approx. 80 g (main body color)
  • 03
    Color B: approx. 60 g (cover/trim color)
  • 04
    Black yarn: approx. 20 g (lens and details)
  • 05
    Felt: Black and White for viewfinder pieces (see felt measurements)

β€” Tools Required

  • 01
    Crochet hook 3.75 - 4.5 mm (US F-5, G-6, 7)
  • 02
    Black plastic zipper ~9 inch (or magnetic snaps to sew on)
  • 03
    Wood button ~15 - 20 mm
  • 04
    Embroidery thread (black and white)
  • 05
    Yarn needle for sewing pieces
  • 06
    Embroidery needle
  • 07
    Scissors
  • 08
    Stitch markers (optional)

Progress Tracker

0% Complete

β€” Bag :

Info :

Color A, Start from base, Base chain - sl knot, chain 35. (35)

Round 1 :

sc 2 into 2nd chain from hook, sc each ch on next 32 sts, sc 3 on next ch (the first ch of the base chain). Turn sideways and continue along another side of the base chain, sc each ch on next 33 sts, slst to the ch st at the beginning round. (70)

Round 2 :

ch 1, [*sc on next st, sc 2 on next st, sc each on next 32 sts, sc 2 on next st,] * 2 times, slst, then sl st(slip stitch) around, slst to the sc st at the beginning round. (74)

Rounds 3-21 :

ch1, sc around ,slst, then slst around, slst to the sc st at the beginning round. (74)

Round 22 :

Color B, blsc around , slst. (74)

Rounds 23-24 :

ch1, sc around , slst. (74)

Info :

Fasten off, weave the yarn end.

β€” Camera Lens #1 :

Round 1 :

Black, 9 sc in Magic Ring, slst. (9)

Round 2 :

ch 1, (inc) *9 times, slst. (18)

Round 3 :

ch 1, (sc 1, inc) *9 times, slst. (27)

Round 4 :

ch 1, (sc 2, inc) *9 times, slst. (36)

Round 5 :

ch 1, Black (sc 3, inc) *2 times, White (sc 3, inc) *2 times, Black (sc 3, inc) *5 times, slst. (45)

Round 6 :

ch 1, (sc 4, inc) *9 times, slst. (54)

Round 7 :

White, ch 1, sc around, slst. (54)

Info :

Fasten off, weave the yarn end. Leave the back yarn ~30cm.

β€” Camera Lens #2 :

Info :

White, Start from chains 54, slst to close circle. (54)

Round 1 :

ch 1, sc around, slst. (54)

Info :

Fasten off, leave the yarn ~30 cm. Sew to the lens #1.

β€” Strap :

Info :

Color B, sl knot, chain 4. (leave the yarn ~25-30 cm.)

Row 1 :

sc into 2nd chain from hook, sc each ch on next 2 sts, turn. (3)

Rows 2-200 :

Ch1, sc across, turn. (3)

Info :

Fasten off, leave the yarn ~25-30 cm. You can adjust the wide strap from sc 3 - sc 5. The length also you can adjust the row form your body.

β€” Cover :

Info :

Color B, Start from base, Base chain - sl knot, chain 35. (35)

Round 1 :

sc 2 into 2nd chain from hook, sc each ch on next 32 sts, sc 3 on next ch (the first ch of the base chain). Turn sideways and continue along another side of the base chain, sc each ch on next 33 sts, slst to the ch st at the beginning round. (70)

Round 2 :

ch 1, [*sc on next st, sc 2 on next st, sc each on next 32 sts, sc 2 on next st,] * 2 times, slst, then sl st(slip stitch) around, slst to the sc st at the beginning round. (74)

Rounds 3-8 :

ch1, sc around ,slst, then slst around, slst to the sc st at the beginning round. (74)

Info :

Fasten off, leave the yarn ~50 cm. Sew to the bag.

Assembly Instructions

  • Start assembly by aligning the finished bag body (Color A) with the cover: place the cover over the top opening and pin in place before sewing so edges match evenly.
  • Sew the cover to the top edge of the bag using the long yarn tail (~50 cm) left from the cover; use whipstitch or invisible mattress stitch and secure with tidy knots.
  • Sew the viewfinder felt pieces onto the center of the cover: position the layered felt squares (01,02,03,04) in the middle and stitch around the edges with embroidery thread for a stitched look.
  • Attach the zipper or magnetic snaps: sew the black plastic zipper (or sew on magnetic snaps) to the inside edge of the cover and the bag opening, ensuring alignment before final stitching.
  • Position and sew the two-part lens: place Lens #2 onto Lens #1 and sew them together using the ~30 cm tail, then mark the lens position on the bag front and sew the lens securely in place.
  • Attach the strap ends to the left and right sides of the bag: fold strap ends under, pin in position and sew several passes to secure for strength and even placement.
  • Final finishing: sew the wood button into the left lens position, weave in all yarn ends, trim threads and check all seams for secure stitching.

Important Notes

  • πŸ’‘Use the specified hook size and DK/light worsted yarn to achieve the recommended gauge and a firm bag fabric.
  • πŸ’‘Count stitches carefully on the base chain and first rounds to ensure the sides match when you turn and work along the opposite side of the chain.
  • πŸ’‘Leave long yarn tails where noted (~30 cm for lenses, ~50 cm for cover) to make sewing pieces together easier and neater.
  • πŸ’‘Pin parts in place before sewing β€” especially the cover, lens and strap β€” to ensure correct alignment and symmetry during assembly.

This camera bag pattern is a playful and practical accessory that adds handmade charm to your wardrobe. It combines neat single crochet fabric with layered lens details and felt accents for a finished look you will love. Make it in contrasting colors or muted tones to match your style, then gift it to a friend or keep for yourself. πŸ§ΆπŸ“Έ

You ask,

we answer.

FAQs

What size will the finished piece be?

The finished bag measures approximately 21 cm wide x 21 cm high (8 in x 8 in) using the recommended yarn and hook size.

Can I use a different yarn weight for this pattern?

Yes, you can use different yarn weights but the final size and fabric stiffness will change. Use an appropriately sized hook and consider adding a lining if using softer yarns.

Do I need prior crochet experience for this pattern?

This pattern is rated intermediate and assumes you are comfortable with single crochet, increases, slip stitches and basic seaming techniques.

How long does this project typically take to complete?

Most crocheters finish this bag in about 5-7 hours, depending on experience, assembly time and any customizations.