About This Christmas Hoop Embroidery Pattern
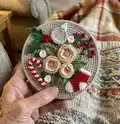
This pattern creates a seasonal Christmas hoop embroidery with holly leaves, woven wheel flowers, a candy cane, a bauble and a stocking. It combines basic embroidery stitches like satin stitch, backstitch, chain stitch, fishbone and woven wheel so you can make a textured, professional-looking piece. The PDF includes a printable transfer pattern and a clear color guide with DMC thread references for easy stitching.
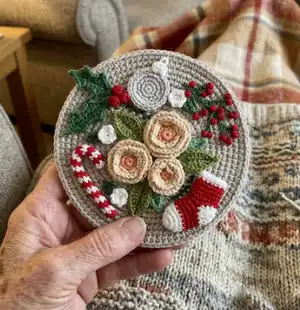
Designed for beginners and all levels, the instructions are visual and descriptive for each stitch used. The project finishes nicely in a 15 cm hoop and makes a lovely holiday decoration or gift.
Why You'll Love This Christmas Hoop Embroidery Pattern
I absolutely love this pattern because it brings together simple stitches into a charming seasonal composition that looks far more detailed than it is. I enjoy how the woven wheel flowers add instant texture and personality to the design. I love that it uses familiar stitches so you can practice new techniques while producing a finished decoration. I feel proud seeing the piece framed in the hoop, and I think youll love gifting it or using it as a holiday accent.
Switch Things Up
I love customizing this design by changing the color palette; try pale pastels for a soft winter look or jewel tones for a rich, festive piece.
I sometimes swap the 15 cm hoop for a smaller or larger hoop to create ornaments or statement pieces; adjust the pattern scale when resizing.
I often add beads or sequins to the bauble or berries to give them sparkle and dimension; small seed beads work well when sewn on after stitching.
I recommend trying metallic or variegated threads for accent stitches like backstitch stems or satin stitch highlights to make your embroidery pop.
I like to vary the flower centers by combining woven wheel stitches and a small French knot cluster to experiment with texture.
I sometimes mix linen and cotton fabrics to change the overall drape and look—linen gives a more rustic feel while cotton canvas looks smooth and modern.
I also create a set of matching ornaments by reducing the pattern and using thinner floss for tiny versions suitable for tree hangers.
I often embroider only selected motifs (holly and candy cane, for example) to make smaller projects or gift tags without completing the full composition.
I encourage you to experiment with different finishing techniques: frame under glass, back with printed felt, or sew into a small pillow to make your work functional.
I usually document my color choices and stitch order so I can reproduce or vary the design easily for gifts or seasonal sets.
Common Mistakes & How to Fix Them
✗ Not transferring the pattern accurately can lead to misplaced motifs; use carbon paper, a window transfer method, or carefully trace the printable pattern to ensure the design sits correctly in your hoop.
✗ Pulling satin stitches too tight will pucker the fabric and distort shapes; keep tension even and allow stitches to sit flat without pulling the fabric together.
✗ Skipping stitch-order planning causes crowded areas and awkward overlaps; plan which elements to stitch first (typically large filled areas then small details) and work from center outward when possible.
✗ Using too many floss strands or inconsistent thread thickness changes the texture unexpectedly; use the recommended DMC thread count and keep strands consistent throughout the project.
✗ Neglecting to secure thread ends properly will cause knots to come undone later; always weave ends to the back and secure them with small stitches or knots hidden in the backing.