🧢 Beautiful ✨ Detailed πŸ’ Adorable

The Bowling Llama Amigurumi Pattern

The Bowling Llama Amigurumi Pattern
4.3β˜… Rating
5-7 Hours Time Needed
2.8K Made This
βœ‚οΈ

Intermediate Level

Ideal for those with basic crochet experience, featuring slightly more advanced stitches and techniques to expand your skills.

⏱️

Weekend Treat

Takes 5-7 hours, making it an enjoyable project to finish over a couple of days.

🧸

Cute Companion

An adorable friend to cherish, handcrafted with love to bring comfort and joy for years to come.

About This The Bowling Llama Amigurumi Pattern

This pattern teaches you how to crochet a charming bowling llama and a matching bowling ball using chunky velvet-style yarn. The design uses integrated no-sew construction so ears, snout and legs are crocheted directly into the head and body. Detailed rounds, bobble stitch instructions and helpful video links make the process easy to follow.

The Bowling Llama Amigurumi Pattern crochet pattern - detailed view of completed project

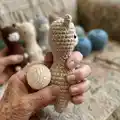
Perfect for gift-making or nursery play, the finished llama stands approximately 15 cm tall. The pattern includes color-change tips and optional steps to stabilize the base so your llama will stand upright.

Why You'll Love This The Bowling Llama Amigurumi Pattern

I absolutely love this pattern because it transforms simple stitches into a playful, tactile toy that both kids and adults adore. I enjoyed designing the integrated no-sew construction so you don't have to sew many separate pieces together. The bobble stitch and color-blocked bowling ball add delightful texture and visual interest. Making a set of llamas in different colors is one of my favorite ways to customize and gift this project.

The Bowling Llama Amigurumi Pattern step 1 - construction progress The Bowling Llama Amigurumi Pattern step 2 - assembly progress The Bowling Llama Amigurumi Pattern step 3 - details and accessories The Bowling Llama Amigurumi Pattern step 4 - final assembly and finishing

Switch Things Up

I love customizing this pattern by changing yarn colors to create playful personalities for each llama.

Try pastel shades for a nursery-friendly set or bold, contrast colors for a modern look.

To make a mini keychain version, use thinner yarn and a smaller hook for a tiny portable llama.

If you want a chunkier, cuddlier toy, choose a bulkier velvet yarn and a larger hook to increase the final size.

I sometimes add tiny crocheted scarves or bow ties to the llamas for seasonal themes or gift tags.

Try embroidering different facial expressions by adjusting eye placement and nose shape for more character variety.

Add a small wire inside the neck or limbs for a posable version if you want the llama to hold poses.

Make a full set of bowling llamas in a gradient of colors and match each one with a contrasting bowling ball color.

I recommend experimenting with surface embroidery or felt appliques for unique markings or spots on the body.

For more stability, insert a small weighted pad or plastic disk into the base to help the llama stand upright, especially if using softer yarns.

Common Mistakes & How to Fix Them

βœ— Skipping the invisible decrease technique can leave a visible gap or uneven shaping; use invisible decreases for neat closures and smoother shaping. βœ— Not stuffing as you go causes lumps and uneven shape later; add small amounts of stuffing gradually and shape as you stitch to maintain an even surface. βœ— Using a yarn that is too loose or large for the recommended hook will create gaps where stuffing shows; use consistent tension and the recommended chunky velvet yarn with a 4mm hook. βœ— Forgetting to place safety eyes at the correct rounds will misalign the face; insert the 6mm safety eyes between rounds 6 and 7 spaced 8 stitches apart before closing the snout area. βœ— Ignoring stitch counts after increases or decreases leads to mistakes in shaping; count stitches at the end of each round to ensure accuracy and rework any rounds with incorrect counts.

The Bowling Llama Amigurumi Pattern

Make a sweet, soft bowling-themed llama toy perfect for playtime and nursery decor. This pattern guides you through crocheting the llama and a matching bowling ball using chunky velvet-style yarn for a plush finish. Clear step-by-step rounds, helpful notes, and video links are included so you can follow along easily and create a lovable handmade friend.

Intermediate 5-7 Hours

Materials Needed for The Bowling Llama Amigurumi Pattern

β€” Main Fabric

  • 01
    Chunky velvet-style yarn (4-5mm recommended), examples: Himalaya Velvet, Himalaya Dolphin Baby - multiple colors (cream, white, beige, gray, yellow) - quantities vary by color (approx 50-100g each depending on color usage)
  • 02
    Cream yarn for main body - amount as needed
  • 03
    White yarn for snout and spots - small amount for details
  • 04
    Gray yarn for bowling ball base - small amount
  • 05
    Yellow yarn for bowling ball accent - small amount

β€” Tools Required

  • 01
    Crochet hook size 4mm
  • 02
    6mm toy safety eyes (2 pieces per llama)
  • 03
    Needle for sewing and weaving in ends
  • 04
    Toy stuffing (fiberfill)
  • 05
    Stitch marker
  • 06
    Scissors
  • 07
    Optional: small plastic pad or cut milk bottle piece (approx 2cm radius) to flatten bottom
  • 08
    Powder blush for cheeks (optional)
  • 09
    Brown thread for nose embroidery

Progress Tracker

0% Complete

β€” Head & Body :

Info :

As this Llama is crocheted as a no-sew project, the legs, nose, and ears are integrated into the body and head, without separate parts. The ears are in round 2, the snout in rounds 6-8, and the legs in rounds 12 and 23.

Info :

Start in cream yarn. (Note: Use cream yarn in black word, white yarn in pink word)

Round 1 :

8sc in MR [8]

Round 2 :

2inc, (ch 4 , skip 2 ch from the hook, slst in next 2 ch), inc in next st of the base, 3inc, (ch 4 , skip 2 ch from the hook, slst in next 2 ch), inc in next st of the base, inc [16]

Round 3 :

(3sc, inc) x 4 [20]

Round 4 - 5 :

20sc [20]

Round 6 :

8sc, 4inc, 8sc [24]

Round 7 :

8sc, 8sc, 8sc [24]

Round 8 :

8sc, 4dec, 8sc [20]

Round 9 :

20sc [20]

Round 10 :

sc, dec, (2sc, dec) x 4, sc [15]

Round 11 - 14 :

15sc [15]

Info :

Stuff the head firmly with fiberfill.

Round 15 :

(2sc, inc) x 5 [20]

Round 16 :

(4sc, inc) x 4 [24]

Round 17 :

24sc [24]

Round 18 :

11sc, bo4, 4sc, bo4, 7sc [24]

Round 19 - 22 :

24sc [24]

Round 23 :

11sc, bo4, 5sc, bo4, 6sc [24]

Round 24 :

24sc [24]

Round 25 :

(sc, dec) x 8 [16]

Info :

Stuff the body firmly with fiberfill.

Info :

Optional: You can insert a pad, 2cm in radius, made from plastic or a milk bottle, inside the llama to flatten its bottom. This will enable your llama to stand upright on its own.

Round 26 :

8dec [8]

Info :

Fasten off, leaving the yarn tail. Using the yarn needle, weave the yarn tail through the front loop of each remaining stitch and pull it tight to close.

Info :

Insert the 6mm safety eyes between rounds 6 and 7, 8 stitches apart. Embroider the nose with brown threads. Use powder blush for the nose and the cheeks.

β€” Bowling Ball :

Info :

Start in gray yarn. (Note: Use yellow yarn in orange word, gray yarn in black word)

Round 1 :

8sc in MR [8]

Round 2 :

8inc [16]

Round 3 :

(sc, inc) x 2, (sc, inc) x 6 [24]

Round 4 :

(2sc, inc) x 3, (2sc, inc) x 3, (2sc, inc) x 2 [32]

Round 5 :

32sc [32]

Round 6 :

(3sc, inc) x 8 [40]

Round 7 - 12 :

40sc [40]

Round 13 :

(3sc, dec) x 8 [32]

Round 14 :

32sc [32]

Round 15 :

(2sc, dec) x 2 + (2sc, dec) x 3 + (2sc, dec) x 3 [24]

Round 16 :

(sc, dec) x 6 + (sc, dec) x 2 [16]

Info :

Stuff the ball firmly with fiberfill.

Round 17 :

8dec [8]

Info :

Fasten off, leaving the yarn tail. Using the yarn needle, weave the yarn tail through the front loop of each remaining stitch and pull it tight to close.

Info :

How to weave in the yarn end on a stuffed piece: https://youtu.be/amYifc37uSs

Assembly Instructions

  • Insert the 6mm safety eyes between rounds 6 and 7 of the head, spacing them 8 stitches apart before closing the snout area.
  • Embroider the nose with brown thread by stitching a small vertical and horizontal line to create the llama nose, then add powder blush to nose and cheeks if desired.
  • Stuff the head and body firmly with fiberfill as instructed (stuff head before continuing after round 14 and stuff the body after round 25) to maintain shape and support.
  • Optional: Insert a small pad (approx 2cm radius) made from plastic or a cut milk bottle inside the bottom of the body to flatten the base and help the llama stand upright.
  • Weave the remaining yarn tails through the front loop of each remaining stitch and pull tight to close openings, then secure and hide ends with a yarn needle.

Important Notes

  • πŸ’‘Make the invisible decrease stitches to have a better result and neater shaping when closing pieces.
  • πŸ’‘Add toy stuffing according to instruction of each part and stuff gradually to maintain shape and avoid lumps.
  • πŸ’‘Stitches should be close together so that when the finished toy is stuffed, the stuffing doesn't come out through gaps in the stitches.
  • πŸ’‘The pattern includes color change techniques, bobble stitch technique and the X stitch technique for single crochet stitch; practice these for best results.
  • πŸ’‘Finished size: the finished toy is approximately 15cm (~ 5.9 inch) high.

Congratulations on completing your Bowling Llama β€” you made something truly special by hand! This set makes a sweet gift or a playful nursery decoration, and the plush texture from velvet yarn is irresistible. Try making a few in different colors and create a whole bowling team of llamas to brighten any shelf. 🧢✨

You ask,

we answer.

FAQs

What size will the finished piece be?

The finished amigurumi llama measures approximately 15 cm tall when using the recommended chunky velvet yarn and 4mm hook.

Can I use different yarn weights for this pattern?

Yes, you can use different yarn weights but this will change the finished size; adjust the hook accordingly and expect differences in texture and gauge.

Do I need prior crochet experience for this pattern?

This pattern is rated intermediate, so basic knowledge of single crochet, increases, decreases and reading round counts is recommended.

How long does this project typically take to complete?

Most crocheters complete both the llama and bowling ball in about 5-7 hours, though time will vary based on experience and speed.

Where should I place the safety eyes?

Insert the 6mm safety eyes between rounds 6 and 7 of the head, spaced 8 stitches apart before closing the snout area.