🧢 Beautiful ✨ Detailed πŸ’ Adorable

SWC Mrs Potts and Chip Amigurumi Pattern

SWC Mrs Potts and Chip Amigurumi Pattern
4.3β˜… Rating
5-7 Hours Time Needed
1.2K Made This
βœ‚οΈ

Intermediate Level

Ideal for those with basic crochet experience, featuring slightly more advanced stitches and techniques to expand your skills.

⏱️

Weekend Treat

Takes 5-7 hours, making it an enjoyable project to finish over a couple of days.

🧸

Cute Companion

An adorable friend to cherish, handcrafted with love to bring comfort and joy for years to come.

About This SWC Mrs Potts and Chip Amigurumi Pattern

This pattern creates a delightful Mrs Potts teapot and matching Chip teacup amigurumi set in UK crochet terminology. It includes full round-by-round instructions, color changes, and small detail pieces like petals and a frilled lid. The pattern uses aran cotton and a 4mm hook for a sturdy, textured finish. Perfect as a whimsical handmade gift or display.

SWC Mrs Potts and Chip Amigurumi Pattern crochet pattern - detailed view of completed project

Clear, photographed steps guide you through shaping, color changes, and assembly for a polished result. Includes instructions for eyes, spout, handle, lid frill and decorative petals.

Why You'll Love This SWC Mrs Potts and Chip Amigurumi Pattern

I absolutely love this pattern because it turns a classic teapot and teacup into charming characters full of personality. I designed the pieces with simple shaping and bright trims so they are fun to make and enjoyable to display. The combination of color changes and small petals adds delightful detail that really elevates the finished set. I also enjoy that the pattern is worked mostly in rounds, which keeps construction neat and predictable.

SWC Mrs Potts and Chip Amigurumi Pattern step 1 - construction progress SWC Mrs Potts and Chip Amigurumi Pattern step 2 - assembly progress SWC Mrs Potts and Chip Amigurumi Pattern step 3 - details and accessories SWC Mrs Potts and Chip Amigurumi Pattern step 4 - final assembly and finishing

Switch Things Up

I love that this pattern is easy to personalise by changing yarn colours; I often swap the purple and mustard for pastels to create a softer look.

I sometimes use a thicker cotton or a DK yarn with a slightly larger hook to make a chunkier, cuddly version; just remember the stitch counts will yield a bigger finished piece.

I like to replace safety eyes with embroidered eyes for a fully child-safe toy; embroider the iris and eyelash details for a different expression.

I add tiny felt accessories such as a small bow or a crochet scarf to give Mrs Potts a seasonal outfit and extra charm.

I sometimes add a bit of wire inside the teapot handle or spout base to help them keep a curved shape if I want them slightly posable.

I experiment with textured stitches on the teapot body or lid to create a vintage or floral effect β€” try cluster stitches for a scalloped texture.

I make the petals in contrasting colours or in variegated yarn for a playful decorative base that changes the overall mood of the set.

I change eye sizes to alter the character's look; larger eyes create a cuter, cartoony face while smaller eyes look more delicate and classic.

I sometimes embroider freckles, blushing (with pastel chalk), or tiny mouth variations to give different facial expressions for each set I make.

I recommend making a small sample swatch when changing yarn or hook size so you can adjust stuffing and eye placement for the best finish.

Common Mistakes & How to Fix Them

βœ— Not using a stitch marker can make you lose the start of rounds; always place a marker at the first stitch of each round to keep accurate counts. βœ— Overstuffing the teapot or teacup can distort the shape and stitches; stuff gradually and evenly while checking the silhouette to maintain the intended shape. βœ— Skipping the BLO/FLO instructions will change the texture of edges and join lines; work in the specified loop (BLO or FLO) to achieve the correct finish for the lid and bottom. βœ— Forgetting to change colours at the exact round can misalign trims and frills; change yarns exactly where instructed and carry or fasten off tails neatly to avoid visible joins.

SWC Mrs Potts and Chip Amigurumi Pattern

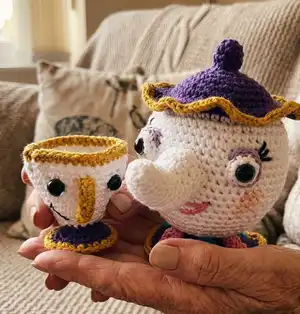
Create a charming Mrs Potts teapot and her little Chip teacup with this complete crochet pattern. You will get step-by-step UK terminology rounds, helpful photos, and assembly guidance to bring these characters to life. Perfect as a gift or display piece, the pattern walks you through every round and finishing detail. Enjoy making this delightful set with clear instructions and fun details.

Intermediate 5-7 Hours

Materials Needed for SWC Mrs Potts and Chip Amigurumi Pattern

β€” Main Fabric

  • 01
    Drop Paris - Aran 100% cotton, White - 40g
  • 02
    Drop Paris - Aran 100% cotton, Purple - 25g
  • 03
    Drop Paris - Aran 100% cotton, Mustard/Gold - 10g
  • 04
    Small amounts of pink and blue yarn for the petals (approx 5-10g each)
  • 05
    Small amount of black yarn for facial features and embroidery

β€” Tools Required

  • 01
    Crochet hook size 4.0mm
  • 02
    4 x 12mm safety eyes (or preferred eye size)
  • 03
    Stitch marker
  • 04
    Scissors
  • 05
    Darning needle for sewing
  • 06
    Polyester stuffing
  • 07
    Small pins for positioning pieces

Progress Tracker

0% Complete

β€” Mrs Potts :

Info :

Starting at the top of the teapot using purple yarn and a 4mm hook make a magic circle.

Round 1 :

6dc into magic circle (6)

Round 2 :

(dc in next st, 2dc in next st) repeat around (9)

Round 3 :

Dc into each st (9)

Round 4 :

(dc in next st, dc2tog) repeat around (6)

Round 5 :

Dc into each st (6)

Round 6 :

2dc into each st (12)

Round 7 :

2dc into each st (24)

Round 8 :

Dc into each st (24)

Round 9 :

(dc in next 3 sts, 2dc in next st) repeat around (30)

Round 10 :

(dc in next 4 sts, 2dc in next st) repeat around (36)

Round 11-12 :

Dc into each st (36)

Round 13 :

BLO dc into each st (36)

Info :

Change to white yarn. Stuff the teapot as you are working.

Round 14 :

(dc in next 2 sts, 2dc in next st) repeat around (48)

Round 15 :

Dc into each st (48)

Round 16 :

(dc in next 7 sts, 2dc in next st) repeat around (54)

Round 17-23 :

Dc into each st (54)

Round 24 :

(dc in next 7 sts, dc2tog) repeat around (48)

Round 25 :

(dc in next 6 sts, dc2tog) repeat around (42)

Round 26 :

dc into each st (42)

Round 27 :

(dc in next 5 sts, dc2tog) repeat around (36)

Round 28-29 :

Dc into each st (36)

Round 30 :

(dc in next st, dc2tog) repeat around (24)

Round 31-32 :

dc into each st (24)

Round 33 :

(dc2tog) repeat around (12)

Info :

Change to purple yarn

Round 34 :

FLO 2dc into each st (24)

Round 35 :

(dc in next 3 sts, 2dc in next st) repeat around (30)

Round 36 :

dc into each st (30)

Round 37 :

(dc in next 4 sts, 2dc in next st) repeat around (36)

Round 38 :

dc into each st (36)

Round 39 :

(dc in next 5 sts, 2dc in next st) repeat around (42)

Round 40 :

(dc in next 6 sts, 2dc in next st) repeat around (48)

Info :

Change to mustard/gold yarn

Round 41 :

dc into each st (48)

Info :

FO stuff and thread tail through remaining stitches to close.

β€” Closing the bottom :

Info :

You will now be working in the BLO from round 33 of the teapot. Using white attach to any st.

Round 1 :

Dc in each st (12)

Round 2 :

(dc2tog) repeat around (6)

Info :

FO and thread through remaining sts to close

β€” Teapot lid frill :

Info :

You will now be working in the FLO of round 13 from the Teapot. Using purple yarn attach to any st.

Round 1 :

Dc into each st (36)

Round 2 :

(dc in next st, 2dc in next st) repeat around (54)

Round 3 :

(dc in next 2 sts, 2dc in next st) repeat around (72)

Info :

Change to Mustard/gold yarn

Round 4 :

(dc in next 3 sts, 2dc in next st) repeat around (90)

Info :

FO and sew ends in.

β€” Spout :

Info :

Using white yarn make a magic circle

Round 1 :

8dc into circle (8)

Round 2 :

BLO dc into each st (8)

Round 3-4 :

dc into each st (8)

Round 5 :

2dc in 1st st, dc in remaining sts (9)

Round 6 :

Dc into each st (9)

Round 7 :

2dc in 1st st, dc in remaining sts (10)

Round 8 :

Dc into each st (10)

Round 9 :

Dc2tog, dc in 3 sts, 2tr in 2 sts, dc in 3 sts (11)

Round 10-12 :

Dc into each st (11)

Round 13 :

dc in 1st st, 2dc in next 2 sts, dc in remaining sts (13)

Round 14 :

dc in 2 sts, 2dc in next 2 sts, dc in remaining sts (15)

Round 15 :

dc into each st (15) FO leaving a long tail for sewing onto the face of the teapot. Sew the teapot spout onto the face before sewing on eyes

β€” Eyes (Make 2) :

Info :

Using white yarn make a magic circle

Round 1 :

6dc into magic circle (6)

Round 2 :

Dc in 1st st, 2dc in next 4 sts, dc in last st (10)

Round 3 :

(dc in next st, 2dc into next st) repeat around (15)

Round 4 :

Sl st in 2 sts, Change colour to light purple, dc in next 5 sts, sl st in next st, leave the last 2 sts unworked and FO leaving a long tail for sewing onto the front of the teapot. NOTE: Before sewing eyes onto the head, insert the eyes into the middle of the circle and secure.

β€” Teapot Handle :

Info :

Using mustard/gold yarn make a magic circle

Round 1 :

6dc into circle (6)

Round 2-24 :

dc into each st (6) FO leaving a long tail for sewing onto the back of the teapot. Line it up with the spout so it is on the opposite side before sewing.

β€” Small petal (make 6 – 3 blue, 3 pink) :

Info :

Using pink/blue yarn ch 4

Round 1 :

Dc in 2nd ch from hook, 2 htr in next st, dc in last st, now working around the opposite side of the foundation ch dc in next st, 2 htr in next st, dc in last st, sl st to 1st st. FO leaving a long tail. Each petal will be sewn on evenly around the bottom of the teapot, rotating each colour.

β€” Chip :

Info :

Teacup - Starting at the bottom of the teacup using white yarn make a magic circle

Round 1 :

6dc into magic circle (6)

Round 2 :

2dc in each st (12)

Round 3 :

BLO (dc in next st, 2dc in next st) repeat around (18)

Round 4-5 :

dc into each st (18)

Round 6 :

(dc in 2 sts, 2dc in next st) repeat around (24)

Round 7-8 :

Dc into each st (24)

Round 9 :

(dc in 3 sts, 2dc in next st) repeat around (30)

Round 10-11 :

Dc in each st (30)

Round 12 :

(dc in 4 sts, 2dc in next st) repeat around (36)

Info :

TURN WORK – you are no longer working in rounds.

Round 13 :

Ch1, working back dc in each st to last 2 sts, leave these unworked and turn work (34)

Info :

Change to mustard/gold

Round 14 :

dc in each sts (34) FO and sew in ends.

β€” Bottom of teacup :

Info :

You will now be working in the FLO from round 3 of the teacup. Using purple attach yarn to any st.

Round 1 :

Dc into each st (12)

Round 2 :

(dc in next st, 2dc in next st) repeat around (18)

Round 3 :

(dc in 2 sts, 2dc in next st) repeat around (24)

Info :

Change to mustard/gold yarn

Round 4 :

Dc in each st (24) FO and sew in ends

β€” Chips handle :

Info :

Using mustard/gold yarn ch 9.

Round 1 :

Dc in 2nd ch from hook and in remaining sts (8) FO leaving a long tail. Sew the handle onto the front of the face with the chip being on the left side.

β€” Sewing/Making Up :

Info :

Ensure you read all instructions for sewing. Each part should be sewn on as instructed in each part.

Item :

Mrs Potts – Sew the spout and handle on opposite sides of the teapot. After this sew Mrs Potts eyes onto the front and sew eyelashes using black and the lips using pink. I added some blush to the sides for her cheeks.

Item :

Chip – After sewing the handle onto chips face, insert the safety eyes. Using a small amount of black, sew on chips mouth. NOTE: I made a small cover to sew around the inside over the safety eyes (see pic) for this repeat rounds 1&2 of the teacup using white yarn. Sew this over the safety eyes on the inside of the cup.

Info :

Your set is now complete. Hope you enjoyed my pattern!!!

Assembly Instructions

  • Sew the teapot spout onto the face before sewing on the eyes, then sew the teapot handle onto the opposite side so it lines up with the spout.
  • Sew the teapot lid frill and top knob to the top opening of the teapot, making sure the frill aligns with the purple rounds and the mustard/gold edge.
  • Sew each small petal evenly around the bottom of the teapot, rotating colours so the petals (3 blue and 3 pink) are spaced uniformly.
  • For Chip, sew the handle onto the front of the teacup face (left side when facing the cup), insert the safety eyes, and embroider the mouth with black yarn.
  • If using safety eyes for Chip, make a small interior cover by repeating rounds 1 and 2 of the teacup with white yarn and sew this inside to cover the back of the safety eyes.
  • Pin pieces in place before sewing to ensure correct placement and symmetry, then sew securely with a darning needle and weave in all ends.

Important Notes

  • πŸ’‘This pattern is written in UK crochet terminology; check the conversion table on page 3 if you need US equivalents.
  • πŸ’‘Use a stitch marker to mark the beginning of each round, especially when working increases and decreases for shaping.
  • πŸ’‘Stuff the teapot and teacup as you go to achieve the correct shape and avoid lumps or underfilled areas.
  • πŸ’‘Change yarn colours exactly at the rounds indicated to ensure trims and frills line up neatly.
  • πŸ’‘Fasten off and weave in ends securely to prevent colours or trims from loosening during handling.

This delightful Mrs Potts and Chip set brings storybook charm to your home with handcrafted detail and personality. The pattern features clear rounds, color changes, and sewn embellishments to make a polished finished piece. Whether you keep them or gift them, these characters are sure to warm hearts and spark smiles. 🧢😊🧡

You ask,

we answer.

FAQs

What size will the finished piece be?

The finished teapot and teacup measure approximately similar to the photos when using Drop Paris Aran cotton and a 4.0mm hook; the teapot is roughly 12-15 cm tall depending on stuffing and yarn tension.

Can I use different yarn weights for this pattern?

Yes, you can use different yarn weights but changing yarn weight and hook size will alter the final size; adjust eye size and stuffing accordingly for the best result.

Do I need prior crochet experience for this pattern?

This pattern is rated intermediate, so basic knowledge of UK stitches (dc, sl st, BLO/FLO) and working in rounds is recommended for best results.

How long does this project typically take to complete?

Most crocheters complete this project in 5-7 hours, though time may vary depending on experience level, detailing, and assembly time.

Are the instructions in UK or US terminology?

The pattern is written in UK crochet terminology; a conversion table is provided in the pattern for US equivalents.