About This Mini Parrot Amigurumi Pattern
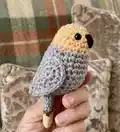
This pattern creates a tiny crocheted parrot approximately 7 cm (3 inches) tall using lightweight cotton yarn. It is worked from the top down with simple single crochet shaping and minimal sewing. The pattern includes clear round-by-round instructions, stitch counts, and explanatory pictures to guide you.

You can make colourful variations with different cotton shades and use the birds as keychains or little decorative gifts. The design is compact, quick, and great for using small amounts of leftover yarn.
Why You'll Love This Mini Parrot Amigurumi Pattern
I absolutely love this pattern because it turns small scraps of yarn into a charming little bird in just a couple of hours. I enjoy how quick the project is and how satisfying it feels to see bright personality emerge from such a simple shape. The minimal sewing keeps the finish neat and fuss-free, which makes it ideal for gifting or making multiples. I also love that the pattern gives room for color play — every bird can look completely different with just a few changes.
Switch Things Up
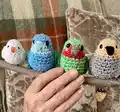
I love customizing these tiny parrots by swapping colors; try tropical brights or soft pastels for a different mood.
I sometimes make the body a single color and use contrasting shades for the face and wings to create a graphic look.
To make a smaller version I use finer cotton and a 1.5 mm or 1.0 mm hook; for a chunkier bird I use a thicker cotton and a 2.5 mm hook.
I often embroider different beak shapes or add tiny felt feet to change the character of the bird.
You can lengthen the tail by adding extra chain and stitches in the wing/tail section for a more dramatic silhouette.
I like to sew on a small keyring or split ring into the final rounds to turn the bird into a keychain or bag charm.
Try adding tiny glass or safety eyes in different sizes to alter the expression and age of the bird.
I sometimes combine yarn types — a cotton body with a slightly shiny acrylic for the chest — to add subtle texture differences.
For a festive set I add little stitched stripes or tiny embroidered spots to make each bird unique and gift-ready.
I also make coordinated color sets to create little flocks that look great displayed together or clipped to a garland.
Common Mistakes & How to Fix Them
✗ Not placing a stitch marker can lead to losing track of the start of rounds; place a marker at the first stitch and move it every round to keep count.
✗ Changing colors in the wrong stitch can create awkward color joins and bumps; always change color in the last yarn over of the designated stitch as instructed.
✗ Overstuffing the body causes the shape to become distorted and lumpy; stuff gradually and evenly, adding small amounts until you reach a firm but pliable feel.
✗ Placing the eyes too high or too low will change the bird's expression; attach the safety eyes alongside the green face between round 4 and 5 to match the photos.