About This Sunflower Power Crochet Coasters Pattern
This pattern creates a single sunflower-shaped crochet coaster with a textured center and layered petals. It uses super bulky Bernat Blanket yarn and a 9 mm (M/N) hook to work up quickly. The design features easy rounds, a 2-triple-cluster petal stitch, and simple color changes for a bold contrast. Ideal for confident beginners who want a fast, cheerful project.

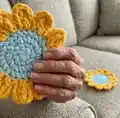
Youll make a round center in C1 then change to C2 for 12 sculpted petals. The finished coaster measures approximately 8" (20 cm) in diameter.
Why You'll Love This Sunflower Power Crochet Coasters Pattern
I absolutely love this pattern because it turns simple stitches into a striking sunflower motif that brightens any table. I enjoy how fast one coaster works up using super bulky yarn and a large hook—you see results quickly which is so satisfying. The petal detail created by the 2-tr cluster gives lovely texture and dimension without complicated shaping. I designed it to be accessible to confident beginners while still offering a pretty, professional-looking finish. Making a set of these feels like gifting sunshine to friends and family.
Switch Things Up
I love customizing these coasters by changing the colors of the center and petals; try a brown center with yellow petals for a realistic sunflower or pastel tones for a softer look.
If you want a larger or smaller coaster, change your yarn weight and hook size—using a bulkier yarn or bigger hook will give you a chunkier, larger coaster.
I often make mini versions for keychains by using lighter yarn and a smaller hook; the same rounds work scaled down for adorable tiny sunflowers.
I sometimes embroider a small spiral in the center after finishing to add extra texture and a handcrafted look.
You can create a full set in coordinated colors for seasonal decor—mix and match centers and petal hues for an eclectic table display.
I like to experiment with metallic or sparkly accent yarn as C1 for a subtle shimmer in the center that catches the light.
For a sturdier coaster, consider lining the back with a small circle of felt and hand-sewing it in place to protect wooden surfaces from heat or moisture.
I also enjoy stitching a tiny loop to the edge to hang the coaster as an ornament or wall decoration when not in use.
If you want more texture, try working the center in front loop only (FLO) for a ridged look before changing to petals.
I recommend making a test coaster to learn the 2-tr cluster before making a full set; once you master the cluster, the rest is quick and very satisfying.
Common Mistakes & How to Fix Them
✗ Not changing colors cleanly at the end of Round 4 can leave a messy join; break off C1 as instructed and join C2 neatly, weaving in ends later.
✗ Skipping the chain-3 or magic ring start will make the center hole too large; always form a tight ring (or use a magic ring) to ensure a neat center.
✗ Failing to count stitches after each round causes uneven petals and mismatches; count your stitches at the end of Rounds 1–4 to confirm the stitch count matches the pattern.
✗ Working with inconsistent tension makes petals uneven and the coaster lopsided; maintain consistent tension and practice the 2-tr cluster stitch before beginning to keep petals uniform.
✗ Stuffing or blocking mistakes are irrelevant here but not blocking the finished coaster can leave it slightly distorted; if needed, gently block your coaster to flatten and even out petals.