🧶 Beautiful ✨ Detailed 💝 Adorable

Succulent Potted Plant Pattern

Succulent Potted Plant Pattern
4.1★ Rating
2-3 Hours Time Needed
2.3K Made This
✂️

Beginner Friendly Level

Perfect for those just starting their crochet journey, with clear instructions and simple techniques

⏱️

Bite-Sized Project

Finishes in 2-4 hours—perfect for an afternoon of creative relaxation.

🏡

Cozy Accent

A warm touch for your space that transforms ordinary corners into inviting nooks filled with handmade charm.

About This Succulent Potted Plant Pattern

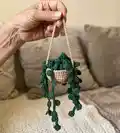
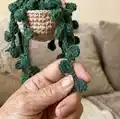
This pattern makes a small hanging potted succulent using a super-fine yarn for delicate detail. You will crochet a tiny pot, a green circle base, and several puff-stitch succulent ropes to assemble into a full hanging plant. The design focuses on texture and a playful trailing look that brightens shelves, windowsills, or gifts.

Succulent Potted Plant Pattern crochet pattern - detailed view of completed project

Clear row-by-row instructions are included for each piece, plus sewing and hanging steps with photos. Suitable for makers who enjoy quick projects and simple assembly.

Why You'll Love This Succulent Potted Plant Pattern

I absolutely love this pattern because it turns a few simple stitches into a delightful miniature plant that looks great anywhere. I enjoyed designing the puff-stitch succulent ropes — they give so much personality with almost no effort. I love how quickly each piece comes together, so you see progress fast and feel motivated to finish. Sharing this small, handmade accent always brightens someone’s day, whether it’s for me or a thoughtful gift.

Succulent Potted Plant Pattern step 1 - construction progress Succulent Potted Plant Pattern step 2 - assembly progress Succulent Potted Plant Pattern step 3 - details and accessories Succulent Potted Plant Pattern step 4 - final assembly and finishing

Switch Things Up

I love customizing this pattern by changing colors — try soft pastels or variegated greens to create different moods.

I sometimes use a slightly thicker yarn and a larger hook to make a chunkier, more substantial pot and succulents.

I add tiny embroidered accents or beads to some succulents to give them a bit of sparkle and character.

I vary the lengths of the succulent ropes when I want a messier, more natural drape versus a uniform look.

I have experimented with different stitch counts in the circle base to make wider or narrower pots depending on my display need.

I often make a cluster of three tiny pots in coordinating colors for a cute grouped display instead of one single pot.

I will sometimes stuff a little firmer in one side to produce a tilted, whimsical plant that looks more organic.

I occasionally add a small loop of wire inside the hanging rope to make the piece hang straighter outdoors or on windy balconies.

I recommend trying embroidery yarn for a softer, fluffier succulent texture if you want a more plush effect.

I enjoy mixing two greens in alternating succulents for a layered, realistic look that draws the eye.

Common Mistakes & How to Fix Them

✗ Forgetting the chain-1 at the beginning of each row can distort the edge of your pot; always chain 1 as instructed and slip stitch at the end of each row to maintain a neat edge. ✗ Not counting increases carefully will produce an uneven base round; count your stitches after every increase round to confirm you have the correct stitch total. ✗ Overstuffing or understuffing the pot changes its shape and makes sewing difficult; stuff gradually and check the shape before closing to maintain the correct silhouette. ✗ Skipping placement checks for succulents will result in crowded or sparse coverage; lay the succulent ropes across the circle base and move them until you like the arrangement before sewing.

Succulent Potted Plant Pattern

Create a charming hanging succulent in a tiny crocheted pot — perfect for gifting or decorating small spaces. This pattern guides you through making the pot, a green base, and multiple puff-stitch succulent ropes. You will enjoy simple rounds, clear shaping, and step-by-step assembly photos to help you finish a delightful handmade accent.

Beginner Friendly 2-3 Hours

Materials Needed for Succulent Potted Plant Pattern

— Main Fabric

  • 01
    Super fine yarn, 1.8 oz (50 g) per skein — beige brown for pot (approx 50 g)
  • 02
    Super fine yarn, 1.8 oz (50 g) per skein — pine green for succulents and circle base (approx 50 g)
  • 03
    Small amounts of additional green for variation if desired (10-25 g)

— Tools Required

  • 01
    Crochet hook size 2.5-3.0 mm
  • 02
    Stitch marker
  • 03
    Sewing needle (yarn needle) for assembly
  • 04
    Scissors
  • 05
    Cotton filling (polyester stuffing)
  • 06
    Pins for positioning parts (optional)

Progress Tracker

0% Complete

— Pots :

Info :

*chain-1 at beginning of row, slip stitch in every time the end of the row*

Round 1 :

Magic ring, chain 1, 10 Single Crochet.

Round 2 :

chain 1, (1 Single Crochet, 1 increase ) 5 times (15 stitches)

Round 3 :

chain 1 (2 Single Crochet, 1 increase) 5 times. (20 stitches)

Round 4 :

chain 1 (3 Single Crochet, 1 increase) 5 times. (25 stitches)

Round 5 :

chain 1 (4 Single Crochet, 1 increase) 5 times. (30 stitches)

Round 6 :

chain 1 (5 Single Crochet, 1 increase) 5 times. (35 stitches)

Round 7-10 :

chain 1, 35 Single Crochet (35 stitches)

— Circle Base : (green)

Round 1 :

Magic Ring, chain 1, 10 half double crochet (10 stitch)

Round 2 :

10 half double crochet increase (20 stitch)

Round 3 :

chain 1, (1 half double Crochet, 1 increase ) 10 times (30 stitch)

Round 4 :

chain 1 (5 Single Crochet, 1 increase) 5 times. (35 stitches)

Round 5-6 :

chain 1, 35 Single Crochet (35 stitches)

— Succulent (make 7-9) :

Infos :

Chain 4, 1 Puff stitch in 3rd sts, 1slip stitch in next sts. Chain 8, 1 Puff stitch in 3rd sts, 1slip stitch in next sts. *this step crochet (8ch, 1PS in 3rd,1 SL ST) until the length you want*

— Sewing Step :

Info :

sew the circle inside the pot and dont forget stuffing ^_^

Info :

next step is sew every succulent rope on the midle of pots

— Hanging rope :

Info :

Hanging rope : chain 60 in the sides of the pots

Assembly Instructions

  • Sew the green circle base into the inside bottom of the pot, position it neatly and add cotton filling to shape the pot before closing.
  • Arrange the succulent ropes across the top of the circle base, then sew each succulent rope to the middle of the pot so they drape naturally over the sides.
  • Attach the hanging rope by chaining 60 and securing each end through opposite sides of the pot, knotting and hiding ends with a few stitches.
  • Use pins to hold succulent ropes in place while sewing to ensure even coverage and spacing before final stitching.
  • Weave in all yarn ends neatly on the inside of the pot to keep the outside clean and tidy.

Important Notes

  • 💡Use a stitch marker to mark the start of each round to avoid losing your place during increases and shaping.
  • 💡Stuff the pot gradually until you reach a firm but not overfilled shape to maintain the correct silhouette.
  • 💡Pin succulent ropes in place before sewing to check placement and adjust for even drape and balance.
  • 💡Work with consistent tension to ensure the pot and circle base fit together smoothly and lay flat.
  • 💡Weave and hide ends inside the pot to keep the finished project neat and secure.

This tiny hanging succulent was designed to bring a little greenery to small spaces and brighten any shelf or window. It is quick to make and wonderfully tactile, combining puff stitches and simple rounds for lovely texture. Enjoy gifting or displaying this miniature plant — it brings smiles and a handmade touch to any room. 🪴✨

You ask,

we answer.

FAQs

What size will the finished piece be?

The finished hanging succulent measures approximately 6-8 cm across the pot with trailing succulents about 10-15 cm long depending on yarn and length of succulent ropes.

Can I use different yarn weights for this pattern?

Yes, you can use different yarn weights but the final size will change; use a smaller hook for finer yarns to keep the delicate look or a larger hook with bulky yarn for a chunky version.

Do I need prior crochet experience for this pattern?

This pattern is beginner friendly and uses basic stitches (sc, hdc, chain) plus the puff stitch; beginners comfortable with single crochet and increases should be able to follow it.

How long does this project typically take to complete?

Most crocheters complete this project in 2-3 hours, though time may vary depending on the number of succulents you make and your assembly speed.

How many succulent ropes should I make?

The pattern suggests making 7-9 succulent ropes to get a full, draping look, but you can add more or fewer depending on how full you want the plant to appear.