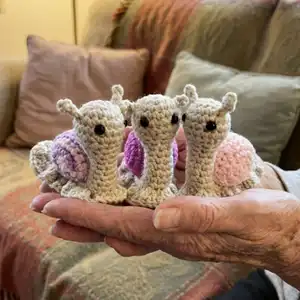
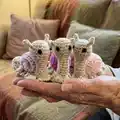
Create a trio of charming garden snails with this easy-to-follow crochet amigurumi pattern. Youll work a ridged spiral shell and a ruffled body skirt to build delightful texture and personality. The pattern includes both UK and US terms so you can follow your preferred stitch language. Perfect for gifting, decorations, or a sweet little handmade collection.
Progress Tracker
0% Complete
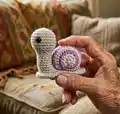
— Shell (UK Terms) :
Row 1 :
Using Contrast Row 1: ch2, htr6 into 2nd st from hook (alternatively htr 6sts into magic ring) (6)
Info :
From this point on the shell is worked through the BLO and 3rd LOOP of the st below in order to create the distinctive ridge pattern.
Info :
If you wish to make the shell as a lollipop type swirl change colour after every row, swapping colours up behind work with no sl st joins. Do not change colour mid stitch.
Row 3 :
(htr into next st, htrinc) x6 (18)
Row 4 :
(htr into next 2sts, htrinc) x6 (24)
Rows 5 - 6 :
dc (24) (2 rows)
Row 7 :
(htr into next 2sts, htrdec) x6 (18)
Row 8 :
(htr into next st, htrdec) x6 (12)
Info :
F/O leaving a 25cm end
Info :
Using 25cm end, and running sts, thread through front loops of last 6sts and gather tightly. Secure end with a couple of small sts.
— Body (UK Terms) :
Row 1 :
Using Main Row 1: ch2, dc6 into 2nd st from hook (alternatively dc 6sts into magic ring) (6)
Row 2 :
inc x2, 1st Antennae: ch6, sl st into 5th and 6th ch from hook, inc x3, 2nd Antennae: ch6, sl st into 5th and 6th ch from hook, inc into last st (12)
Row 3 :
(dc into next st, inc) x6 (18)
Rows 4 - 6 :
dc (18) (3 rows)
Row 7 :
(dc into next st, dec) x6 (12)
Row 8 :
(dc into next 2sts, dec) x3 (9)
Info :
Stuffing throughout, as you work on the next section:
Rows 9 - 26 :
dc (9) (18 rows)
Row 27 :
(dc into next st, dec) x3 (6)
Info :
Stuff remainder of body.
Info :
F/O leaving a 60cm end
Info :
Using 60cm end, and running sts, thread through front loops of last 6sts and gather tightly. Secure end with a couple of small sts. Making sure that the antennae are central to top of head, thread through body and come out 4 rows in front of the tail end.
Info :
Secure end with a couple of small sts being careful not to distort body. Pick up the shell and thread through the middle of the outer edge of shell, between the 2 central ridges. Come out at the opposite side of shell diameter, making sure that you remain central and on same ridge as previously used.
Info :
Thread end into body at the centre back of neck, 2 rows down from the base of the head. Catch in a single st and then pull tight to create the iconic shape of the snail's body. Making sure that the antennae are central at top of head and the shape of the shell has not been distorted, secure end with a couple of small sts. Attach the shell to the body along BLO ridge, 1 row out from the centre. Secure end with a couple of small sts. Weave end through shell/body and cut flush to finish.
— Body Skirt (UK Terms) :
Info :
Place a stitch marker at centre front of body, 8 rows down from the neck.
Row 1 :
Using Main Row 1: leaving a 10cm end, sl st into the base of body 1 row down from bottom of shell on the furthest side from you, the base should be facing towards you and the head should be facing left, 1st Side: ch3 and then 3trinc into 1st in every row up to the stitch marker, 2nd Side: turn so you are working down the opposite side and 3trinc into every row, keeping in line with the 1st st down from shell 3trinc until you get to point of tail, 1st Side: turn and 3trinc in every row down 1st side until you are back at the start, sl st to join at top of ch3 to finish.
Info :
F/O leaving a 10cm end.
Info :
Secure both ends with a couple of small sts before weaving through frill and body. Cut flush to finish.
— Features (UK Terms) :
Eyes :
Using black oddment, thread through head 2sts from the centre of face and 1 row down from the antennae. Do 5 small back sts 1 row in depth. Thread through to opposite side of face and repeat. Weave through head and cut flush to finish.
— Shell (US Terms) :
Row 1 :
Using Contrast Row 1: ch2, hdc6 into 2nd st from hook (alternatively hdc 6sts into magic ring) (6)
Info :
From this point on the shell is worked through the BLO and 3rd LOOP of the st below in order to create the distinctive ridge pattern.
Info :
If you wish to make the shell as a lollipop type swirl change colour after every row, swapping colours up behind work with no sl st joins. Do not change colour mid stitch.
Row 3 :
(hdc into next st, hdcinc) x6 (18)
Row 4 :
(hdc into next 2sts, hdcinc) x6 (24)
Rows 5 - 6 :
sc (24) (2 rows)
Row 7 :
(hdc into next 2sts, hdcdec) x6 (18)
Row 8 :
(hdc into next st, hdcdec) x6 (12)
Info :
F/O leaving a 25cm end
Info :
Using 25cm end, and running sts, thread through front loops of last 6sts and gather tightly. Secure end with a couple of small sts.
— Body (US Terms) :
Row 1 :
Using Main Row 1: ch2, sc6 into 2nd st from hook (alternatively sc 6sts into magic ring) (6)
Row 2 :
inc x2, 1st Antennae: ch6, sl st into 5th and 6th ch from hook, inc x3, 2nd Antennae: ch6, sl st into 5th and 6th ch from hook, inc into last st (12)
Row 3 :
(sc into next st, inc) x6 (18)
Rows 4 - 6 :
sc (18) (3 rows)
Row 7 :
(sc into next st, dec) x6 (12)
Row 8 :
(sc into next 2sts, dec) x3 (9)
Info :
Stuffing throughout, as you work on the next section:
Rows 9 - 26 :
sc (9) (18 rows)
Row 27 :
(sc into next st, dec) x3 (6)
Info :
Stuff remainder of body.
Info :
F/O leaving a 60cm end
Info :
Using 60cm end, and running sts, thread through front loops of last 6sts and gather tightly. Secure end with a couple of small sts. Making sure that the antennae are central to top of head, thread through body and come out 4 rows in front of the tail end.
Info :
Secure end with a couple of small sts being careful not to distort body. Pick up the shell and thread through the middle of the outer edge of shell, between the 2 central ridges. Come out at the opposite side of shell diameter, making sure that you remain central and on same ridge as previously used.
Info :
Thread end into body at the centre back of neck, 2 rows down from the base of the head. Catch in a single st and then pull tight to create the iconic shape of the snail's body. Making sure that the antennae are central at top of head and the shape of the shell has not been distorted, secure end with a couple of small sts. Attach the shell to the body along BLO ridge, 1 row out from the centre. Secure end with a couple of small sts. Weave end through shell/body and cut flush to finish.
— Body Skirt (US Terms) :
Info :
Place a stitch marker at centre front of body, 8 rows down from the neck.
Row 1 :
Using Main Row 1: leaving a 10cm end, sl st into the base of body 1 row down from bottom of shell on the furthest side from you, the base should be facing towards you and the head should be facing left, 1st Side: ch3 and then 3dcinc into 1st in every row up to the stitch marker, 2nd Side: turn so you are working down the opposite side and 3dcinc into every row, keeping in line with the 1st st down from shell 3dcinc until you get to point of tail, 1st Side: turn and 3dcinc in every row down 1st side until you are back at the start, sl st to join at top of ch3 to finish.
Info :
F/O leaving a 10cm end.
Info :
Secure both ends with a couple of small sts before weaving through frill and body. Cut flush to finish.
— Features (US Terms) :
Eyes :
Using black oddment, thread through head 2sts from the centre of face and 1 row down from the antennae. Do 5 small back sts 1 row in depth. Thread through to opposite side of face and repeat. Weave through head and cut flush to finish.
These little Garden Snails are a delightful, quick amigurumi project perfect for small gifts or a sweet display. They combine textured shells and a playful ruffled skirt for maximum charm. Make them in bright or pastel contrasts to suit any mood — happy crocheting! 🧶✨