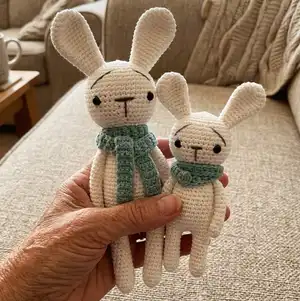
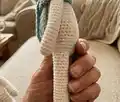
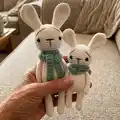
Create two adorable straight bunnies — a small and a large version — with clear step-by-step instructions, photos, and helpful tips. This pattern uses aran weight yarn and simple amigurumi techniques so you can crochet a charming handmade toy for gifts or decor. Follow the rounds exactly and enjoy making a sweet, minimal-style bunny with a tiny scarf and embroidered face.
Progress Tracker
0% Complete
— Small Straight Bunny :
Legs & Body Step One :
Colour: Paper White
Round 1 :
Magic ring & 5 sc into the ring [5 sts]
Round 2 :
Increase 5 times [10 sts]
Round 3-12 :
Sc around (10 rounds in total) [10 sts]
Info :
We\'ve now finished the first leg. Cut a couple of inches / 5 cm long yarn tail to fasten off and set the leg aside for now. Crochet one more leg and once you\'ve done the 12th round, do NOT cut the yarn carry on following the pattern.
Round 13 :
We have now completed the second leg. We have two legs and we need to join the two legs together in order to crochet the body. Step 1: Chain 3
Step 2 :
Take the first leg & crochet 10 sc around it. When you crochet the first sc, place your stitch marker into the first stitch.
Step 3 :
Crochet 3 sc (one sc into every chain stitch / we have 3 chain stitches)
Step 4 :
We are now crocheting around the second leg 10 sc
Step 5 :
Working on the other side of the chain. Crochet 3 sc (one sc into every chain stitch / we have 3 chain stitches) [26 sts]
Info :
After the step 5 we have 26 stitches in total. Fill the both legs with fibrefill now and carry on adding more stuffing inside the body as you crochet the other rounds.
Round 14-21 :
Sc around (8 rounds in total) [26 sts]
Round 22 :
5 sc, inv dec, 11 sc, inv dec, 6 sc [24 sts]
Round 23 :
Sc around [24 sts]
Round 24 :
*inv dec, 6 sc* rep 3 times [21 sts]
Round 25 :
Sc around [21 sts] Remember to add stuffing as you crochet.
Round 26 :
*5 sc, inv dec* rep 3 times [18 sts]
Round 27 :
Sc around [18 sts]
Round 28 :
*inv dec, 4 sc* rep 3 times [15 sts] slip stitch to finish.
Info :
Cut a long enough yarn tail to sew head & body together. Thread the yarn tail onto a yarn needle & bring it out from the next stitch by inserting the needle from back to front of the next stitch.
— Head Step Two :
Round 1 :
Colour: Paper White. Magic ring & 6 sc into it [6 sts]
Round 2 :
*inc* rep 6 times [12 sts]
Round 3 :
*sc, inc* rep 6 times [18 sts]
Round 4 :
*2 sc, inc* rep 6 times [24 sts]
Round 5 :
*3 sc, inc* rep 6 times [30 sts]
Round 6 :
*4 sc, inc* rep 6 times [36 sts]
Round 7-12 :
Sc around (6 rounds in total) [36 sts]
Round 13 :
*4 sc, inv dec* rep 6 times [30 sts]
Info :
At this point insert the eyes in between 10th & 11th rounds. Leave 7 holes between the 2 eyes.
Round 14 :
*3 sc, inv dec* rep 6 times [24 sts]
Round 15 :
*2 sc, inv dec* rep 6 times [18 sts]
Info :
Fill the head with fibrefill.
Round 16 :
*4 sc, inv dec* rep 3 times [15 sts] sl st
Info :
Cut a small yarn tail to fasten off.
Section :
Embroidering the mouth & the eye lashes: Thread your embroidery floss / thread on a yarn needle and follow photos for facial placement. I am using DMC cotton perle black colour embroidery thread, shade number 310 and thickness number is 3. You will need 50 cm / 20 inches long thread to embroider the whole facial parts.
Info :
Insert your needle from the open bottom of the head. Leave a 5 cm / 2'' long tail dangling out. Bring your needle out from the hole numbered as 1. Insert the needle into hole numbered as 2 & come out from number 1. Go in & out number 1 & 2 three times.
Info :
Your needle is now coming out of the hole numbered as 1. Insert it into the hole numbered as 2, but bring it out from the middle hole in between number 1 & 2. Insert the needle down into the third hole to create straight / vertical bar. Then bring the needle out from the hole numbered 4.
Info :
Insert the needle into the hole numbered as 5 & bring it out from the hole numbered as 6. Insert the needle into the hole numbered as 7 and bring it out from the open bottom of the head. Make a couple of tight knots to secure the facial parts. Cut the excessive thread tails. All done. Ready to sew head & body together.
Info :
Sewing head & body together: Put a little more stuffing inside the head before sewing. Start sewing the head and body together and stop half way to add stuffing as necessary. Finish sewing and then fasten off.
— Ears Step Three :
Item Name (P1) :
Colour: Paper White / Make Two
Round 1 :
Magic ring & 5 sc into it [5 sts]
Round 2 :
*inc* rep 5 times [10 sts]
Round 3 :
*sc, inc* rep 5 times [15 sts]
Round 4-7 :
Sc around (4 rounds in total) [15 sts]
Round 8 :
*3 sc, inv dec* rep 3 times [12 sts]
Round 9 :
Sc around [12 sts]
Round 10 :
*inv dec, 4 sc* rep twice [10 sts]
Round 11 :
Sc around [10 sts]
Round 12 :
*inv dec, 3 sc* rep twice [8 sts]
Round 13 :
Sc around [8 sts]
Info :
We now need to flatten the ear and to do that; crochet just one slip stitch. Cut a long enough yarn tail for sewing. Thread the yarn onto a yarn needle; insert the needle inside the next hole from inside out to bring the yarn tail out for sewing. Press & shape the ear with your fingers. No need to put any stuffing inside the ears. Sew the ears in between the 3rd & 7th rounds; counting from the top / first round / 6 sc in the magic ring.
— Arms Step Four :
Item Name (P1) :
Colour: Paper White / Make Two
Round 1 :
Magic ring & 6 sc into it [6 sts]
Round 2-16 :
Sc around (15 rounds in total) [6 sts]
Info :
No need to fill the arms with fibrefill.
Round 17 :
We will now flatten the arm; and to do that, simply push the top (open end) flat. We now have 3 stitches on each side. Just crochet 3 sc over the both sides of the flatten piece. When you need to crochet over both sides, insert your hook under both sc sts you have on both sides of the piece as you see in the photo. Then carry on crocheting normal single crochet stitches. Cut a long enough yarn tail for sewing.
Info :
I\'ve sewn the arms in between the last two rounds of the body and I\'ve used 4 holes to sew each arm to the body.
— Tail Step Five :
Round 1 :
Colour: Paper White. Magic ring & 6 sc into it [6 sts]
Round 2 :
*inc* rep 6 times [12 sts]
Round 3 :
*3 sc, inc* rep 3 times [15 sts]
Round 4 :
Sc around [15 sts]
Round 5 :
*sc, inv dec* rep 5 times [10 sts] sl st
Info :
Cut a long enough yarn tail for sewing. Put a tiny bit stuffing inside the tail. Bring the yarn tail out from the next stitch.
— Scarf Step Six :
Item Name (P1) :
Colour: Washed Teal. Crocheting with 4.50mm hook
Instruction :
Make a slip knot & crochet 50 chain stitches. Turn the back side of the chain where you will see horizontal stitches look like the runner stitches as you see in the photo. Needle is to show you both horizontal stitch and the 4th st, and then half double crochet into the 4th horizontal stitch to create a button hole. Carry on crocheting half double crochet until the end of the chain. Cut a tiny yarn tail to sew the button on the edge of the scarf. I used a 1.50 cm plastic button, but you can use any button you have in your button jar. Wrap the scarf twice around the bunny\'s neck and button it up.
— Assembling Small Bunny :
Info :
Attach head to body by sewing with yarn tail left from body; sew firmly and add stuffing as needed. Sew ears in between rounds 3 and 7 counting from top. Sew arms between the last two rounds of the body using 4 holes each. Sew tail to bottom of the body. Add scarf and button.
— Large Straight Bunny :
Legs & Body Step One :
Colour: Paper White. Same as the small bunny, we will start crocheting the big bunny from the legs and then join the legs together, then carry on crocheting the body. Numbers are of course different as this bunny is bigger, but the methods are the same.
Round 1 :
Magic ring and 6 sc into it [6 sts]
Round 2 :
*inc* rep 6 times [12 sts]
Round 3-20 :
Sc around (18 rounds in total) [12 sts] Once you\'ve crocheted 10 rounds, stop & put some fibrefill into the leg. Crochet the next 8 rounds and put some more fibrefill into the leg.
Info :
Cut a small yarn tail for fastening off. Set the first leg aside for now and make another leg.
Round 21 :
Second leg is done now. We\'ll join the legs just like we did with the small bunny. Chain 6
Instruction :
12 sc around the first leg (remember to place your stitch mark once you\'ve done the first sc). 6 sc (sc into every chain). 12 sc around the second leg. 6 sc (sc into every chain). Once we\'ve joined the legs we should have 36 sts in total [36 sts]
Info :
Weave the tiny yarn coming from the first leg tail inside stitches & drop it into the second leg, same as we did with the small bunny.
Round 22-35 :
Sc around (14 rounds in total) [36 sts] Start filling the body and keep adding more stuffing as you crochet the other rounds.
Round 36 :
*10 sc, inv dec* rep 3 times [33 sts]
Round 37 :
Sc around [33 sts]
Round 38 :
*9 sc, inv dec* rep 3 times [30 sts]
Round 39 :
Sc around [30 sts]
Round 40 :
*8 sc, inv dec* rep 3 times [27 sts]
Round 41 :
Sc around [27 sts]
Round 42 :
*7 sc, inv dec* rep 3 times [24 sts]
Round 43 :
Sc around [24 sts]
Round 44 :
*6 sc, inv dec* rep 3 times [21 sts]
Round 45 :
*5 sc, inv dec* rep 3 times [18 sts] sl st
Info :
Cut a long enough yarn tail for sewing head & body together. Bring the yarn tail out from the next stitch.
— Head Step Two (Large) :
Round 1 :
Colour: Paper White. Magic ring & 6 sc into it [6 sts]
Round 2 :
*inc* rep 6 times [12 sts]
Round 3 :
*sc, inc* rep 6 times [18 sts]
Round 4 :
*2 sc, inc* rep 6 times [24 sts]
Round 5 :
*3 sc, inc* rep 6 times [30 sts]
Round 6 :
*4 sc, inc* rep 6 times [36 sts]
Round 7 :
*5 sc, inc* rep 6 times [42 sts]
Round 8 :
*6 sc, inc* rep 6 times [48 sts]
Round 9-18 :
Sc around (10 rounds in total) [48 sts]
Info :
Insert the eyes in between 14th & 15th rounds; start counting from the top / beginning. Leave 11 holes in between two eyes.
Round 19 :
*6 sc, inv dec* rep 6 times [42 sts]
Round 20 :
*5 sc, inv dec* rep 6 times [36 sts]
Round 21 :
*4 sc, inv dec* rep 6 times [30 sts]
Info :
Start filling the head with fibrefill.
Round 22 :
*3 sc, inv dec* rep 6 times [24 sts]
Round 23 :
*2 sc, inv dec* rep 6 times [18 sts]
Info :
Sl st, cut a little yarn tail to fasten off. Add a bit more stuffing as needed.
Section :
For facial embroidery: Use the photos to mark 7 pins for face placement. You will need to use 5 holes for the nose and then come down into the 4th hole to create the mouth. Eyebrows are embroidered between the 7th & 12th rounds leaving 3 holes between the two eyebrows.
— Arms Step Three (Large) :
Round 1 :
Colour: Paper White / Make Two. Magic ring & 8 sc into it [8 sts]
Round 2-23 :
Sc around (22 rounds in total) [8 sts]
Info :
After the 10th round is done put a little bit of stuffing into the tip of the arm / hand. After that no more stuffing is needed.
Round 24 :
Push the open end together and crochet 4 sc over the single crochet stitches you have on both sides. [4 sts] Cut a long enough yarn tail for sewing.
— Tail Step Four (Large) :
Round 1 :
Colour: Paper White. Magic ring & 6 sc into it [6 sts]
Round 2 :
*inc* rep 6 times [12 sts]
Round 3 :
*sc, inc* rep 6 times [18 sts]
Round 4 :
*2 sc, inc* rep 6 times [24 sts]
Round 5-6 :
Sc around (2 rounds in total) [24 sts]
Round 7 :
*inv dec* rep 12 times [12 sts] sl st
Info :
Put some stuffing into the tail. Cut a long enough yarn tail for sewing.
— Ears Step Five (Large) :
Item Name (P1) :
Colour: Paper White / Make Two
Round 1 :
Magic ring & 6 sc into it [6 sts]
Round 2 :
*inc* rep 6 times [12 sts]
Round 3 :
*sc, inc* rep 6 times [18 sts]
Round 4 :
*2 sc, inc* rep 6 times [24 sts]
Round 5-9 :
Sc around (5 rounds in total) [24 sts]
Round 10 :
*6 sc, inv dec* rep 3 times [21 sts]
Round 11 :
Sc around [21 sts]
Info :
Flatten the ear, crochet one slip stitch to close. Cut a long yarn tail for sewing. Sew the ears in between the 3rd & 9th rounds on the head.
— Assembling the large bunny :
Step 1 :
Sew head & body together.
Step 2 :
Sew the ears on bunny\'s head in between the 3rd & 9th rounds.
Step 3 :
Sew the arms on each side of the bunny in between the last two rounds on the body by using 5 holes.
Step 4 :
Find the best place for the tail and sew it on the bottom of the bunny\'s body.
Info :
Wrap the scarf twice around neck and add button. Make sure all parts are securely sewn and weave in ends.
This Straight Bunny pattern includes two sizes — small and large — so you can crochet a tiny companion or a bigger cuddly friend. 🧶 Make one as a gift, a nursery friend, or a sweet shelf decoration with minimal supplies. Have fun customizing the scarf or facial expression to make each bunny uniquely yours! 😊