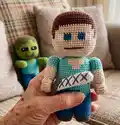
๐Ÿงถ Beautiful โœจ Detailed ๐Ÿ’ Adorable

Steve & Zombie Amigurumi Pattern

Steve & Zombie Amigurumi Pattern
3.9โ˜… Rating
5-7 Hours Time Needed
2.2K Made This
โœ‚๏ธ

Intermediate Level

Ideal for those with basic crochet experience, featuring slightly more advanced stitches and techniques to expand your skills.

โฑ๏ธ

Weekend Treat

Takes 5-7 hours, making it an enjoyable project to finish over a couple of days.

๐Ÿงธ

Cute Companion

An adorable friend to cherish, handcrafted with love to bring comfort and joy for years to come.

About This Steve & Zombie Amigurumi Pattern

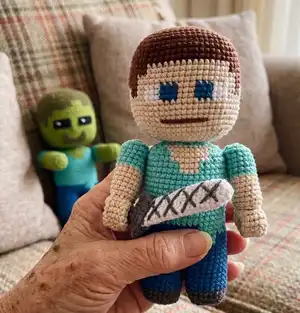
This pattern guides you step-by-step to crochet Steve and a matching Zombie amigurumi, including detailed rounds, color changes and finishing techniques. You will create pixel-style faces, movable arms using safety eyes, and a removable sword. It includes materials, abbreviations and full assembly photos to make construction straightforward.

Steve & Zombie Amigurumi Pattern crochet pattern - detailed view of completed project

Designed for intermediate crocheters comfortable with amigurumi shaping and color changes. The pattern uses 4-ply yarn and a 2.0 mm hook for a compact, neat finish.

Why You'll Love This Steve & Zombie Amigurumi Pattern

I absolutely love this pattern because it captures that pixelated Minecraft charm in a cuddly amigurumi that kids and collectors adore. I enjoyed designing the color-change rounds to recreate faces and hair while keeping the construction simple and sturdy. The movable arm technique using safety eyes makes the finished toys more playable and durable. Sharing a pattern that balances detail with friendly construction is something I always enjoy โ€” it means more people can make something special to gift or keep.

Steve & Zombie Amigurumi Pattern step 1 - construction progress Steve & Zombie Amigurumi Pattern step 2 - assembly progress Steve & Zombie Amigurumi Pattern step 3 - details and accessories Steve & Zombie Amigurumi Pattern step 4 - final assembly and finishing

Switch Things Up

I love customizing this pattern by swapping colors to create different characters; try pastel shades for a softer, cute look or neon colors for a bold statement.

To make a mini keychain version, simply use a finer yarn and smaller hook; the stitch counts remain the same but the result will be palm-sized and adorable.

Want a bigger plush? Use a bulkier yarn with a larger hook and increase stuffing for a chunkier, huggable variant.

I often add embroidery details like freckles or scar marks to personalize faces; small changes in eye placement can change the expression entirely.

For posable arms, you can insert thin wire instead of safety eyes, or use joint kits for stronger movement if you prefer mechanical limbs.

Try different yarn brands or textures for unique finishes โ€” cotton gives a crisp pixel look while acrylic is softer and easier to wash.

Add tiny accessories like a crocheted hat, scarf or backpack to expand into a whole collection of themed amigurumi.

Experiment with stuffing levels to change posture: firmer stuffing helps the toy stand, while softer stuffing gives a squishier feel.

I sometimes mix felt pieces for eyes instead of embroidered details for a different aesthetic; just sew them securely and hide edges inside the stitches.

Lastly, create a matching set by making multiple character color palettes and arranging them as a display โ€” they make excellent gifts and decor!

Common Mistakes & How to Fix Them

โœ— Skipping stitch markers during multi-color rounds can cause you to lose track of round starts; place a marker at the beginning of each round to keep alignment correct. โœ— Not stuffing gradually leads to lumps and uneven shape; stuff firmly but in small batches and shape as you go for a smooth result. โœ— Changing yarn tension between colors creates visible shifts in the design; keep consistent tension and practice color joins to maintain even stitches. โœ— Forgetting to move the marker when starting a new round can shift your stitch pattern; always move your marker to the last stitch when instructed to preserve shaping.

Steve & Zombie Amigurumi Pattern

Create your own adorable Steve and Zombie amigurumi duo inspired by Minecraft. This pattern gives you full step-by-step rounds, color changes, and assembly tips so you can crochet charming, poseable toys. Perfect for crafters who love pixel-inspired characters and detailed finishing.

Intermediate 5-7 Hours

Materials Needed for Steve & Zombie Amigurumi Pattern

โ€” Main Fabric

  • 01
    Fine/4ply yarn Gazzal Jeans (50g/170m) beige color (code 1114) for Steve's head and hands
  • 02
    Fine/4ply yarn YarnArt Jeans (50g/160m) brown color (code 70) for Steve's hair and beard and for the sword details
  • 03
    Fine/4ply yarn YarnArt Jeans (50g/160m) navy blue color (code 16) for Steveโ€™s pants
  • 04
    Fine/4ply yarn YarnArt Jeans (50g/160m) turquoise color (code 33) for Steveโ€™s shirt
  • 05
    Fine/4ply yarn Gazzal Jeans (50g/170m) dark gray color (code 1140) for boots
  • 06
    Fine/4ply yarn Gazzal Jeans (50g/170m) green color (code 1151) for Zombieโ€™s head and hands
  • 07
    Fine/4ply yarn Gazzal Jeans (50g/170m) dark green color (code 1129) for Zombieโ€™s hair
  • 08
    Fine/4ply yarn YarnArt Jeans (50g/160m) light gray color (code 49) for the sword blade
  • 09
    Some white and black yarn for the eyes and small details
  • 10
    Any stuffing material to your taste (I use fiberfill or synthetic filling)

โ€” Tools Required

  • 01
    Crochet hook size 2.0 mm (recommended)
  • 02
    Safety eyes (for the arms fastening)
  • 03
    Washers for safety eyes
  • 04
    Scissors
  • 05
    Tapestry needle for embroidery and sewing on pieces
  • 06
    Stitch markers
  • 07
    Pins for assembly
  • 08
    Polyester stuffing (fiberfill)

Progress Tracker

0% Complete

โ€” Head :

Info :

Start in brown color.

Rnd 1 :

8 sc in a MR [8]

Rnd 2 :

(1 sc, 3in1)*4 [16]

Rnd 3 :

2 sc, (3in1, 3 sc)*3, 3in1, 1 sc [24]

Rnd 4 :

3 sc, (3in1, 5 sc)*3, 3in1, 2 sc [32]

Rnd 5 :

4 sc, (3in1, 7 sc)*3, 3in1, 3 sc [40]

Rnd 6 :

5 sc, (3in1, 9 sc)*3, 3in1, 4 sc [48]

Rnd 7 :

6 sc, (3in1, 11 sc)*3, 3in1, 5 sc [56]

Rnd 8 :

7 sc, (3in1, 13 sc)*3, 3in1, 6 sc [64]

Rnd 9 :

BLO 64 sc [64]

Rnd 10-12 :

(3 rounds): 64 sc [64]

Info :

In the next rounds alternate brown, blue, white and beige colors.

Rnd 13-14 :

25 sc (brown), 15 sc (beige), 24 sc (brown) [64]

Rnd 15-16 :

23 sc (brown), 19 sc (beige), 22 sc (brown) [64]

Rnd 17-18 :

18 sc (brown), 3 sc (beige), 2 sc (brown), 2 sc (beige), 3 sc (white), 3 sc (blue), 3 sc (beige), 3 sc (blue), 3 sc (white), 2 sc (beige), 2 sc (brown), 3 sc (beige), 17 sc (brown) [64]

Rnd 19 :

18 sc (brown), 7 sc (beige), 3 sc (white), 3 sc (blue), 3 sc (beige), 3 sc (blue), 3 sc (white), 7 sc (beige), 17 sc (brown) [64]

Rnd 20-21 :

18 sc (brown), 29 sc (beige), 17 sc (brown) [64]

Rnd 22-23 :

18 sc (brown), 10 sc (beige), 2 sc (brown), 5 sc (beige), 2 sc (brown), 10 sc (beige), 17 sc (brown) [64]

Rnd 24 :

15 sc (brown), 13 sc (beige), 9 sc (brown), 13 sc (beige), 14 sc (brown) [64]

Rnd 25 :

15 sc (brown), 13 sc (beige), 9 sc (brown), 27 sc (beige) [64]

Info :

Continued on the next page =>

Info :

Next, crochet only in beige color.

Rnd 26 :

7 sc, (sc3tog, 13 sc)*3, sc3tog, 6 sc [56]

Rnd 27 :

6 sc, (sc3tog, 11 sc)*3, sc3tog, 5 sc [48]

Rnd 28 :

5 sc, (sc3tog, 9 sc)*3, sc3tog, 4 sc [40]

Info :

Stuff the head tightly and evenly with fiberfill and continue:

Rnd 29 :

4 sc, (sc3tog, 7 sc)*3, sc3tog, 3 sc [32]

Rnd 30 :

3 sc, (sc3tog, 5 sc)*3, sc3tog, 2 sc [24]

Rnd 31 :

2 sc, (sc3tog, 3 sc)*3, sc3tog, 1 sc [16]

Rnd 32 :

1 sc, (sc3tog, 1 sc)*3, sc3tog [8]

Info :

Sl st at the end, cut the yarn, pull off the hole to close and fasten off.

โ€” Arms :

Info :

PALMS (make 2). Crochet in beige color. Ch 5, start in the second chain from the hook.

Rnd 1 :

1 inc, 2 sc, 3 sc in the last chain, on the other side of the chain 3 sc [10]

Rnd 2-9 :

(8 rounds): 10 sc [10]

Info :

Do not stuff, fold in half and crochet 5 sc through both sides. Then crochet the fingers: From the last stitch: ch 4, 3 sc (along the chain), 3 sl st (along the last round of the palm), ch4, 3 sc (along the chain). Sew the fingers to round 1 of the palm.

Info :

ARMS (make 2). Crochet in beige color:

Rnd 1 :

8 sc in a MR [8]

Rnd 2 :

(1 sc, 3in1)*4 [16]

Rnd 3 :

BLO 16 sc [16]

Info :

Sew the crocheted part to the palm as shown in the photo.

Rnd 4-8 :

(5 rounds): 16 sc [16]

Info :

Change color to turquoise:

Rnd 9-14 :

(6 rounds): 16 sc [16]

Info :

Leave the yarn end about 40 cm long to finish the arm after fastening it to the body.

โ€” Legs :

Info :

(make 2) Start in dark gray color.

Rnd 1 :

8 sc in a MR [8]

Rnd 2 :

(1 sc, 3in1)*4 [16]

Rnd 3 :

2 sc, (3in1, 3 sc)*3, 3in1, 1 sc [24]

Rnd 4 :

BLO 24 sc [24]

Rnd 5-6 :

24 sc [24]

Info :

To keep the soles flat, cut out a piece of thick plastic to fit the shape of the sole and put it inside. Change color to blue:

Rnd 7 :

BLO 24 sc [24]

Rnd 8-15 :

(8 rounds): 24 sc [24]

Rnd 16 :

17 sc (short round), cut the yarn, leaving a long end for sewing.

Info :

Crochet the second leg in the same way from Rnd 1 to Rnd 15, and finish Rnd 16 to the end:

Rnd 16 :

24 sc [24]

Info :

After the second leg is done, do not cut the yarn. From this point, we will continue to crochet the body.

โ€” Body :

Info :

Place the legs as shown in photo 1 and sew up 6 sc on the right and 6 sc on the left leg. Before sewing, pay attention to how the square is located at the base of the legs. Sew the stitches together along the side of this square. After sewing, continue to crochet from the last stitch on the second leg. Work around both legs, making extra sc at the sewing points.

Rnd 1 :

4 sc, 2 extra sc between the legs, 13 sc (blue), 2 sc (turquoise), 3 sc, 2 extra sc between the legs, 14 sc (blue) [40]

Rnd 2 :

19 sc (blue), 2 sc (turquoise), 19 sc (blue) [40]

Rnd 3-4 :

17 sc (blue), 6 sc (turquoise), 17 sc (blue) [40]

Info :

Change color to turquoise:

Rnd 5 :

(work in back loops along blue stitch and in both loops along turquoise stitches): 40 sc [40]

Rnd 6-14 :

(9 rounds): 40 sc [40]

Rnd 15-16 :

24 sc (turquoise), 4 sc (beige), 12 sc (turquoise) [40]

Rnd 17-18 :

22 sc (turquoise), 8 sc (beige), 10 sc (turquoise) [40]

Rnd 19 :

6 sc (turquoise), move the marker of the round beginning into the last stitch and start a new round.

Rnd 20 :

5 sc, sc3tog, 3 sc, sc3tog, 1 sc (turquoise), 10 sc (beige), 1 sc, sc3tog, 3 sc, sc3tog, 5 sc (turquoise) [32]

Info :

Stuff the legs and body tightly with fiberfill, next crochet only in turquoise color:

Rnd 21 :

4 sc, sc3tog, 1 sc, sc3tog, 10 sc, sc3tog, 1 sc, sc3tog, 4 sc [24]

Rnd 22 :

4 sc, sc3tog, 10 sc, sc3tog, 1 sl st

Info :

Cut the yarn, leaving a long end for sewing the head.

โ€” Assembly :

Info :

In order for Steve's arms to be movable, use safety eyes instead of joints (cotter pins). Insert eyes into the body between rounds 18 and 19 symmetrically on both sides. Now pass these eyes through the arms (move 2 rounds down from the edge). Put washers on the legs of the eyes and stuff the body and arms tightly with fiberfill.

Rnd 15 :

Finish crocheting the arms: (1 sc, sc3tog)*4 [8]

Info :

Sl st at the end, stuff the upper part tightly with fiberfill, pull off the hole to close and fasten off.

Info :

Sew the head to the last round of the body around the perimeter. See assembly photos for positioning.

โ€” Sword :

Info :

BLADE - Crochet in light gray color:

Rnd 1 :

6 sc in a MR [6]

Rnd 2 :

6 sc [6]

Rnd 3 :

6 inc [12]

Rnd 4-19 :

(16 rounds): 12 sc [12]

Info :

Fold in half and crochet 6 sc through both sides. Cut the yarn, fasten off.

Info :

GRIP - Start in dark gray color:

Rnd 1 :

6 sc in a MR [6]

Rnd 2-3 :

6 sc [6]

Info :

Change color to brown:

Rnd 4 :

2 sc, 1 dec, 2 sc [5]

Rnd 5-7 :

(3 rounds): 5 sc [5]

Info :

Change color to dark gray:

Rnd 8 :

5 inc [10]

Rnd 9 :

10 inc [20]

Rnd 10 :

20 sc [20]

Rnd 11 :

(1 sc, 1 inc)*10 [30]

Info :

Sl st at the end, cut the yarn, leaving a long end for sewing pieces. Insert the blade into the grip and sew the last round of the grip with the blade. After that, if desired, embroider stripes on the blade. Cut the yarn, fasten off.

โ€” Steve is ready :

Info :

So we have done our Steve! Check photos for final details and positioning.

โ€” Zombie :

Info :

Start crocheting the head in dark green color. Rounds 1-9 are the same as for Steve.

Rnd 10 :

64 sc [64]

Info :

In the next rounds alternate dark green, green and black colors.

Rnd 11-12 :

32 sc (dark green), 4 sc (green), 28 sc (dark green) [64]

Rnd 13-14 :

25 sc (dark green), 15 sc (green), 24 sc (dark green) [64]

Rnd 15-16 :

23 sc (dark green), 19 sc (green), 22 sc (dark green) [64]

Rnd 17-18 :

18 sc (dark green), 3 sc (green), 2 sc (dark green), 2 sc (green), 6 sc (black), 3 sc (green), 6 sc (black), 2 sc (green), 2 sc (dark green), 3 sc (green), 17 sc (dark green) [64]

Rnd 19 :

18 sc (dark green), 7 sc (green), 6 sc (black), 3 sc (green), 6 sc (black), 7 sc (green), 17 sc (dark green) [64]

Rnd 20-21 :

18 sc (dark green), 29 sc (green), 17 sc (dark green) [64]

Rnd 22-23 :

18 sc (dark green), 10 sc (green), 2 sc (dark green), 5 sc (green), 2 sc (dark green), 10 sc (green), 17 sc (dark green) [64]

Rnd 24 :

15 sc (dark green), 13 sc (green), 9 sc (dark green), 13 sc (green), 14 sc (dark green) [64]

Rnd 25 :

15 sc (dark green), 13 sc (green), 9 sc (dark green), 27 sc (green) [64]

Info :

Finish the head as for Steve (Rnds 26-32) but in green color.

Info :

Arms for Zombie: I crocheted without the palms. Rounds 1-8 are the same as for Steve (but in green color), then work:

Rnd 9-13 :

(5 rounds): 16 sc [16]

Info :

Change color to turquoise and work Rnds 14-19 as for Steve (Rnds 9-14).

Info :

Crochet the legs and body of Zombie in the same way as for Steve, but replace the beige color with green. Optionally, embroider highlights in front of the eyes with a white thread. Fasten the arms, finish them and sew the head in the same way as when assembling Steve.

โ€” Zombie is ready :

Info :

Check photos for final positioning and finishing details.

Assembly Instructions

  • Insert safety eyes into the body between rounds 18 and 19 symmetrically on both sides, then pass these eyes through the arms (move 2 rounds down from the edge) and secure with washers so the arms are movable.
  • Stuff the body and arms tightly with fiberfill before final closing; place washers on the legs of the safety eyes and check arm orientation (fingers back) before tightening.
  • Finish crocheting the arms with Rnd 15: (1 sc, sc3tog)*4 [8], sl st, stuff the upper part tightly, pull the hole closed and fasten off.
  • Sew the head to the last round of the body around the perimeter using the long tail left from the body; make even stitches and check the face alignment before fully tightening.
  • Insert the sword blade into the grip and sew the grip closed to the blade; embroider stripes on the blade if desired, then secure all loose ends.

Important Notes

  • ๐Ÿ’กWork in 'X-shape' or 'semi X-shape' single crochets (yarn under technique) rather than a 'V-shape' to avoid visible stitch shifts in the head design.
  • ๐Ÿ’กUse stitch markers to mark the beginning of each round especially during color changes and shaping sections to maintain symmetry.
  • ๐Ÿ’กStuff gradually and evenly to avoid lumps; overstuffing can distort the shape while under-stuffing makes seams baggy.
  • ๐Ÿ’กPin parts in place before sewing to ensure correct placement and symmetry, particularly for arms and head alignment.
  • ๐Ÿ’กKeep tension consistent throughout so color changes and pixel details remain crisp and proportionate.

This Steve & Zombie duo brings pixel charm into soft amigurumi form and makes for a perfect handmade gift or collector display. Follow the full rounds and assembly steps to achieve sturdy, poseable toys with detailed faces and a cute sword accessory. Happy crocheting โ€” may your hook bring pixelated adventures to life! ๐Ÿงถ๐Ÿงต

You ask,

we answer.

FAQs

What size will the finished piece be?

The finished amigurumi measures approximately 14-16 cm tall when using the recommended 4-ply yarn and a 2.0 mm hook; exact size depends on yarn and tension.

Can I use different yarn weights for this pattern?

Yes, you can use different yarn weights but the final size and stitch counts will change; switch hook sizes accordingly and consider adjusting rounds for proportions.

Do I need prior crochet experience for this pattern?

This pattern is rated intermediate, so basic knowledge of single crochet, increases, decreases, magic ring and working in BLO is recommended.

How long does this project typically take to complete?

Most crocheters complete both Steve and Zombie in about 5-7 hours total, though time may vary depending on experience and attention to colorwork and assembly.